How to sew or make a brownie from fabric, burlap, stockings, pompons or cones. Detailed master classes with photos.
Content
- DIY house kuzya: master class
- DIY Obrait doll with your own hands from a burlap: Pattern
- DIY Obrait doll from nylon tights
- How to make a house from threads and cardboard with your own hands?
- Brownie from the cone: craft to school, kindergarten
- DIY brownie from salt dough
- Video: DIY Brouse from a burlap
People believe that peace and happiness in the house, whether it be a city apartment or a village estate, protects the brownie. Nobody has ever seen him, no one knows exactly how he looks and in what hidden corners hides. But everyone understands that if you respect and love the brownie, he will take care of the well -being of each family member. In order for the brownie to understand that he is loved, people create amulets in the form of dolls-dominant.
DIY house kuzya: master class
For many people, such a doll is associated with a house of Kusey from everyone’s favorite cartoon. Cartoon Kuzya became so popular that the production of toys and amulets of this doll was established. But, to buy a standard multi -stage toy and make it with your own hands - two big differences. Only which you did the house yourself, in which you have invested your soul, thoughts and feelings can become both your favorite toy of children and the amulet of the house.
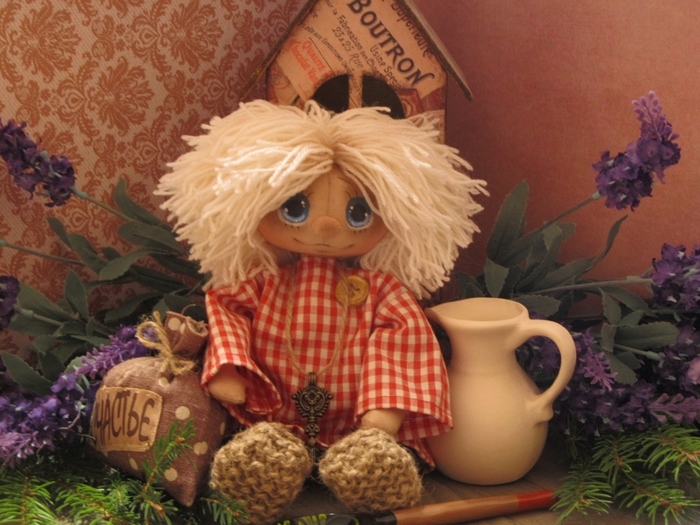
The master class that we offer you is not the easiest: a rather complicated pattern is used to draw the face you need to have basic skills in the visual arts, and to make paws, you need to knit. However, the result is worth it, and such a Kuzya house will surprise you and your loved ones with their originality.

Kuzya households: materials and devices that are needed
You probably already realized that this house of Kuzya is sewn from fabric. For sewing it is better to choose beige cotton fabric. If you take the fabric stretching, it will not puff at the seams. Cotton is better than synthetics, because paints and blush that are needed are better to draw to draw a face. So, to make a brownie with your own hands will be required:
- Beige fabric
- Colorful shirt fabric and dark fabric for trousers
- Synthetic winterizer or syntepchch for stuffing
- Rope-shpagat to tie naps and knitting knitting needles
- Hair yarn
- Acrylic paints and brush
- Colored crayons or blush with shadows to give the face
paints - Big button for shirt
- Spoon, key or other accessories at your request
- Threads, needles and other standard sewing accessories

The pattern for Kuzi's household is shown in the figure below. Using a printer, it can be transferred to paper.
- The head will be sewn from the wedges, so it will turn out voluminous
- The patterns of other details are simple, without
- We transfer the pattern to the fabric, cut out and sew the blanks
- We turn the blanks and stuff with synthetic winterizer
- Now you can draw your eyes and mouth on your head, sew your hair
- A spout in the form of a ball is sewn after the paint has dried up
- We sew all the parts of the dolls, put in a shirt, pants and bast shoes
- Kuzya is ready!

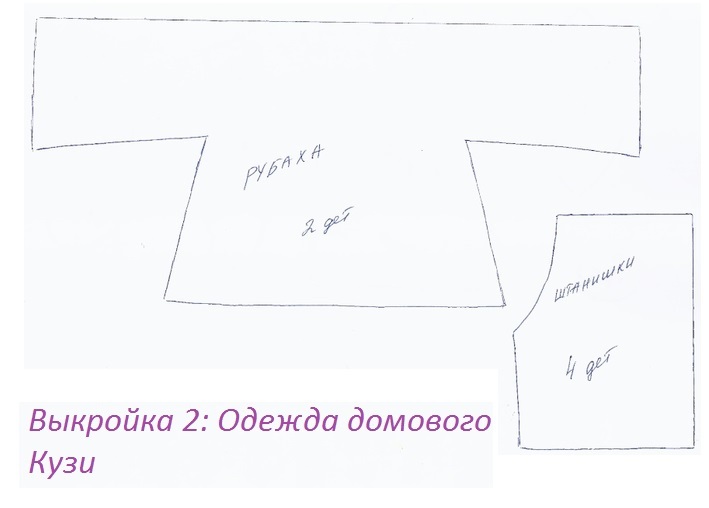
- To sew clothes for a householder, we need another pattern
- We also print it and cut it out with scissors
- Shirts and pants will sit freely, so they are a little larger in size than the house
- In the cartoon, Kuzya appears in an inexpected and pure form. You can make both one or the other toy option
DIY Obrait doll with your own hands from a burlap: Pattern
A burlap dolls made with his own hands, despite the apparent unpretentiousness and simplicity, invariably cause a feeling of admiration. They associate our present with a distant past with an invisible thread. In this past, bread is mowed manually with a scythe, in hot noon they drink cool bread kvass, and the kids are watered with fresh milk.

There, in this past, children play with rag dolls, which mothers could make in a couple of minutes, turning several shreds of matter. Perhaps that is why our genetic memory returns us to simple toys from a burlap. You can make a house doll on the principle of sewing small parts on a bag symbolizing the head and torso.

The pattern for the brownie from the burlap is very simple:
- You need to make a rectangle, which will be a head and a body
- Then cut the parts for the hat and legs
- A beard and mustache are made of threads. We sew them last

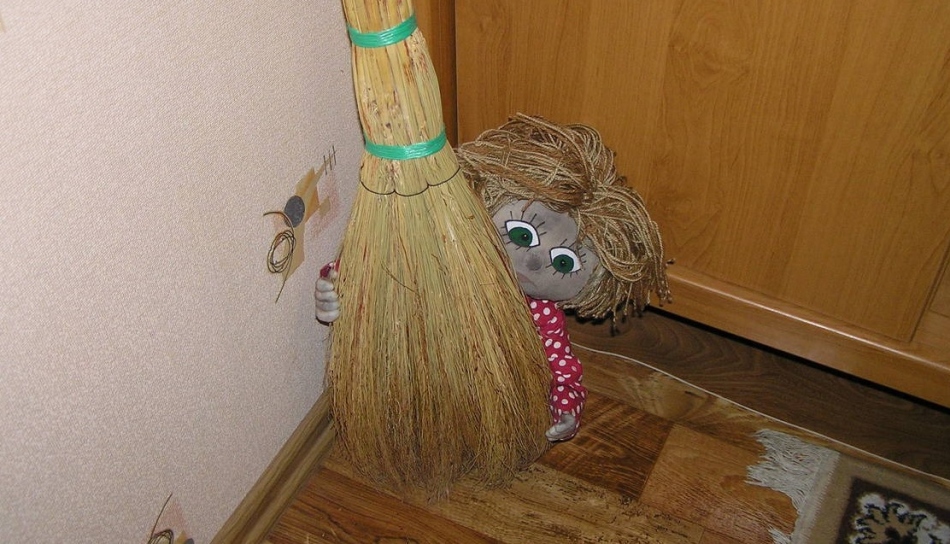
There are a great many options for the house, which can be sewn with this pattern. We will write in detail how to make such a brownie as in the photo below, with nylon handles and frowning eyebrows. And you, depending on your wishes, you can add or remove small details yourself.

So, to make such a brownie will need:
- New bag or piece of burlap
- Sinetone for stuffing
- A small piece of cardboard in order to make the legs with hard
- Kapron stockings for pens
- Thin copper wire that bends easily to make a hand frame
- White plastic, as well as blue and black paper to make eyes
- Motley fabric for a shirt
So, let's start sewing toys:
- We cut a piece of burlap of the desired size, for this house a piece of 20 by 85 cm was taken, but the size may be others, the main thing is to observe the proportion of about 1 to 4
- We fold the burlap in half and sew on the sides, we cut the lower corners a little
- We dissolve the upper edge, from the threads that remain on the workpiece of hair, and from the threads that we pulled out you can make a mustache and eyebrows

- To make a beard, a mustache and eyebrows, we bandage the bundles of threads in the middle, and then trim the edges with scissors.
- In order to make the nose, cut out a circle from the nylon tights and mark it with a thread along the edge, then in the middle we put a piece of synthetic winterizer and tighten the thread.

We take the manufacture of the head and the body again:
- A strong thread we sew the edge with loose threads so that it does not bloom further
- We make another seam to separate the head from the body

- Fill the workpiece with synthetic winterizer and tighten the threads

- For the eye we cut out the blanks of plastic and colored paper
- Glue them among themselves with glue
- We make a frame for wire handles

- We carefully wrap wire blanks for handles with synthetic winterizer
- Then we cut out two rectangles from the kapron
- We tighten the wire with a kapron and fix the fabric, bandaging it with a thread on the wrist
- We take a thread with a needle and sew the connections between the fingers
- After that, we make the remaining part of the handles: we wrap a little synthetic winterizer on the wire and sew the kapron

This is how the blanks for our brownie from the burlap at this stage will look like:

- For the legs we cut 2 blanks from cardboard
- We cut out two of the same parts from the burlap, a little larger. One of them is simply glued to the cardboard, the second is stuffed with synthetic winterizer and glued to the cardboard only after that
- Then two parts are sewn together
- The seam, if desired, can be decorated with a pigtail woven from threads
- The legs are attached to the body with good glue

- Now all the basic elements of our brownie are ready and you can begin to make clothes and accessories
- In our case, the brownie has a shirt and a hat

- We fasten all the details with each other with glue and admire the result

If it is difficult for you to work with Kapron, then the handles of the house can be made from the threads of burlap, braided in pigtails, and a nose from a piece of wood.

DIY Obrait doll from nylon tights
Dolls from kapron tights are very similar to people and therefore even scare a little with their realism. Those who are not afraid to put such a doll at home can make it with their own hands. The principle of manufacturing a doll in stuffing nylon blanks with a synthetic winterizer and manually stitching the face of a doll, pens and legs by hand.

You will need a brownie from stockings:
- Kapron stockings, tights or socks
- Sinetone for stuffing
- Wire to make doll handles
- Round -liners
- Sackcloth
- Hair yarn
- Spikelets and artificial flowers for decoration

Let's start making a doll from the manufacture of pens. For them we need:
- Wire
- Two square pieces of kapron
- Syntephop
- Bend the wire with our hands so that it turns out five fingers
- With the help of round -drawers, bends can be made more even

- After that, press the fingers with round -liners, so that they are not too thick
- Then the free ends of the wire are twisted with each other and cut to the desired length

- Turn each finger with synthetic winterizer

- We tighten the workpiece with a nylon and fix the fabric with a thread on the wrist
- Fingers share the seams together

More about how to make hands for nylon dolls, you can learn from the video below.
Video: how to make hands for dolls from Kapron - Mini master class
Now that the hands are ready, you can proceed to the manufacture of the head of the brownie:
- We tear off several pieces of synthetic winterizer: one largest for the head, two smaller for cheeks, one for a nose and the smallest for the lips
- We take a piece of synthetic winterizer designed for the head, give it the shape of the ball and tightly fit the marton
- Then we insert lumps designed for cheeks, nose and sponges in place
- With puffs, we form a nose, cheeks, lips and eyes

Video: How to make a house from nylon tights?
Make a fabric torso for the doll:
- Fold a rectangular piece of matter with face inward, sew it on the sides, turn it out and fill it with a synthetic winterizer
- Head, legs and hands are sewn to the body manually
- Clothes for the brownie can be made in the form of a frock coat
- Measure the chest girth of your doll, divide the result by 2 and add the allowance to the seams. So you get the size of the workpiece for the frock coat along the chest line

How to make a house from threads and cardboard with your own hands?
- If you sew your eyes, ears, pens and legs to a pompon from threads for knitting.
- Any threads are suitable: plain, multi -colored or colorful
- The eyes can be decorated with buttons, and the handles and legs are cut out of colored cardboard or plastic bottles

If you take a lot of threads, then the brownie will turn out to be voluminous, and it can be placed as an independent toy. If you wound long threads into the cardboard in 2-3 layers, you will get a fairly flat brownie that will need to be glued to the cardboard base. A detailed master class on how to make an application with the brownie in the video below.
Video: How to make a house from threads and cardboard?
Brownie from the cone: craft to school, kindergarten
For the manufacture of a house from cones, you can use dried leaves, twigs, acorns and other natural materials.
- The hair of such a house can be wood chips
- Headdress - a hat from the acor
- And a beard - a piece of fur

You can make a brownie out of the cone as shown in the figure:

The fields of the hats are made of paper, the basket is also paper.
A brownie made of cones can look very realistic and harmoniously fit into a natural landscape.

DIY brownie from salt dough
Figures made of salty dough are sculpted in about the same way as plasticine figures. The difference is that dried figures from salt dough are subsequently painted with handles. The sculpting dough is prepared from water, salt and flour.
For half a glass of medium -sized salt, you will need a glass of water and flour. Mix salt and flour and knead elastic dough
If the brownie is voluminous, start working with the details that are at the base of the picture.
Video: How to make a picture of salt dough?
Next, sculpt the house of the brownie itself:
- Small facial features, eye shape, clothes of clothing can not be sculpted, but cut out with a thin knife. As this is done when wood carving
- After the modeling is finished, the product needs to be dried and painted with paints
- Когда краска высохнет придайте фигурке блеск, покрыв её бесцветным лаком

Video: DIY Brouse from a burlap
- DIY dolls with your own hands from fabric and threads: step-by-step instructions, master class.
- Foamiran dolls: patterns, master class.
- How to sew a beautiful textile, interior doll, big -lifetime, Waldorf with your own hands: patterns, instructions, photos, videos.
- Obel dolls - herbalist, plantain, health, cerebells, for family, angel, successor, marriage, prosperity, for pregnancy
- Obel dolls - for a child, cherry, non -memorials, for happiness, bell, for the house, a deserted
- How to make a pupa of voodoo from paper, branches, felt
- Crochet knitted Lalalupsi dolls: master class, schemes and description
- How to make a Barbie, Tilda, Mobanka doll with your own hands?
- How to make a doll with clothes from cardboard with your own hands: schemes, stencils, photos.