In this article, we want to talk about how to make a doll-cooker with our own hands. Our ancestors actively used this type of needlework, so why don't we remember their experience?
Content
Even in our time, the doll is not just a toy - it helps the child get acquainted with life roles, to comprehend the adult world in an understandable form. What can we say about our ancestors, for whom the doll served as a powerful amulet! Adults considered her an assistant in everyday life, personal and social life. Now this skill begins to gain popularity again.
The story of the puppet-renovations
Souvenir, collectible and even just gaming dolls have their own history, but they began their counting much later than puppet-renovations. It can be safely said that this is a carrier meaning of the creation of the hands arose simultaneously with its creators - that is, about 40-50 thousand years ago.
Such dolls had the same meaning as religious symbols, idols of paganism. They are embodied the images of gods, various spirits, served as important components of rites, defended their hostsin and even used in sacrifices Instead of living sacrifices.
Important: the material was used by the one that was at hand - straw, wood, rags.

The very first the officially documented doll was found on the territory modern Czech Republic. It was made from the bone of the mammoth. Surprisingly, this ancient doll even had mobile limbs!
Quite often the first dolls were made from ash - From the water, she swelled and comfortably formed into the ball. They attached to the ball Prutiki, burlap. Since the ash symbolized the hearth, it was necessary to take such a needlework when changing their place of residence.
After ash appeared rag and low amulets - They are also called motanks, nodules. The story of a motanda, which the craftswomen create with enthusiasm today, has about 5000 years! It arose at the same time, when linen fabric came into use.

Inside the nodular doll was placed straw, and the hair served threads. There were handles-knobs rag. Our ancestors made motives certainly in the shape of a cross - Only then, in their opinion, did they have power.

Important: from the time immemorial, the craftswomen tried to make dolls so that neither a needle nor scissors are used during operation. From here Motanka got its name. It was believed that a thing made with the help of piercing-cutting objects cannot serve as a talisman.
By the way, straw is not the only filler that was used before. Herbs, flowers, twigs, vine - Enough affordable and convenient material. It was believed that birch branches Family happiness will save, and aspen They will drive away evil spirits.

In general, different countries had their own materials. So, egyptians Used clay, wax and wood, Greeks - clay, Romans - rags. Often such products wore a sacred meaning - for example, when they embodied the gods.


Slavic dolls-workers
Tripoli culture It is one of the oldest Slavic cultures, preceding the emergence of Kievan Rus. It is believed that there was a triple culture approximately in 5400 BC,and it lasted about 2000 years.
The Tripolites revered the sun, the sky, water and the bull as a symbol of agriculture. A considerable place was occupied and the cult of a woman - Archaeologists managed to find a lot of clay dolls. This is not surprising, because the woman acted as a symbol of motherhood, needlework and fertility.

Important: it is likely that the motans appeared in this culture. They served as an indispensable component of meditation and magic associated with the female sex.
At the same time, representatives of the Tripoli culture, which was quite developed, carefully they passed on from generation to generation the ability to create models dolls.

Tripolis wrapped the doll most often in a spiral. They believed that the spiral symbolizes growth, increase, creation of the world.
However, the doll carried not only an important sacred meaning. She is She helped in everyday life, housekeeping, treated for diseases. The amulet was believed to contribute to establishing mutual understanding between spouses. The doll was created on the occasion of any important event.
Important: a prerequisite was the facelessness of the doll. It was believed that it is in a state of energy exchange with its master, and a certain image may not coincide with the inner world of a person. And the similarity with any person was completely useless-he could give him all the negativity from the doll.
The technology for creating amulets is approximately the same for all Slavic peoples, however, each region had its own differences. So, in the north They were made from birch bark, in the south - from the cobs of corn, straw.


Motans from the territory modern Ukraine could not have arms or legs, but differed large head. For other regions - for example, in modern Kursk region - on the face of the doll flaunted cross. The scythet, characteristic of creativity southern Slavs, had to contribute to fertility.


Russian folk folk dolls
In Russia, a doll-cooler accompanied a person from birth and during the whole adulthood. Independentabout your own the first doll The girl made about 12-13 years. In terms of quality, adults tried how ready the girl is for marriage. Beautiful work was sent to the chest for the dowry.
Important: this kind of needlework was exclusively engaged in women. Men were not even allowed to observe the process.
Each region of Russia appropriated a certain outfit with a doll. So, northern provinces dressed up their creations in bright sundress and kokoshnik with beads. Ryazan craftswomen We put on the doll bright ponev, embroidered shirt and headdress "Magpie".


Our ancestors were especially attentive to filling their needlework. For example, if a woman i could not get pregnant, she filled a doll-concern grass, which was collected on the night of Ivan Kupala. Cornflower helped if surrounded by people who planned unkind. St. John's wort defended kids from the evil eye, a gladiolus strengthened health to adults.
Important: the craftswomen in Russia believed that on some days the manufacture of amulets should not be engaged in the manufacture of amulets. Friday, Sunday and major holidays were inappropriate days. In addition, it was believed that it was important to make a doll in one day.
DIY dolls with your own hands from fabric: Master class
Doll Bereginya I was especially popular among our ancestors. The needlewomen chose the following for this amulet:
- The brightest fabric, certainly natural
- Fly fabric
- Filler - medicinal dried herbs like sage, thyme, St. John's wort, mint. Vata, synthetic winterizer, cereals may come up
- Canvas
- White and orange or red threads

First of all, you need to take fly fabric and cut off from it a piece of approximately 8 by 8 centimeters. This piece turns around a small ball of filler - so the head is formed. This is fixed all with a white thread.
Important: when working with a thread, it is worth considering that the revolutions need to be done an odd number. But the nodules should be an even amount.


Now you need spread the fabricwhich remained under the head.

We form pens Dolls from the corners of the straightened fabric. These corners for starters they turn inside, and then three times fold the "airplane".


After the above folding, each handle folds in half and it is bandaged with a white thread. Just keep in mind that it is worth retreating from the edge of the handle a centimeter one and a half.

It's time bright fabric! Cut or, if possible, tear it off from it two small squares of 6 centimeters each. Invest in squares filler balls - So you will form breast Dolls.

Stick your chestAs in the case of the head and arms, thread.
Important: when tying nodules, you should pronounce aloud your wish for your health and relatives.

Further the chest is neat wagging To the doll.

In order to create skirt, take a bright piece of fabric and attach it under the chest so that it the front side was turned inside. In this case, the fabric should cover the head. Book the future skirt to the body, fasten it with a knot - and only then lower it down.

Now create dolls on your head farm - A scarf that Russian married peasants previously wore. It will symbolize it double red or orange thread.

The turn has come a front hand - It will suit him a piece of canvas is small. Turn this piece from above about a centimeter. In the basement, put the previously twisted thread. With a thread, the apron is tied to Beregin.

Now created ring. For it, a triangle is cut out of the canvas, which is tied.
Important: the node should be placed behind, and the ends of the scarf must be hidden on the back. So before, women tied a scarf.

The Bereginya doll is ready! Now you can once again correct her skirt - and she can serve people. Those who do not belong to the family are not recommended to pick it up.

DIY doll with your own hands from threads: step-by-step instructions
Often in March, craftswomen created dolls Martinichi - they had to attract spring. In addition, Martinichi served as a talisman family happiness, helped man and woman better get along with each other.
Traditionally, these dolls are made in two colors - Red and white. White symbolizes the outgoing winter, but here red - The coming spring.
It was customary to hang these amulets on the trees.
For martinich you will need:
- A ball of white yarn
- A ball of red yarn
- Cotton wool and a variety of remains from yarn
- Cardboard 15 by 15 centimeters
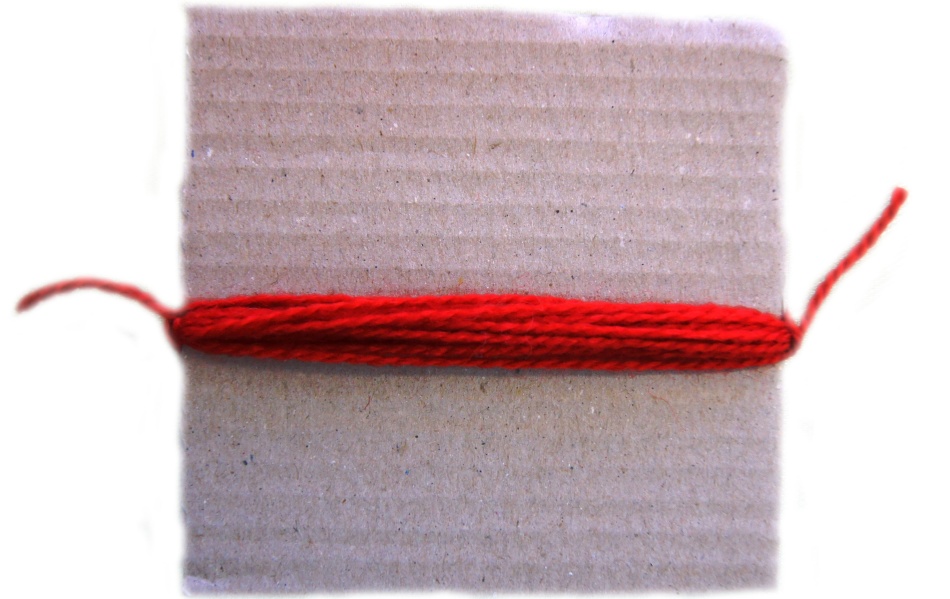
So, first you need to wind it on the cardboard 25 turns of red yarn.
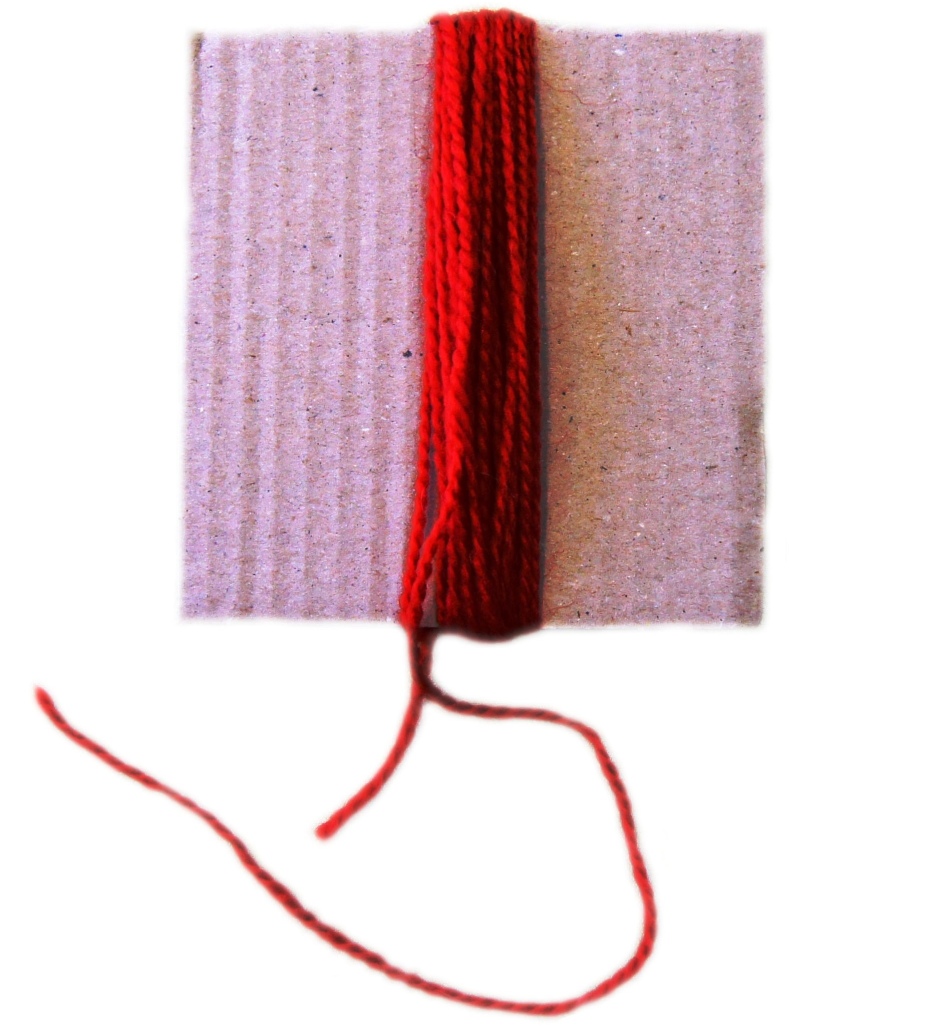
The wound yarn is neatly tied with a knot.

From yarn of both colors you need to create a pigtail is approximately 30 centimeters long. The ends of the pigtail should be bandaged.
IMPORTANT: Drawing a pigtail, do not forget to leave a couple of free centimeters of yarn. Artistically dissolve these tips.

One of the ends of the pigtail needs to be tied To the coil created earlier. It is advisable to do this where a bundle was created on the yarn - the pigtail perfectly masks it.

Now it's time to create head. You will need cotton, although you can use yarn-from some of these materials you need to make ball about 2-3 centimeters. The ball is placed under the nodules.

Under the ball, the threads are tied. The head area is masked by yarnth so that the base is not visible.

The turn has come pens. On the same cardboard that was used earlier, it is worth wiping 15 layers of yarn. From both ends of the yarn it follows tie nodes.
On both sides of the yarn, you need to do the dressing of the ends.
Important: should retreat 2 centimeters on each side.

After the ends of future handles are pulled, you can safely artistically cut the yarn. If the workpiece begins to resemble candy, you are on the right track. Further, the handling for the hands is needed put in a motor-tulle Under the head.

The handle of the handle yarn is intercepted from below and bandaged - this is how it forms waist Dolls.

On the principle of creating hands, it is also formed and podol Dolls - the edges are cut and straightened.

Now it remains, using the previous instruction, to create another doll from white yarn. This doll It is attached to the second end of the pigtail.

As you can see, there is nothing complicated in the manufacture of puppet-workers. And their centuries -old history definitely deserves a detailed study.
Read about other protective dolls in articles:
- Obel dolls - herbalist, plantain, health, cerebells, for family, angel, successor, marriage, prosperity, for pregnancy
- Obel dolls - for a child, cherry, non -memorials, for happiness, bell, for the house, a deserted
- How to make a pupa of voodoo from paper, branches, felt
- Crochet knitted Lalalupsi dolls: master class, schemes and description
- Doll amulet of a brownie with your own hands from tights, burlap, thread and cardboard
- How to sew a doll yourself: patterns, master class.
- How to make a doll with clothes from cardboard with your own hands: schemes, stencils, photos.