

Window slopes are an important part of the interior, which is one of the first in the field of view, so their design is very important. We suggest you make them beautifully.
Content
- DIY windowing window slopes
- Do -it -yourself window slopes from ceramic tiles
- Video: mole of ceramic tiles
- Original window slopes from mirrors with your own hands
- Video: Installation of mirror slopes
- DIY windowing window slopes
- Video: Mirror mosaic on window slopes
- DIY window slopes
- Video: Loft -style windows - wood slopes with your own hands
- Do -it -yourself window slopes decoration with a decorative stone
- Video: Rolling Stone slopes: Detailed steps
- Original window slopes from laminate with your own hands
- Video: slopes from laminate
We bring to your attention several interesting ideas for decorating window slopes. All these methods are available without attracting hired masters, you can achieve a great result with your own hands yourself.
DIY windowing window slopes
- Clinker tiles - a special type of ceramic tiles that have been firing at a temperature of more than 1200 ° C. It has colossal strength, as well as a variety of texture and wide spectrum of coloring. The slopes and other surfaces lined with this material are reliable, durable and have a beautiful appearance.
- How to make window slopes with your own hands using clinker tiles, and without attracting hired masters? First of all, it is necessary to learn that the clinker is a material for external cladding, so here we will talk about external window slopes.
So what do we need?
- Clinker tiles
- Glue
- Cutting tool (grinder, cutter, file)
- Ruler and Plotnitsky pencil
- Level
- Special corners (if they are used)
- Glue spatula
How to perform cladding?
- Carefully draw all the measurements, mark them on the tile and wall.
- Start work directly with slopes, then perform cladding of the internal corners.
- To make the angle look beautiful, the chamfer method is used when the angle is removed inside the tile at 45 degrees. This work requires special care and accuracy, a thicker material is selected for it.
- You can not remove the chamfer, glue the tiles at the corners of the VSTOK, and then use special corners that will provide an excellent appearance. This method does not require such high accuracy of masonry and trimming, but you have to spend more on the material - the same corners.
- The gluing begins with the outer corners, then the internal corners are glued, and then even flat places. It is advisable to select glue and clinker tiles of the same manufacturer.
- The work is done carefully by observing the instructions on the packaging of glue.

Important points:
- Before laying the clinker, slopes must be thoroughly aligned - praiseuse drywall or chipboard, surface grind.
- Work can be carried out if the temperature on the street remains within from +5 to +30 ° C.
- You can not perform cladding during the rain.
- Glue should be applied with a gear spatula, a continuous layer. The height of the rowing of the spatula should be 6-8 mm for light tiles, and 10-12 mm for heavy.
Do -it -yourself window slopes from ceramic tiles
This method is similar to the previous one, because the properties of ceramic tiles (tiles) and clinker are quite similar. But there are significant differences.
First of all, ceramic tiles:
- Strong
- Wear -resistant
- Does not absorb water
- Hygienic
- Not combustible
- Environmental
- Inexpensive
- Beautiful, multicolor
It is the glossy, multi -colored, glazed surface that is the main difference between the tile and the clinker.

The technology for decorating window slopes with ceramic tiles is similar to the technology of laying clinker tiles:
- The slopes are thoroughly aligned with the method of plastering or with drywall, after which they are thoroughly primed.
- All measurements are carefully held And the surface of the slope is marked along them. It is especially necessary to ensure that on both vertical slopes the height of the tiles, inter -seams coincided were on the same level.
- The glue is diluted according to the instructions for use and applied to the slope.
- The tile is laid out, starting from the first lower row, from the corner.
- The corners can be glued to the bunch, taking a previously 45 degrees of the chamfer, but for a thin tile you just need jewelry accuracy, and a good result is far from always obtained. Therefore, it is better to use special corners. They will provide accurate styling and beautiful appearance.
- The laying of each row is controlled by the level, and the same distances between the rows and tiles in them are achieved by the use of special crosses-fluids
- After the glue dries completely, the seams are wiped using the white sequence and fine -grained sand. Instead of cement, you can take the finish putty, add a coloring composition to give color.
- After drying the grout in the seams, the surface of the tile is wiped with a wet rag, or washed.
Video: mole of ceramic tiles
Original window slopes from mirrors with your own hands
To decorate window slopes with mirror materials, you can use not only tiles with a mirror surface, but also entire mirrors in size of the slope. Such a cladding creates the effect of expanded space, an endless path of images on both sides of the window. Mirrors are cut out independently or order mirror panels for individual cutting, strictly corresponding to the size of the slopes - the upper and two side surfaces.

- For gluing is used liquid nails, sealant or glue for amalgam.
- The glue is applied to the back of the panel and on the surface of the slope, the mirror is placed at the mounting site, pressed and allowed to grab the glue.
- All work needs to be carried out extremely neatly and carefully, since if a fragile mirror bursts, you will have to cut or order a new panel, the cracked repair is no longer subject to repairs.
- If you need to support the panel with support, be sure to protect the outer mirror layer from scratches with soft material.
- If necessary, the joints are closed decorative bar.
Video: Installation of mirror slopes
DIY windowing window slopes
- This method finishing window slopes It is used when they want to visually increase the small room, give it more light, “break” the usual rectangular space.
- Unlike continuous mirror slopes, which are made of panels to the size of the window, and create the effect of visual increase in space, mirror tiles creates many faces, which is why the ordinary window seems to be a fabulous crystal.
- In general, glass on slopes it looks very beautiful and expensive But subject to one important condition. It must be wiped daily with a rag, and regularly washed with special detergents.

Features of work with mirror tiles for window slopes:
- Such tiles are different from the usual tile less thickness, greater fragility and special delicacy of the upper mirror layer. Work with her does not tolerate haste, requires special accuracy and increased attention. Such a tile is mounted on a specially designed tile, neutral sealant, liquid nails.
- Can not use cement mortar and ordinary sealant, In which there is vinegar.
- First of all, we choose Tiles in size. It is quite difficult to cut it, so it is better to immediately choose the optimal size to minimize the number of cuts. The range of such tiles is very diverse in size.
- We very carefully align the surface of the slope. Any tile requires alignment, but in this case it is necessary to carry out this work with special care, preventing the slightest irregularity.
- Pillow the slope with a special primer.
- We produce very thorough marking, making marks on the surface of the wall and on the tile.
- If there is a need for cutting, we use exclusively diamond glass cutter of high quality.
- The tile prepared for gluing should be set vertically, leaning against the support, in order to avoid scratches on the mirror surface.
- Glue is applied on the back of the tile, Then it is applied to the installation site according to the marks, and pressed for a few seconds
- It is necessary to leave the gap between the tiles, which is achieved by special gaskets-wretches.
- At the corners, tiles with fatcet are adjusted to the water, forming a line.
- After the glue is completely dried (usually after a few days), you should make grinding seams.
- The best material for this is neutral siliconThe seams are filled, and the remains are removed with a rubber spatula and a damp cloth.
Video: Mirror mosaic on window slopes
DIY window slopes
- Wooden window slopes have a number of undoubted advantages. They are beautiful, environmentally friendly, even a special charm and expensive view give the ordinary double -glazed window.
- At the same time, the costs of them are completely small, especially if you perform work with your own hands. For wooden slopes, MDF is suitable, sandwich panels, and, of course, actually a tree.
- You can buy ready -made slopes, or you can make them independently from improvised material.
- If you have wooden windows, then slopes should be made from the same tree as the frames.
In the event that ordinary double -glazed windows are on the windows, the best wood of such species will be:
- Oak
- Pine
- Larch
- Linden

Before starting work, you need to prepare the material:
- The boards are aligned with a fuguer machine. If you do not have it, you can do with improvised tools - a shirt, a fugan.
- All boards do the same thickness, cutting off excess material.
- One of the ribs on each board is processed, cutting at an angle of 90 degrees.
- Cut the board along the width of the slope.
- Perform cross sections To give the slope of the inclination.
After that, you can proceed directly to the installation of window slopes from wood. There are two ways used for this purpose:
- Using mounting foam:
- Prepare wooden structures, make accurate measurements, process corners that should clearly coincide.
- Apply to the surface of the slope a small amount of foam, Given the possibility of its expansion.
- The collected wooden slopes are connected to the window opening.
- The joints after the foam harden it is advisable to process silicone sealant.
- Application of fasteners:
- Install special fasteners to support panels.
- The slopes are aligned, a layer of mineral wool for insulation is laid between the opening and the frame.
- To prevent wool humidity isolated by film or painting tape.
- The frame from the panels is connected by self -tapping screws, and this design is fixed on the slope using fasteners.
- In the case of wooden windows, the panels are attached to the frames with self -tapping screws.
Video: Loft -style windows - wood slopes with your own hands
Do -it -yourself window slopes decoration with a decorative stone
The decoration of window slopes with a decorative stone gives them an unusual appearance, and the original design of such windows is remembered for a long time. There are two types of stones used for lining of slopes, natural and artificial.
Each of them has its own advantages and disadvantages:
- Their appearance is almost indistinguishable, but still natural stone is never repeated in its patterns, and the artificial has A fixed range of design solutions.
- Artificial stone is much lighter than natural, but much less strong and durable.
- The price of artificial stone is lower, Its installation is cheaper, but due to less strength, it periodically requires repair.
You can lay the stone close, monolithic, or with the preservation of the seam. Before starting work, you need to conduct preparation:
- Lease the surface of the slopes, Remove significant depressions and apply a layer of primer.
- When working with heavy elements natural stone, Apply reinforcing grid.
- Carefully choose glue according to the recommendations of the manufacturer.
- Prepare for the sawing of natural stone, a grinder with a diamond disk, and for an artificial - a hacksaw.
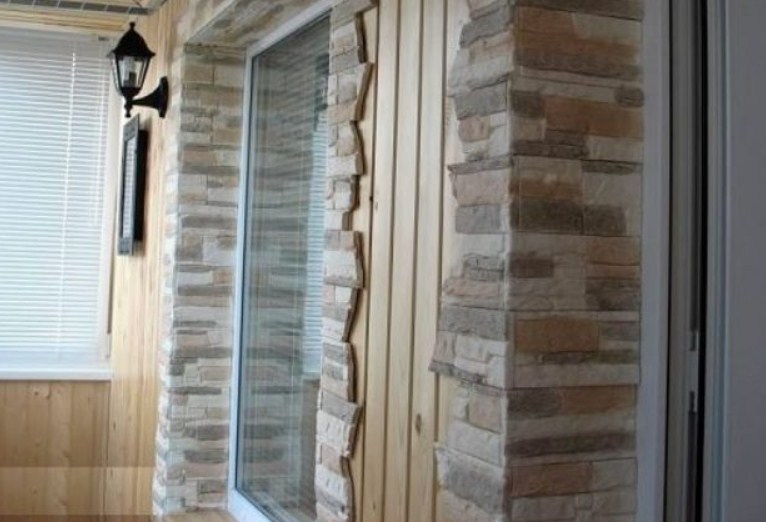
Now you can start work:
- Apply on the disgusted surface of the slope marking.
- Make a notch on the surface of the slope for better adhesion.
- Dilute glue according to instructions.
- Apply glue with a gear spatula to the stone if installation with a seam is made, or on a slope, with a seamless method.
- The stones are applied to the surface of the slope, slightly pressed and aligned, row per row.
- Seams, if any, are only embroidered after completely setting the glue.
Video: Rolling Stone slopes: Detailed steps
Original window slopes from laminate with your own hands
If desired, you can make original window slopes with your own hands from such a material as a laminate. Its undoubted advantages include the following:
- It differs huge a variety of colors and textures.
- General and almost not exposed to wear.
- It can hardly lend itself to mechanical damage.
- For care Enough wiping with a damp cloth.
- Elegant and expensive appearance.

At the same time, the laminate is afraid of excessive moisture and temperature difference, therefore it is not suitable for bathrooms, bathrooms and external slopes. For window slopes, it is enough to use a mid-class laminate (23-31).
Installation on window slopes is usually carried out with a frameless way. For this:
- The surface of the slope align, cleaned of garbage, primed.
- Lameli is cut for two side and one upper slope.
- Apply glue to the wrong side of the lamella and press it to the upper part of the slope, proportions of vertical supports until the glue dries completely.
- To fix the side panels, the glue is applied to the lamella and on the surface of the slope.
- The panel is pressed against the wall and fixed 2-3 self-tapping screws.
- Another side panel is installed in the same way.
- They put between them horizontal spacers.
- The fasteners are twisted and closed with special self -adhesive traffic jams.
- A decorative platband is installed along the perimeter of the window.
We showed you some interesting ways of beautiful and inexpensive design of window slopes with our own hands, available to an ordinary home craftsman. At the same time, the result can be very good, your windows will look stylish and expensive.
Do you do repairs? Then we advise you these useful articles:
- The interior of the apartment: TOP-100 of the most useful layout tips
- How to clean and wash a plastic windowsill
- How and how to wash white plastic on the windows after repair, from adhesive tape
- How to wash tiles in the bathroom, on the floor without stains
- How and what to wash linoleum after repair without divorces
- How and what to wash the laminate after repair without divorces
- How and how to wash the doors of interior, wooden, plastic


