Do you need to create a paper owl with your own hands? It is not difficult to do this if you use our tips.
Content
A wide variety of techniques, and therefore, a variety of papers from paper are presented to your attention in this article.
Owl of paper for children: templates
- A very simple craft for the hands of kids. You will need tools with which preschool children are already able to work: glue, scissors, paints (or felt -tip pens, markers, pencils) and, of course, paper. If you work with paints, for a more accurate application, you will need a sponge made of foam rubber.
- Use the finished template to create an owl made of paper, which is better to print on a thick sheet of paper. To paint it, it is best to squeeze out a little of each paint on a sheet of paper or cardboard (you can use a paper plate) and, cutting into the pieces of the sponge, proceed to the prints. To do this, distribute each piece of foam rubber for each color and take it in turn in paints, making multi -colored prints on the body of the owl. So, an imprint by the print, you will draw a bright colorful bird.
- Let the paints dry on your advance, and then start cut with scissors along the contours. Now it remains to boast of a wonderful colorful owl made by their own hands.


Owl of an owl from paper
- Prepare colored paper, several small pins, you will also need glue, and you can’t do without a pencil and scissors. And it will be completely wonderful if you are stocked up with a punch-drone. If you want to additionally decorate your work, also take a brilliant foam, a felt of red and white, a ribbon.
- Use ready -made templates for creating an owl of paper,having downloaded and printed them, and then carefully cut out the details, following the outlined contours, and transferring them to the sheets of colored paper. Now it is necessary to glue the details as indicated in the figure - everything except the wings. You need to put the wings to the Council in the position that you want to receive, and make the tip of the scissors a small hole through the body of the bird and the wing itself.
- We fasten the wings with pins of 5 mm, and use 8 mm as the eye. If your owl is preparing for the New Year, dress it in Santa Claus’s hat, making it from felt.
- It remains to attach small pieces of foam behind and with their help to fix the bird on the postcard, a sheet of paper, in a word, on any basis.


Owl - photo frame
- Let's start with the choice and printing of a template of the owl of paper, which we carefully cut out along the contour of each part, including transferred to the cardboard.

- Now we make a bird's eyes - for this you can use ready -made, rotating, on special pins. If you do not have such an eye, just cut them out of paper (you need white and black circles) and fix it with a wire.

- And the last strokes: we fasten the body with wings, add the beak and eyes to it, and in the central, widest part of the abdomen we place a photo of the baby. Such an original frame will delight both the child and all the guests of your house.

Paper plate - owl
- Remember what Owl feathers look like? The same waves and cover the bottom in the center of the paper plate. And now, turn its edges to the center - you will get peculiar wings. Also fold the top, and fix everything reliably with glue.
- Now we make eyes of 4 circles of paper (you need two small and more). Orange paper will be needed to cut the legs. We color the wings, glue the beaks and eyes, “put” the owl on the legs - and here, instead of us, instead of an ordinary nondescript paper plate, a cute funny owl from paper.

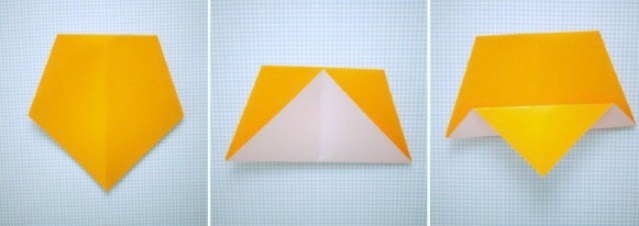
- The same funny owl can be made in the same way from paper circles. Or, for example, squares: bend three corners to the center not an overlap, but from the fourth make a support on which the bird will stand.
- The upper triangle will serve as a “head”, on which glue your eyes (also from paper circles), and the lower open edges of this triangle will be a beak. Now reveal your creation and take up coloring. That's all, the paper owl is ready.


Toilet
- It is not necessary that the paper itself will need, but the sleeve from the roll, which will make the figure of voluminous. In addition to her, take small paper forms in which cupcakes are baked, as well as colored paper and glue with scissors. Start working with cutting one edge of the sleeve, following the line of the arc.
- Three in half cupcake molds and glue these halves on the sleeve so that the bright part remains on the front side of the future bird. Glue, blocking one wing with another.


- Now take up the laying out of the owl plumage using as many layers as you consider necessary for sufficient splendor. Eyes of black and white circles and orange beaks glue as usual. Here is such a voluminous funny owl.


Owl from a paper bag
- Such an owl from paper itself can become a gift package in which you can originally present a small souvenir or sweets. To do this, you need to fold from a paper bag on top with a triangle. Cut all the details of the finished template transferred to the sheets of colored paper. We collect our eyes, glue the beak and bend the top of the top. That's it, you can add gifts and hand it over!
- A slightly different owl from the package can be done in this way: paint the bottom of the mound with the color that you want, but for now the work dries, we are engaged in the eyes. For them, we cut out three circles of different sizes and colors and glue them in the right order.
- The paint has dried up - you can turn the painted sides with a triangle, and turn the lower part into its beak, for which it is simply painted with black.
- Well, it remains to stick your eyes and fold our triangle. To please the child, make the wings from the carved prints of his palms glued on both sides of the chalk. If you want, designate feathers with a black felt -tip pen.


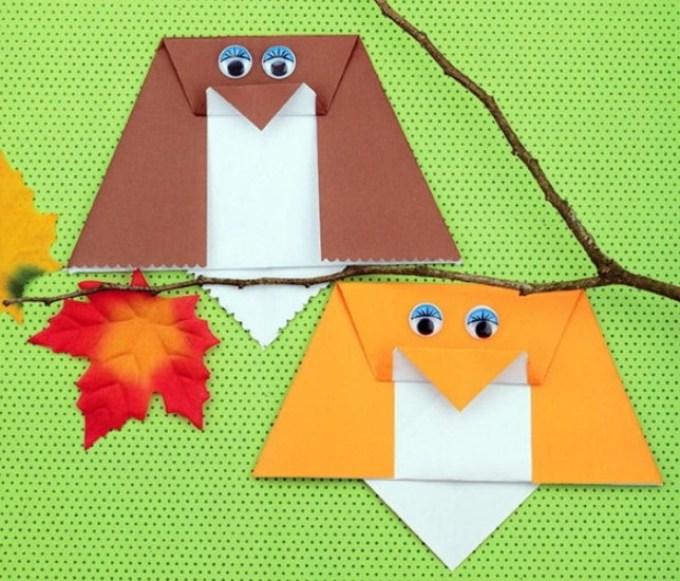
Owl-arches of paper
- Even a child will perform such an owl from paper in the technique of origami. The main thing is to follow the instructions and take the first step correctly: to bend the special sheet for the work of the origami diagonally and put it diagonally so that the colored surface is below.
- When checking with the instructions, perform wings, head, then beak, then turn over the sheet and take care of the tail. Everything, turn the bird to yourself and build her eyes at your discretion. Now you have an owl performed with your own hands!

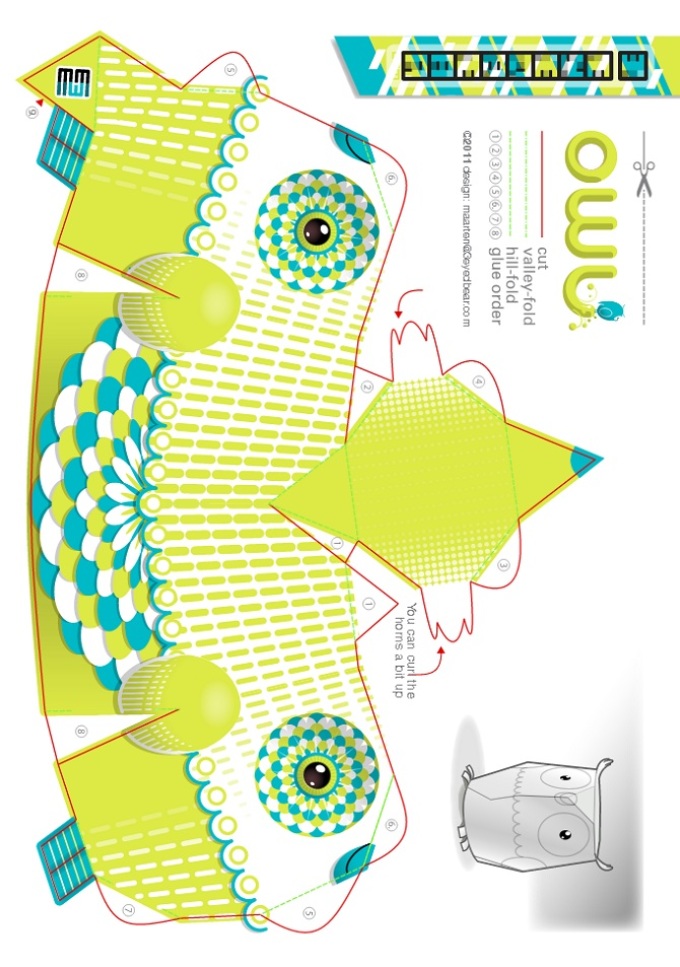
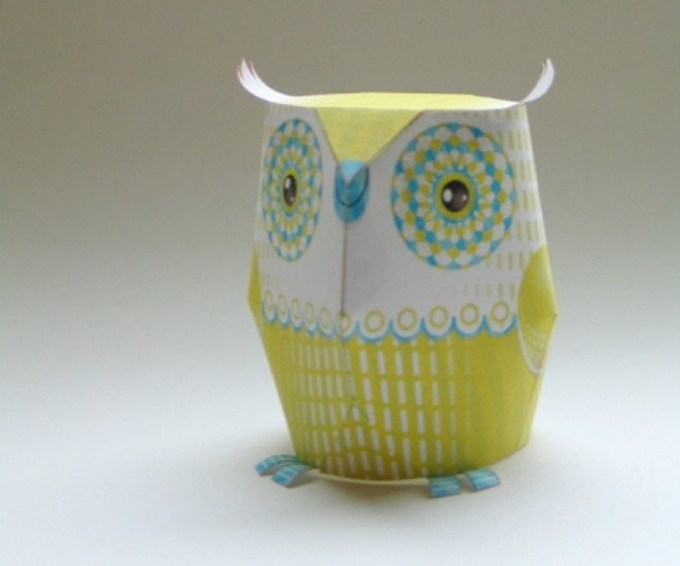
3D-sova from paper
- From the finished template, bringing it on the monitor to the desired size and redrawing the contours on the paper, you can glue a wonderful 3D-sow of paper. Transfer the details to the cardboard and cut it out, and then - pushes them with colored paper, each with the corresponding color. Make your eyes, as usual, from black and white circles and semicircles.
- When all the details of the owls will be ready and cut out, collect them into a single whole, gluing the figure. A beak of a small triangle and a paw of blue (this is a technique in which the fabric sewn from several layers eventually turns out a fluffy, like fur) will complement your toy. If you wish, you can even sign your bird from the back, which will make it completely exclusive.
- By the way, if you have a colored printer, you can do without the stage of transferring parts to cardboard, then on paper, etc., since you can immediately print a finished template, and not redraw it.
Owl-Sytynanka from paper
And you can also perform an owl from paper in the technique of beautiful cutting, which is called the prick. It turns out very beautifully, openwork and exquisite. The main thing is to stock up on good sharp scissors so as not to tear paper (manicure). And do this on the basis - so more convenient. The basic rule of the prick: the more holes, the more air owl will look more air.

We will also tell you how to do: