Do you have a lot of yarn? Make interesting and useful things for your home.
Content
- Knitted round rugs of fabric and yarn, using a hook: ideas, description, photo
- Decorative stands for mugs from the remains of yarn with your own hands: schemes, photos, video
- Video: Crochet Master class of napkins, stands for hot for a cup, mugs of yarn residues
- Soft seat on a chair from pompons of the remnants of yarn with your own hands: description, photo, tips
- Mobile from pompons for a child from the remnants of yarn with your own hands: idea, description, photo
- Craft in a frame of small pompons from the remnants of yarn with your own hands: Description, photo
- What can be done with your own hands from the remnants of the yarn - decor for flower pots: description, tips, photo
- Clothes for watches - Decor from the remnants of yarn with your own hands: Description, photo
- We put on the legs of chairs - decor from the remnants of yarn with our own hands: description, photo, video
- Video: Case for the legs of a chair
- Video: Crochet socks on a chair. Details for beginners
- DIY blankets of yarn: description, photo, video
- Video: Super plaid from the remnants of the yarn! We free the shelves from unnecessary motorcycles
- DIY flowers from yarn: description, photo, video
- Video: gorgeous flowers from the remains of yarn. Light needlework
- Amigurumi toys from the remnants of yarn with your own hands: Description
- What can be tied from the remnants of yarn with your own hands - ideas: Clothes in the style of patchwork, Avoska
- Video: I knit crochet from the remains of yarn. Part 1
- Video: I knit crochet from the remains of yarn. Part 2
During the forced imprisonment of the house during quarantine, many remembered their hobbies, and with pleasure continued to engage in them. For example, for those who love to knit and have the remnants of the yarn, you can offer several ideas for implementation. Read further.
Knitted round rugs of fabric and yarn, using a hook: ideas, description, photo

Read on our website an article on how you can tie socks for women, men, child on 2 knitting needles. The schemes are simple, the descriptions are understandable, there are videos with master classes.
A rather complicated idea in execution, but for an experienced craftswoman, complexity only spurred interest. Such a rug is suitable for cottage and apartments in quality:
- Places for a cat or dog
- As the basis for a pillow of chairs, shops, stools
- Foot mats by the bed, etc.
Here is an instruction-description for the manufacture of such a knitted round rug made of fabric and yarn with a hook, as in the photo above:
- For the basis, you will need old remains of fabrics, if they are not, you can use something from the old knitwear: children's t-shirts that have become small, adult worn knitted T-shirts, etc.
- Cut things into thin strips more authentic (or how it turns out) 2-3 cm wide.

- Weave more tight braids from these ribbons. These pigtails need to be collected in a round or square base (in the shape of a carpet). To do this, sew or weave the resulting braids using the hook.

- We begin to draw up the resulting base. To do this, tie from the remains of the threads of the box 10 loops with the front surface (you can crochet 10 loops with ordinary viscous, which more like it).
- Sew the resulting Kant to the base along the edge.

- For decoration, you need to prepare details. Take rings from plastic of different diameters. From water in plastic bottles, the ring holds the lid, there is a common size and more on bottles with cold tea, juices, etc., from the cans of the ring will be large.

- Wrap the ring in a circle with a thread, tie it with an ordinary column (it is better to take thick threads, then the rings will turn out larger), for beauty you can start a thread of contrasting color along the edge.

- Prepare more such elements of the future carpet, let the width of the rings be different, and the thickness must be adhere to one. Then the carpet will not have high -rise differences. The more the flowers of yarn, the brighter and more colorful the carpet will turn out.

- Distribute the rings according to the basis, ideally filling it without gaps, sew decorative elements to the base.

- For beauty, you can additionally decorate the carpet with ribbons, beautiful laces, beautiful beads, etc. Your masterpiece is ready.
Here's another idea, how you can knit such a rug:

Decorative stands for mugs from the remains of yarn with your own hands: schemes, photos, video

This is a job for those who can handle a crochet. Look at the photo how beautiful these stands are. Knitting them is very simple:
- Choose any scheme to taste.
- Start knitting.
- You can tie multi -colored plain products or from 2-3 colors Create a set of several stands. Here is the choice of the craftswoman.
Important: In order for the cups to stand on the surface evenly, it is necessary that the surface of the stand is as flat as possible. To do this, choose the threads of one thickness and try to knit as tightly and homogeneous as possible.
Here are the schemes that can be used for knitting with your own hands of decorative stands for mugs from yarn residues:


One of the options for the scheme is described in the video below.
Video: Crochet Master class of napkins, stands for hot for a cup, mugs of yarn residues
Soft seat on a chair from pompons of the remnants of yarn with your own hands: description, photo, tips

There is an idea - to create a bright, comfortable and soft seat for chairs and stools from pompons with your own hands. You will need multi -colored remains of yarn, cardboard and scissors. You can make such a decor as in the photo above or make one seat, as in the picture below.

The difference will be only in the number of pompons that will be needed. The seat needs less balls from yarn. If there are a lot of threads of thread, then you can decorate the chair completely.
- Make pompons. To do this, wind the threads on two fingers of the left hand. Pull the formed motor between the fingers with the cut end of the thread and fasten well.

- Cut the motors on the bend opposite the fixing and straighten the resulting pompom.
- It is necessary to wind enough such pompons of various colors that there is enough to uniform coating of the entire surface of the seat.

- For the base, you can use a bathroom rug or kitchen with a large number of holes.
- You can purchase it in a supermarket or household store.

- Attach the pompom to the base. To do this, push the threads from mounting on a pompom into two neighboring holes on the rug using scissors.
- Tie these threads among themselves on the wrong side of the base.

- Also attach the remaining pompons to the base.
- It should turn out a bright soft surface on which it will be convenient and pleasant to sit.
As a result, one decor was obtained from several skeletons of yarn of different colors.

Advice: If you plan to make a rug on the floor, then pompons are best done with cardboard. Such products will turn out to be denser and more high -quality.
Cut the base of the desired diameter, wrap the threads, cut and trim the edges. Do not wound many threads, otherwise the product will turn out to be too dense. Instructions on how to make such a pompom:

Mobile from pompons for a child from the remnants of yarn with your own hands: idea, description, photo

This is a great idea for a gift for a family in which the baby recently appeared. Mobile is a design with suspended figures or other objects. It is attached above the bed or stroller in the visibility zone of the child. Children like to follow the movement of objects, they try to reach and grab them. Mobile for a child can be made with your own hands from pompons from the remnants of yarn as follows:
Prepare everything you need:
- A small piece of cardboard
- Schools for embroidery
- Scissors
- Needle
- Remains of yarn of different colors
Here's a description of the work:
- Make pompons described earlier in the way (in the instructions about the seat on the chair), only instead of fingers, use a piece of cardboard, as in the picture in the previous description.
- It should turn out at least 25 pieces.

- Wrap the hooks from the hoop thoroughly and tightly, without gaps.
- Prepare three long thick threads and tie them from one edge with each other.

- Above the place of fastening, you need to make a loop and attach a large pompom below.
- Attach several pompom to each thread under each other, you should get a beautiful fluffy garland, which can be hung by the loop.

- Fasten the resulting garland on the ring of hoops so that the loop with a large pompon is above the ring, and the threads with pompons hang from different sides under the ring.

The mobile is ready, you can fix it over the bed using a special device. For beauty and to make the child more interesting, tie another or more soft toys, as in the photo above.
Craft in a frame of small pompons from the remnants of yarn with your own hands: Description, photo

Panel from the balls can be made with the child. The basis will serve as a shallow container with a frame or sides.

Here is a description of the process of performing a craft in a frame of small pompons from the remnants of yarn with your own hands:
- Choose a frame of the desired size with a cardboard base, as in the photo above.
- Apply the preliminary drawing of the future panel on the basis, using the colors of those yarn remains that are available.
- Prepare small glomerulus from the remnants of the yarn. Make them according to the instructions described above in the text.
- Put them in the cooked container so tightly that all free places are filled or folded the desired pattern.
- To use crafts as a decorative element, you can glue the glomeruli to the base.
And you can use it as a developing fascinating game for children over 3 years old. They will be happy to pick up the colors according to the drawing. You can use several options for drawings.

As a basis for the toy, you can adapt a shallow plastic basin of small diameter and with even sides. Show the child how to lay out the picture, mosaic or drawing and he will repeat.
What can be done with your own hands from the remnants of the yarn - decor for flower pots: description, tips, photo

From small fur coats of yarn, which remained after the knitting of the products, you can make a decor for flower pots with your own hands if there are indoor plants in the house. But it is not necessary to even be able to knit. You can simply use your imagination and the remnants of the yarn.


Such a number of pretty pots, as in the photo above, will be a real and unusual decoration. Here's a description of the work:
- Prepare everything that comes in handy for the decor: pots, yarn, scissors, PVA glue.

- Light a thin layer of glue in a circle under the edge of a cashek with a thin line.
- Start winding the thread on the pot in a circle.
- Make sure that the layers fit tightly to each other.
- Gradually additionally smear the surface of the pot with glue.

- On a third of the height of the pot, cut the thread, fix the tip of the glue stronger.
- So do with threads of two colors. Grand the tips thoroughly so that they do not stick out.

- To make the surface of the threads less dirty and easily wash, cover the surface with transparent varnish.

- Places of cut threads can be additionally fixed by gluing additional decorative elements: buttons, beads, flowers from strands, etc.
- Use this superglue or adhesive gun for this.
Advice: The more yarn flowers you use, the brighter and attractive the products will be. If the pot is small, then three threads of thread are enough. For large pots, you can choose 5, 6 or 7 shades of yarn.
Clothes for watches - Decor from the remnants of yarn with your own hands: Description, photo

If you use bright colors in the design of your home, then the idea with a knitted cover - clothes for wall clocks will definitely be appropriate.
Around the wall clock there is a dense rim that can be decorated by wrapping the remains of yarn. Or you can tie such a decor from the remains of yarn with your own hands with a hook or knitting needles. Here's a description of the work:
- Type on the knitting needles 25-30 loops And knit the strip of the front or wrong surface, alternating the colors of the threads.
- Then sew the strip to get a circle and put on the resulting rim on the frame of the clock.
Play with flowers, and with the texture of the yarn. It will turn out brightly and original, as in the photo above. It is clear that in any interior, such an idea cannot be entered. But by applying imagination and inspiration, you can come up with an interesting design for any conditions.
Advice: Cover the finished product with transparent varnish, this will help protect the watch from frequent purges and simplify the care to simple dusting.
We put on the legs of chairs - decor from the remnants of yarn with our own hands: description, photo, video

This idea will help the owners of the expensive and “vulnerable” flooring to protect it from scratches. Or come in handy for those who do not like the sound of pushing chairs. The floors will be without scratches, the furniture will move easily and silently. So, we put on the legs of the chairs. Here's a description of how to make a decor from the remains of yarn with your own hands, as in the photo above:
- Tie socks for the legs of chairs in any, the simplest way for you by crochet or knitting needles.
- Such models need very little yarn, so a small glomerulus is enough for a few socks.
- So that such a clothing does not slide, sew a fixing gum along the upper edge.

If you cannot choose how to knit - with knitting needles or hook, pattern or simple surface, then watch the video below. In it, the craftswoman shows how to crochet decor.
Video: Case for the legs of a chair
From this video, you will learn how to knit socks for the legs of a chair or stool with knitting needles:
Video: Crochet socks on a chair. Details for beginners
DIY blankets of yarn: description, photo, video

This is an idea for very economical and patient housewives. Since you need to save a long time, there is a lot of troubles. But the result surpasses all expectations. Here is a description of the work on creating a blanket from the remnants of the yarn with your own hands:
- Collect threads of different lengths (from 50 cm), for convenience, shake them in one skein. You can not even bother with the selection of flowers, it will still turn out beautifully. This can be seen in the photo above.
- From the resulting holes, bind squares 25 by 25 cm. You can knit with knitting needles (front stitch) or hook (circular or flat knitting).
- Calculate the number of necessary squares in order to get a plaid of the size you need.
- To assemble the entire canvas in a single product, use a plain yarn of a neutral color (white, gray, beige, black). Collect all the squares with a hook or ordinary needle and with a thread.
- Process the resulting plaid along the edge with an additional border crochet or make a fringe.
- If desired, you can make a fleece lining.

It turned out a wonderful, one of a kind object of the situation that will decorate the room and warm in cold evenings. Watch more in the video how to knit such a plaid:
Video: Super plaid from the remnants of the yarn! We free the shelves from unnecessary motorcycles
DIY flowers from yarn: description, photo, video

From the remnants of the yarn, you can connect the flowers, which then decorate the clothes, or leave it as a separate art object in your interior. For the manufacture of such products, you need very little yarn, one or two colors. We offer a description of the knitting of flowers from yarn with our own hands:
- Pour the thread on your finger and wrap it twice.
- Then stretch the hook and pull the thread, knitting it.
- Then remove the thread from the finger and tie it with a crochet 12 times with a column. Fasten the resulting circle in a half -column.
- Make 2 air loops and then knit with lush columns - 3 tbsp. With a crochet without knitting.
- In the next loop, also make 3 tbsp. With a crochet without knitting.
- Tie all the columns on the hook together and 2 V.P. And fix the petal into the same loop into which the last 3 columns knitted.
- Repeat with the rest of the petals, they should turn out 6 pieces. Ready.
Important: The most complex flowers (roses, for example) are made by turning in a roll of tied braid, as in the photo below - simply and quickly.

Tie flowers according to the selected scheme, decorate them with beads or other decor. Cores and other details for the stems are easily found in needlework stores. See what beauty can be done in the way, which was described above.

Read more the master class is explained in the video:
Video: gorgeous flowers from the remains of yarn. Light needlework
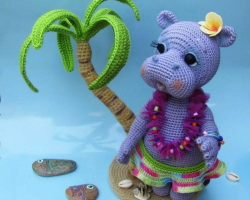
Amigurumi toys from the remnants of yarn with your own hands: Description

If there are very small yarns of yarn, you can crochet small cute toys from them together with children. Below is the instructions for knitting.

Here is a description of the knitting toys with amigurumi from the remnants of the yarn with your own hands:
- Prepare - yarn, hook No. 2 and filler - what will be inside toys, cotton wool, pieces of foam rubber, synthetic winterizer, etc.
Conditions:
- pV - air loop
- sBN - Nakid column
- etc - increase, i.e. 2 columns are knitted in 1 column
- sS - connecting column
- ub - Reduce, i.e. 2 columns knit together
- pr*6 - increase 6 times *1 SBN, pr *6 times (18) - *1 column without crochet, increase *and this is repeated to the end of the row 6 times (it turns out in a row 18 SBN)
- kr - A circular row
And two of any color yarn stir out. We proceed:
- 12 PV (1 color), row 1: 12 SBN, turn, 12 SBN (24)
- Row 2-5: 24 SBN (24)
- Change the thread (2 color), row 6-7: 24 SBN (24)
- Row 8: * 3 SBN, pr * 6 times (30)
- Row 9: 30 SBN (30)
- Change the thread (1 color), row 10: * 4 SBN, pr * 6 times (36)
- Change the thread (2 color), row 11: 36 SBN (36)
- Change the thread (1 color), row 12: 36 SBN (36)
- Change the thread (2 color), row 13: 36 SBN (36)
- Change the thread (1 color), row 14: *4 SBN, UB *6 times (30)
- Change the thread (2 color), row 15: * 3 SBN, UB * 6 times (24)
- Change the thread (1 color), row 16: *2 SBN, UB *6 times (18)
Follow with synthetic winterizer (or other filler), giving the desired type of owl.
- Row 17: * 1 SBN, UB * 6 times (12)
- Row 18: * UB * 6 times (6)
- Row 19: Close all the loops.
Eyes are loud amigurumi - Tie two identical details:
- KR 1: 2 PV, in the second from the hook 5 SBN (6) (black)
- KR 2: pr*6 times (12) (white)
- Change the thread (yellow)
- KR 3: * 1 SBN, pr * 6 times (18)
- Close knitting, leave a thread for sewing
Wings (green) are loud amigurumi - Tie two identical details:
- Row 1: 2 PV, in the second from the hook 5 SBN (6)
- Row 2: * pr * 6 times (12)
- Row 3: * 1 SBN, pr * 6 times (18)
- Close knitting, leave a thread for sewing
Paws (pink) are loud amigurumi - Tie two identical details:
- Row 1: 2 PV, in the second from the hook 5 SBN (6)
- Row 2: * pr * 6 times (12)
- Row 3: 1 SBN, 3 PV, 1 SBN, 3 PV, 1 SBN, 3 PV, 1 SBN, SS
- Close the loops, leave the thread for sewing
The beak (pink) is loud:
- Row 1: 6 PV
- Row 2: 10 SBN (10)
- Row 3: 3 ss
- Leave a thread for stitching
Assembly is baked:
- Sew your eyes to the body, retreating 3 rows down.
- Sew the wings to the body, along the edges from the eyes, retreating 5 rows down.
- Sew the paws to the bottom of the body.
- Cut into 18 cm. Three threads, divide them into 2 equal parts. Having folded each segment of three threads in half, attach in the corners of the body from above.
- Sew the beak between the eyes.
Ready! The bindings turned out to be beautiful and very cute.
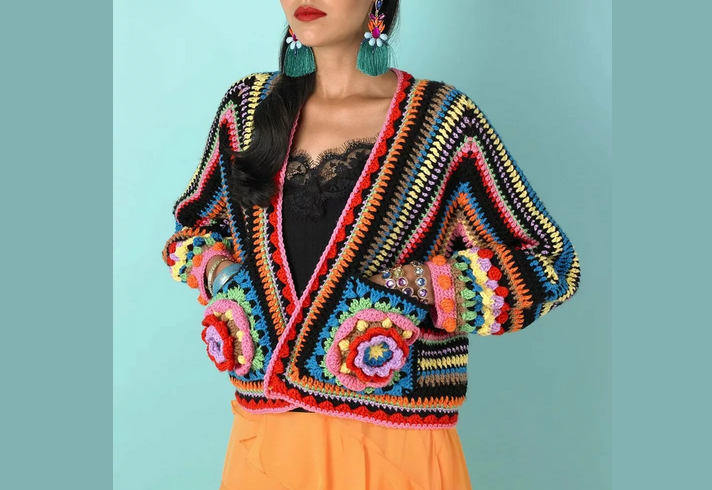
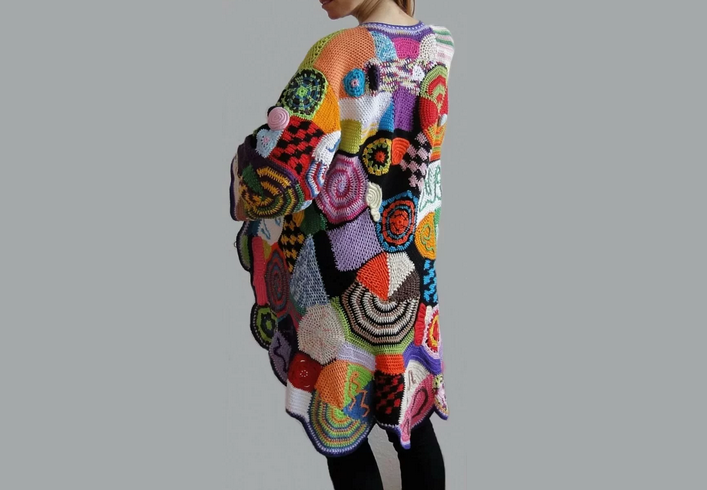
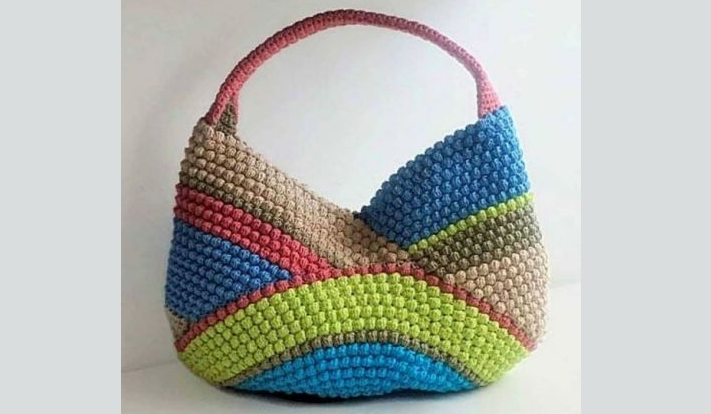
What can be tied from the remnants of yarn with your own hands - ideas: Clothes in the style of patchwork, Avoska
From the remnants of the yarn, you can bind clothes (vests, poncho), made in the style of a patchwork of elements tied with your own hands. The size and design of the finished product depends on the number of residues. A vest and a poncho is offered as the simplest in the assembly of the model, which the novice master can make.
- The original shopping bag is again in fashion.
- It does not need a lot of yarn on it, there will be enough those remains that are stored in each knitter.
- The string bag is knitted simply and quickly.
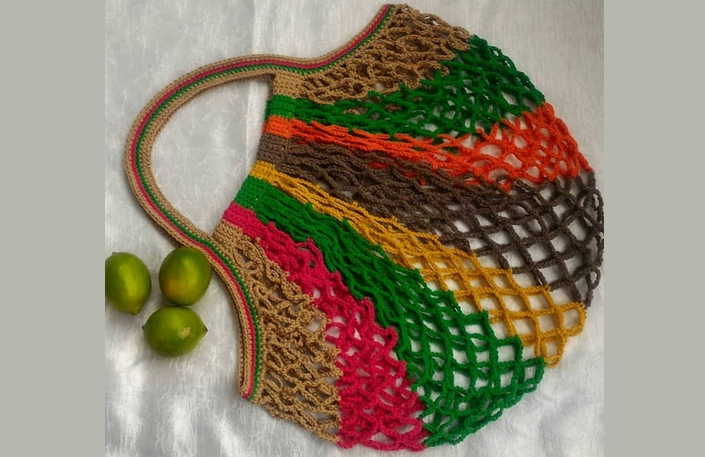
- Think about the future view of the string bag.
- The shape of the bottom can be round or oval, the length of the main canvas, the shape and length of the handles.
- Tie the base in the form of a circle (oval, rectangle) with a simple dense viscous columns without crochet.
- For the main canvas, you can choose any air pattern. Knit the main part to them.
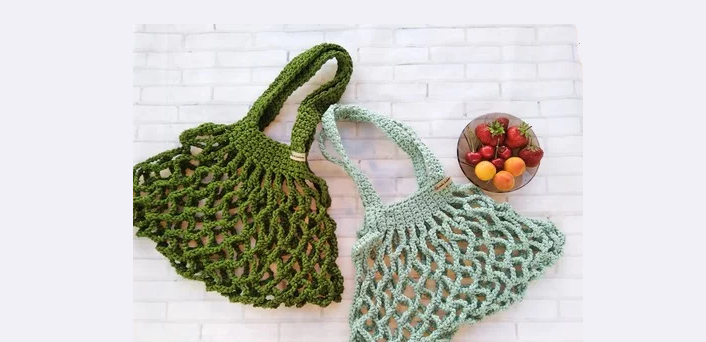
- The upper part should be denser, knit it with a dense knit, which was used for the base.
- In height, it is at least a quarter of the total height of the bag without handles.

- The handles can be knitted from the main canvas of the bag, or you can make loops and insert plastic rings or other devices sold there in stores for needlework.
- The finished model will decorate the shopping for any woman.
These tips will help every woman choose an option for herself, feel like a creator, spend fascinating evenings at home for a beloved hobby. Nothing soothes the nerves so and does not appease, as the process of creating a beautiful thing. Good luck!
Video: I knit crochet from the remains of yarn. Part 1
Video: I knit crochet from the remains of yarn. Part 2
Read on the topic: