Crochet: how to knit a bunny of any yarn.
Content
A knitted bunny is an ideal comrade, both a friend for a baby and as an interior decor. Today they are knitted with both giant and amigurumi kids, from cotton, acrylic, smooth and fluffy yarn, but the trend of recent years is a teddy bunny crocheted. In this article we will talk about how to crochet the most diverse bunnies.
How to crochet a plush hare?
In this section, we will tell you how to crochet hare from plush yarn. To work, we need:
- Yarn Dolphin Baby (Himalaya) Motok;
- Softy yarn (Alize) in a small amount for the muzzle;
- 30 cm of satin white tape for a bow on the neck;
- Black beads-eyes, or any eyes for toys;
- Filler for toys (synthetic winterizer or holofiber);
- Two hooks No. 4.5 and 3.5;
- Scissors;
- Black threads No. 40;
- A needle to sew eyes, or glue to glue.

The knitting process is fast enough and simple:
- We knit an amigurumia ring of 6 loops;
- The next row is SBN, two SBN (hereinafter referred to as SBN) from one loop, and so on until the end of the row, total of 9 loops will come in a total of 3 row;
- The entire Row SBN, and tighten the last loop. The legs are ready!
The knitting process is also simple:
- We knit an amigurumia ring of 6 loops;
- The next row is all loops: two SBN with one loop. 12 loops are on the 3rd row;
- From 3 to 8 rows inclusive - SBN;
- Tighten the last loop - the legs are ready! On the second leg we do not tighten the thread and do not break off. She will be right.
Now we knit the body, first connecting it to the legs:
- We unfold the legs so that the threads look in one direction, otherwise the effect of negligence will be created. This is one of the most important moments in knitting paired things by crochet;
- We take the right leg in your hands and continue to knit SBN-in the 9th row 6 loops (this is a zone between the legs). Next: 1 air loop, after 12 SBN, into the air loop 2 SBN (increase) and again 12 SBN, in total at the end of the 9th row-28 loops;
- Insert the marker into the last loop to understand where to sew the legs;
- From the 10th to 15 rows-28 loops in each row, we knit SBN;
- We stuff the legs with synthetic winterizer, since then it will not be possible to get to them;
- In the 16th row we knit 5 times by: 3 SBN, 1 time: a decrease from two SBN in 1 column, at the end of the row you will have 23 loops;
- In the 17th row unchanged, all 23 loops of SBN;
- In the 18th row: with 2 loops in one SBN, 3 SBN and again a decrease. 18 loops will go to the 19th row;
- 19th row: 18 SBN;
- Time to sew the paws. Depending on the knitting method, you will see relative to the marker whether you have shifted knitting to the left. The paws of the legs are sewn, after recovering the knitting with his hands that had gone to the left, but slightly, otherwise then everything will become in place, and the legs will be crookedly sewn. Before sewing the paws - fill them with a filler;
- For sewing one foot, select 4 loops;
- So, 20 row: 4 SBN, 4 SBN from the paw, 4 SBN, 4 SBN from the paw and 2 SBN of the back. Please note that there will be 6 loops on the back, and 4 on the breast, so that the legs look aesthetically aesthetically forward, slightly forward;
- Fill the body with a filler;
- The body is ready, but do not break the thread, from the body we immediately switch to knitting our heads.
The head of the bunny is knitted from the body, with a transition of two rows - neck:
- 21 row (we continue knitting): SBN, reduce 2 in 1 SBN, etc. to the end of the row;
- 22 row: 12 SBN;
- 23rd: add this way, SBN, two SBN with one loop, and so on until the end of the row (total 18 loops);
- Add the stuffing to the body, if required by the filler;
- 24 row: SBN, with one loop 3 SBN, and so on to the end of the row (total 31 loops);
- 25-29 rows: 31 SBN;
- 30 row: 2 SBN, decrease from two loops into one column and so on until the end of the row;
- 31 row: SBN, decrease 2 in 1 and so on until the end of the row;
- 32 row: 8 times decrease 2 in 1 and one connecting column. Tighten and sew up the remaining thread, having previously stuffed your head.
The next stage is the ears of the hare:
- We begin in the same way - an amigurumia ring of 6 loops;
- 2 row: from each loop 2 SBN;
- 3 row: 2 half -stolmers with crochet (hereinafter referred to as PSN), one increase from 1 loop 2 PSN and so on to the end of the row (20 loops);
- 5 row: 4 PSN, one increase from 1 loop 2 PSN and so on to the end of the row (24 loops);
- 6 row: 5 PSN, one increase from 1 loop 2 PSN and so on to the end of the row (28 loops);
- 7-10 row: PSN;
- 11 row: we knit 4 loops, 2 in 1 and so on until the end of the row (total 24 loops);
- 12 row: 24 PSN;
- 13 row: we knit 4 loops, 2 in 1 and so on until the end of the row (total 20 loops);
- 14 row: 20 PSN;
- 15 row: we knit 3 loops, 2 in 1 and so on until the end of the row (16 loops);
- 16 row: PSN;
- 17 row: we knit 2 loops, 2 in 1 and so on until the end of the row (total 12 loops);
- 18 row: on the pattern;
- 19 row: 1 PSN, 2 in 1 and so on until the end of the row (total 8 loops);
- 20 row on the pattern;
- Fold the ear and knit 4 SBN by connecting two walls of the ears. We do not fill the ears;
- We sew the ears to the top of the head and hide the thread.
And the conclusion is a muzzle:
- We take white yarn and a smaller hook;
- Classic ring of amigurumia for 6 loops;
- 2 row: with each loop 2 crochet columns;
- 3 row: Nakid column, 1 in 2 columns (total 18 loops);
- 4th row: Nakid column, 1 in 2 columns (total 27 loops).
And now on the assembly:
- In the center of the muzzle, we tie the black thread for the eye and pink for the nose;
- We stretch the pink thread through the center of the white muzzle;
- We sew the eyes with a black thread;
- We tighten the thread so that the end is tightly hidden in the head;
- We sew a white muzzle around the perimeter and fill it with a slightly filler from one edge;
- We sew a pink thread and a smile. We hide the tip in the muzzle and head.
And the last stroke - we tie the tape. The plush bunny is ready!
Video: Amigurumi toy. Long -legged hare Monya Crochet
How to crochet a hare?
Tilda's style at the peak of the popularity of interior toys, and in this section we will tell you how to crochet a hare in the style of Tilda.

Let's start knitting from the legs:
- 1 row always begins with an amigurumia ring of 6 loops;
- 2 row: 1 SBN, out of 1 in 2 loops, the additive and so on to the end of the row (total 9 loops);
- 3 and 4 row: SBN 9 loops each row;
- 5 row: we knit a finger, a cone (from one loop 3 columns with 1 crochet) and 8 SBN;
- Up to 22 rows inclusive - all SBN, 9 loops on each row. Torn the thread and tighten the last loop.
Now we knit the legs:
- 1 row: an amigurumia ring of 6 loops;
- 2 row: we increase from each loop from 1 loop to 2 SBN;
- 3 row: 1 SBN, from 1 in 2 loops and so on (total 18 loops);
- 4 row: 18 SBN, only with capture exclusively beyond the back wall, without affecting the front wall, so that the strip forms in front;
- 5 row: 3 SBN, 6 columns of 2 loops 1 column (total 12 loops);
- 6-12 rows: 12 columns without crochet in each row;
- 13 row: 3 SBN, from 1 loop 2 SBN and so on to the end of the row (15 loops);
- 14 row: the right leg - 17 SBN, the left - on the contrary, do not tie it. Only 13 sbn.
We knit the tail of the bunny:
- 1 row: an amigurumia ring of 6 loops;
- 2 row: we increase from each loop from 1 loop to 2 SBN;
- 3 row: 3 SBN, add from 1 loop to 2 SBN, etc. (total 15 loops);
- From 4 to 6 rows inclusive: 15 SBN in each row;
- 7 row: 3 SBN, decrease from 2 loops in 1 column, etc. (12 loops);
- 8 row: decreases, from every two loops in 1 column and tighten the last loop.
Next, we knit the head of the hare:
- 1 row: an amigurumia ring of 6 loops;
- 2 row: we increase from each loop from 1 loop to 2 SBN;
- 3 row: 1 SBN, from 1 in 2 loops, etc. (total 18 loops);
- 4 row: 2 SBN, from 1 in 2 loops, etc. (total 24 loops);
- 5 row: 3 SBN, from 1 in 2 loops, etc. (total 30 loops);
- 6 row: 2 SBN, out of 1 in 2 loops, etc. (total 36 loops);
- 7 row: 5 SBN, from 1 in 2 loops, etc. (total 42 loops);
- From 8 to 15 inclusive: we knit SBN 42 loops in each row;
- 16 row: 9 SBN, out of 1 in 2 loops, 2 SBN, of 1 in 2 loops, 16 SBN, of 1 in 2 loops, 2 sbn, 1 in 2 loops, 9 sbn (total 46 loops);
- From 17 to 19 row inclusive: 46 SBN in each row;
- 20 row: 9 SBN, of 2 loops in 1 SBN, 2 SBN, of 2 loops in 1 SBN, 16 SBN, of 2 loops in 1 SBN, 2 SBN, of 2 loops in 1 SBN, 9 columns without crochet (total 42 loops);
- 21 row: 5 SBN, decrease from 2 loops in 1 SBN, etc. (total 36 loops);
- 22 row: 2 SBN, decrease from 2 loops in 1 SBN, etc. (total 30 loops).
The next stage is the torso of the bunny:
- 1 row we tie the legs. 1 air loop, around the first leg - 15 SBN, 1 SBN on the air, 15 SBN (total 32 loops);
- 2 row: 32 SBN;
- 3 row: 7 SBN, an increase of 1 loop in 2 SBN, etc. (total 36 loops);
- 4 row: 5 SBN, an increase of 1 loop in 2 SBN, etc. (total 42 loops);
- 5 row: 6 SBN, an increase of 1 loop to 2 SBN, etc. (total 48 loops);
- From 6 to 8 rows: three rows of 48 SBN each row;
- 9 row: 6 SBN, of 2 loops in one SBN, etc. (total 42 loops);
- From 10 to 12 rows: in each row 42 SBN;
- 13 row: 5 SBN, of 2 loops in 1 SBN, etc. (total 36 loops);
- 14-15 rows: two rows of SBN;
- 16 row: 4 SBN, of 2 loops in 1 SBN, etc. (total 30 loops);
- 17-18 rows: two rows of SBN;
- 19 row: 3 SBN, of 2 loops in 1 SBN, etc. (total 24 loops);
- 20-21 rows: two rows of SBN;
- 22 row: 2 SBN, of 2 loops in 1 SBN, etc. (total 18 loops);
- 23 row: on the pattern;
- 24 row: we get the legs, on each paw of 3 SBN, slightly shifting forward;
- 25 row: 4 SBN, of 2 loops in 1 SBN, etc.
Ears remain:
- 1 row always an amigurumia ring of 4 loops;
- 2 row: 1 SBN, an increase of 1 loop in 2 SBN, etc. (total 6 loops);
- 3 row: 1 SBN, an increase of 1 loop to 2 SBN, etc. (total 9 loops);
- 4 row: 2 SBN, an increase of 1 loop in 2 SBN, etc. (total 12 loops);
- 5 row: 3 SBN, an increase of 1 loop in 2 SBN, etc. (total 15 loops);
- 6 row: 4 SBN, an increase of 1 loop in 2 SBN, etc. (total 15 loops);
- 7 row: 5 SBN, an increase of 1 loop in 2 SBN, etc. (total 15 loops);
- From 8 to 19 row inclusive: according to the pattern;
- 20 row: 5 SBN, of 2 loops in 1 SBN, etc.
- Fold in half and flash the SBN.
We fill the parts with the filler and sew into a single whole. Sew the eyes and embroider a nose with a smile. Next, we decorate, depending on the floor of Tilda, and send it to a stylized place where the bunny will look amazing.
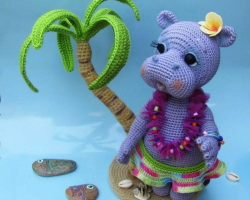
Crochet Bunny: Photo Ideas
In this section, we give a photo of the ideas of variations how to crochet a hare.


Crochet bunny: tips and recommendations
Tatiana: I knit toys to order, both for children and for interiors. For children, plush yarn, acrylic and cotton are good. Any yarn is suitable for the interior, depending on the stylization of the toy. Bunnies can be very diverse, from round paws, to elongated, from Tildovsky, to lovely from Soviet cartoons.
Mila: I just started knitting, and I am most interesting to toys. For beginners, a number of tips: fluffy yarn is much more problematic than smooth, it is better to knit tightly so that the syntepuh does not seep through the holes and, of course, the score and attention is important. Knitting is a laborious process, but what chic things are obtained!
Do you like knitting? You may like our articles:
- Stool mat: crochet for beginners, ideas, photos;
- Corn with knitting needles - diagrams. Corn pattern with circular knitting needles - scheme;
- Tunisian knitting for beginners: step -by -step master class, introduction to the foundations, ideas of products;
- Hand knitting-5 products that can be tied without knitting needles: master classes, video.