Cake decoration with chocolate: patterns, balls, fences
Content
- How to draw, make inscriptions with liquid chocolate on the cake: instructions, examples of inscriptions and drawings, photos
- How to make patterns from white and dark chocolate and decorate the cake: ideas, examples of jewelry, photo
- How to make a net, an openwork of chocolate and decorate the cake: ideas, photo
- How to make curls, chocolate feathers and decorate the cake: ideas, photo
- How to make chocolate leaves and decorate the cake: ideas, photo
- How to make chocolate figures and decorate the cake: ideas, photos?
- How to make chocolate chips and decorate the cake with chocolate chips: photo
- Cake decoration with openwork flowers: ideas, photo
- Cake decoration with chocolate balls: ideas, photo
- How to make a chocolate drops on a cake and decorate the cake: ideas, photo
- How to make a fence for a cake from chocolate: chocolate patterns, photo
- Video: How to collect and decorate a birthday cake?
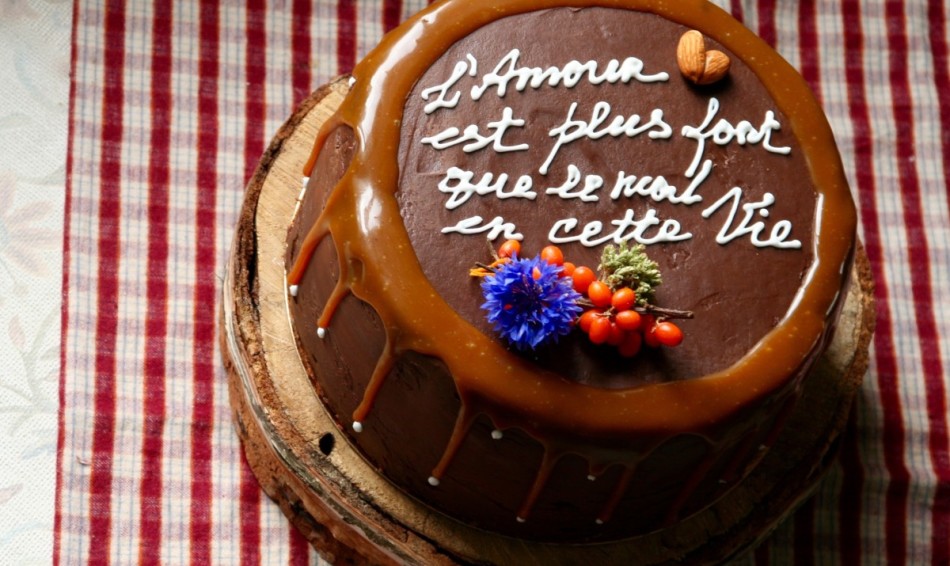
The inscriptions and drawings from liquid chocolate are an ideal method that allows you to decorate the cake yourself at home. Using this technique, you can apply the words of congratulations that will be addressed to the culprit of the holiday on any dessert. You can use several methods at once. For example, how to draw an openwork or a beautiful ornament using chocolate, or decorate the cake with curls, leaves ... In general, choose, think, use our tips.
How to draw, make inscriptions with liquid chocolate on the cake: instructions, examples of inscriptions and drawings, photos
The festive pie from the side looks much more interesting if it has a beautiful inscription, which is also made with all love. And it is not necessary that the handwriting is excellent, plus there is no need to have the skills of a professional artist. The most important thing here is the technique by which words will be applied.
To begin with, you should practice a little so that your hand does not accidentally tremble during the inscription. If you have never applied chocolate, but you would like to learn this occupation, you need to study the following recommendations that experienced confectioners gave. In order to make an inscription, you need to melt the chocolate. You can learn more about the melting of chocolate here.
- The most ideal method for applying chocolate inscription is the use of special felt -tip pens that are designed to decorate cakes. The tube that contains a chocolate mixture is equipped with a small hole. Through this hole, liquid chocolate is squeezed out, as a result of which the inscription on the cake is neat and even.
- Before applying a chocolate inscription, apply barely noticeable sketches to the surface of the cake glaze using a toothpick. So the words will always look even and beautiful.
- Try to write a large number of words on a congratulatory cake. Remember - congratulatory words should be concise and clear.
- If you made a mistake during the application of chocolate, do not delete the letter. Apply completely the inscription, remove the cake in the refrigerator. Only after the jewelry froze, remove the spoiled element, and write a new letter that is not enough instead.
- The most ideal surface on which chocolate elements are applied are mastic or glaze that has a contrasting color.
- Do not use hot chocolate for applying. Because of it, the glaze and another similar surface simply melts and flow.
- Do not use the preposition "from" in the inscriptions. It is considered a sign of mourning wording.
- Do not allow repeating words to be present in the inscriptions. For example, "the best teacher on his teacher's day."
- Place each word evenly so that they are on only one line. Do not divide the words, do not tolerate letters to another line.

You should also adhere to such rules during the decoration of the cake:
- Before starting the inscription, cool the cake
- Start to start on the glass. After that, if your words turn out beautiful, you can place them on a cake
- Replace the chocolate with a mixture prepared from cocoa powder and oil for training. Connect them in the same proportions
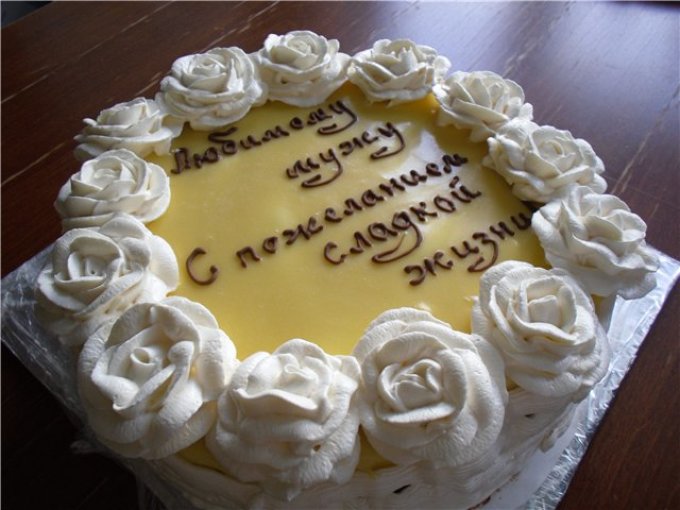
How to make patterns from white and dark chocolate and decorate the cake: ideas, examples of jewelry, photo
To easily squeeze out a certain chocolate pattern, use chocolate or chocolate-mesh lipstick to work, since it has an ideal consistency. Take a cornet that has a small nozzle in the form of an asterisk. Place the chocolate lipstick in it. Make it a border for a cake in the form of a star, shells, curls.
It is difficult to squeeze out liquid chocolate from a metal nozzle, since the chocolate freezes from the cold of metal faster than necessary. You can add a little glycerol to the chocolate lipstick. He will make the chocolate thicker, without waiting for the fondant lipstick, squeeze it very quickly.
In order to squeeze the threads and strips of chocolate, apply a cornet that does not have nozzles. Remove the tip from him so that you form a hole of the required diameter. Squeeze the lipstick in the form of thin, wavy, straight, angular or zigzag lines.


You can also make a white chocolate jewelry, painting it with dyes. Use only those dyes, the basis of which is vegetable oil, or a dye-powder. Liquid paints, when they fall into chocolate, make it very viscous, deprive of useful qualities.
- Melt the chocolate (25 g). Apply the ornament on the paper that you want to decorate the cake. Cover with a piece of waxed paper, fasten every corner using a sticky tape
- Pour chocolate into the cornet, wrap the edges of the cornet inward, then remove the tip
- Gently squeeze a thin thread from chocolate along the contour of the pattern. As soon as the figure freezes, remove it with a knife-lobe
- Make a few more such drawings
- Decorate them with a cake or cookies
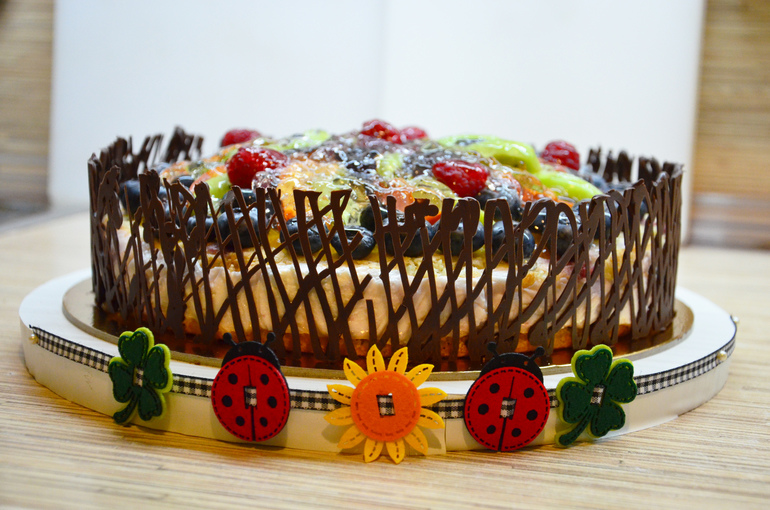
How to make a net, an openwork of chocolate and decorate the cake: ideas, photo
Openwork chocolate drawings allow you to make a festive cake more colorful and more beautiful. You can also make them if you are in advance:
- Chocolate
- Paper or cellophane culinary waders (you can take a syringe with a thin nozzle)
- Stencils
- Light paper, which is designed for baking, or cling film
For openwork, use confectionery chocolate preferably. However, you can replace it with ordinary store chocolate. Just buy the one in which there are no additives and fillers. The best chocolate for decoration is black, even bitter. It is harder than milk, therefore, it has the ability to keep the shape better.


Processing processing process:
- Take the chocolate.
- Melt it.
- Close the stencil that you prepared for decoration. To do this, you need to take a food film or paper.
- The chocolate that you melt is placed in an envelope, circle them a drawing on the stencil.
- Put the openwork jewelry in the refrigerator so that it is completely frozen.
- After solidification, carefully remove the decoration, use for the decoration of the pie.
How to make curls, chocolate feathers and decorate the cake: ideas, photo
The next option for decorating cakes is a variety of curls, feathers, spirals.
Chocolate curls:
- Take chocolate (125 g). Melt it. Apply chocolate to something solid, for example, on a wooden bearer. Drink with a knife-lobe so that the surface becomes perfectly flat.
- When your chocolate froze a bit, but not completely, with the help of a knife, scrap thin curls from the layer. Try to keep the knife so that between him and the chocolate layer is an angle of 45 degrees.
- So that you get large curls or straws, draw a knife throughout the layer.
- If you want to get small curls, then use a knife to work with which you clean the potatoes.

Chocolate spirals:
For work, you will need to take: chocolate tiles and culinary film.
Production process:
- Melt the tile of chocolate. Cut the film along the entire length. Pour chocolate on the film, put to the side to cool. Spend a chocolate with a fork, divide it into several parts.
- Turn the film in the form of a spiral, put on the rug. Send into the refrigerator.
- Gently remove the food film as a result, you will get thin spirals that you can steal any dessert.

You can make feathers in the same way. Only apply the corresponding pattern on the film.
How to make chocolate leaves and decorate the cake: ideas, photo
This method is considered very simple to execute. You can fantasize a little by applying a variety of leaflets for the base of the leaf.
Chocolate leaves:
For manufacture, stock up:
- Chocolate
- Brush
- Real green leaves
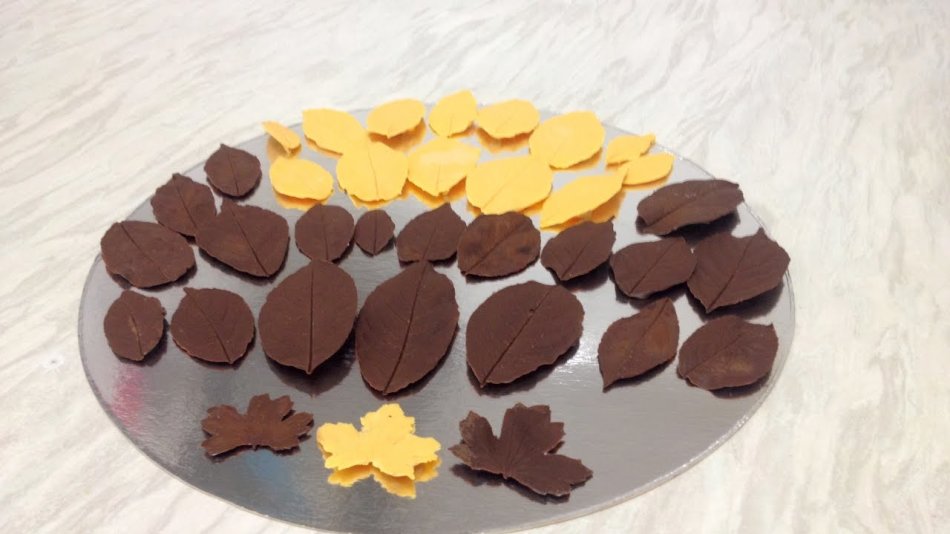
Production process:
- Wash the leaves thoroughly, dry well. Melt the chocolate
- Take the sheet, turn it over, apply chocolate on the back. Then distribute with a brush. Put in the refrigerator so that the chocolate froze
- Carefully remove the leaf-Osnov from chocolate. Make leaflets as much as you need to decorate the cake
Chocolate roses:
In order to make chocolate roses, stock up:
- Chocolate mastic - 200 g
You can take any: from white, black, milk chocolate.
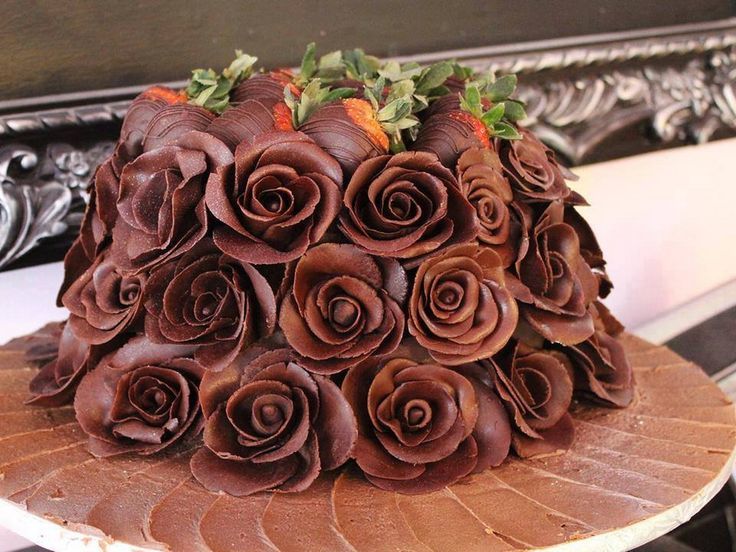
Cooking process:
- Mash mastic in your palms. It should be soft. Cover the mastic of white chocolate with powdered sugar, the dark one with a cocoa powder. Roll the chocolate mastic with a rolling pin so that you get a thin layer.
- Cut circles out of it. For pink, you will have enough 9 pcs.
- From the first circle, blind the cylinder. Win the rest of the circles so that you have a bud.
- Edges 2 petals should be under 1, edges 3 under 2 and so on.
- Attach all the petals like that, turn the edges of each outward. When you get a rose, cut it.
- Leave the flower so that it is completely frozen.
With this method, make a few roses.
How to make chocolate figures and decorate the cake: ideas, photos?
Figures with contours:
Unlike figures that are made in the form of an openwork, these decorative jewelry have a chocolate background, plus they have stroke on the contour.
For manufacture, stock up:
- Chocolate (white, dark, milk)
- Parchment paper
- Paper for applying a figure
You will also need a cornet of paper or a regular confectionery bag to work.

Production process:
- Put parchment on the sheet on which the figure is depicted.
- Melt black chocolate or milk. Squeeze it on parchment paper on the contours of the figure, wait until the chocolate hardens.
- Melt white chocolate. Fill them with empty parts of the figure. Give her time to completely freeze. Turn over.
Ordinary cut figures:
Such figures can be done by any person, even one who has no experience. Therefore, you can attract your child to work, he will definitely like to help you.
Stock up for this figure:
- Chocolate
- Parchment paper

Production process:
- Melt the chocolate
- Using a knife or spatula, distribute the chocolate evenly (about 2 mm thick) on the surface of parchment paper
- As soon as you notice that the chocolate began to freeze, cut the desired figure using a mold
If during cutting the chocolate will stick to the mold, then it has not cooled completely. If the chocolate breaks, then it hardened, and therefore heat it again.
How to make chocolate chips and decorate the cake with chocolate chips: photo
Decorating holiday cakes and pies using chocolate chips is one of the trusted and successful methods. After all, you can simultaneously combine chips of various shades, shapes, sizes. Plus, there are several methods of obtaining chocolate chips.
Method 1:
Take ordinary chocolate tiles in which the filler is not present. Place it for a short period of time in heat. When the chocolate tile is slightly softened, cut a thin layer at an angle with a sharp large knife so that it takes the shape of a tube. Before decorating the cake, put the chocolate decor in the refrigerator. He will freeze and will keep his shape wonderful.
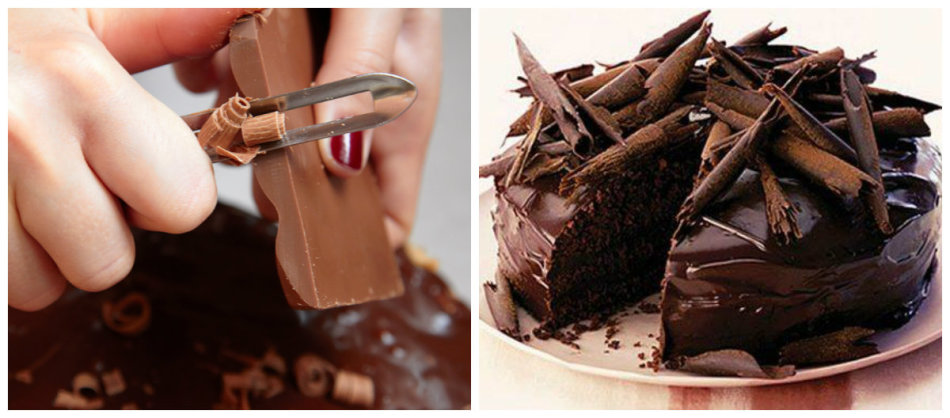
Method 2:
This method is considered more complicated. To begin with, turn the chocolate into the icing, apply it with a thin layer on the food film, cool, and then cut the thin layers with a sharp knife. When the jewelry is frozen, you will receive large shavings.
Method 3:
Take chocolate tiles, grate it. Choose the size of the grater itself at your discretion.

Method 4:
Melt the tile of white chocolate, put the dye in it. Choose color yourself. Use, for example, by method 3. Make shavings of different colors, decorate with it cake, laying out some kind of drawing. You can completely cover the cake in one color of the chips or mixed with different shades.
Cake decoration with openwork flowers: ideas, photo
Have you prepared a cake for your sister's birthday or beloved mother yourself? Decorate it with a beautiful decor. For example, openwork flowers. You will not need dye and mastic. Since you can make wonderful jewelry out of chocolate. Therefore, be inspired, fantasize, but remember about attentiveness and caution.
So, take for the cake:
- Confectionery bag or syringe
- White chocolate tiles (melt it in advance)
- Food film or a little parchment paper
- Simple pencil
- Wooden stick with a thin tip

Production process:
- Draw on paper a sketch of future flowers. Turn the paper over
- Fill a syringe or bag with chocolate. Circle the drawing along the contour with chocolate. So that your flowers turn out to be delicate, draw thin lines to the central part with a thin stick
The first flower is ready. Make such jewelry a few pieces, cool them. When the flowers are completely frozen, separate them from paper. Decorate the cake.
Cake decoration with chocolate balls: ideas, photo
Chocolate decoration is an ideal addition to each dessert. In order for such a decor to get the first time, it is necessary that the chocolate be sweet, thick and decadent. Listen to our useful and simple tips, then you can turn the cake into an unforgettable work of art.
1 method
To perform these chocolate balls, take:
- Chocolate tiles
- Iron tube
- Pastry bag

Production process:
- Place the iron tube for a while in the freezer.
- Melt the chocolate, pour into a confectionery bag.
- Remove the tube, cover it with a bag of chocolate.
- On the cold iron tube, the chocolate will instantly cool, and then carefully remove it.
- Roll the ball from the chocolate immediately.
You can make such balls several colors and sizes. Lay the resulting balls at the top of the cake, complement with other jewelry.
2 method
For the second method, you will have to take:
- Circular ice molds
- Chocolate tablets (white, black)

Production process:
- Melt the chocolate tablets of dark color. Apply the paste to the inner part of the molds. Do it a little casually.
- Apply white chocolate on top of the dark.
- Place molds in the freezer chamber.
- When the chocolate is completely freezed, remove the molds.
- Place in warm water for a couple of seconds. After that, you can easily take out the hemispheres.
- Connect the two hemispheres among themselves so that you get a ball.

In the middle of such a ball you can place any filling. For example, pieces of fruit or berries.
How to make a chocolate drops on a cake and decorate the cake: ideas, photo
A very good option for cake decor is chocolate drops. You can apply them to decorate the cake, homemade cake, cookies. But those drops that are sold in the store do not always come across high -quality. Therefore, make such droplets yourself. You will definitely have no doubt about their quality and taste.
For cooking, stock up with the following products:
- Cocoa powder-1 t
- Coconut oil - 1 \\ 2 t
- Honey - 4 tbsp.
- Vanilla extract - 1 tsp
Cooking process:
- For work, take a confectionery bag.
- Melt the coconut oil. When it begins to gradually melt, remove from the stove, pour into a separate bowl, cool. You should get a transparent oil.
- Pour cocoa and other ingredients to it.
- Mix the paste so that it becomes homogeneous. Cool in the refrigerator for half an hour.
- When it cools down, fill the pastry bag with paste.
- Squeeze drops of different sizes, place them close to each other to save space on the surface.
- Place the surface with drops in the freezer for about 25 minutes.
How to make a fence for a cake from chocolate: chocolate patterns, photo
Chocolate openwork is the best decoration that can decorate the sides of the cake and make a fence out of it. Such jewelry is prepared from any chocolate, there is no particular difference.
The thinner the layer of chocolate turns out, the more fragile the figures will turn out of it.
Option 1
For this fence, take:
- Aluminum foil
- Culinary bag
- Shoulder blade
- Chocolate (any)

Cooking process:
- Melt the tile of chocolate. Place it in a culinary bag
- Draw an openwork fence on the foil of chocolate paste
- Place the foil with chocolate in the refrigerator for about 60 minutes
- Separate the chocolate with a shoulder blade, decorate the cake on the sides
Option 2
- Cut a ribbon of such a length from parchment paper that it can grab the cake around the circle
- Apply a drawing on paper using white chocolate. For example, peas, flowers, butterflies, rings and so on
- Put the refrigerator for a while so that the chocolate froze a little
- Pour a spoon of black melted chocolate over the pattern, carefully, with a knife or shoulder blade, smear the chocolate over the entire tape. Try not to touch the drawing
- Wrap the cake with a tape, put in the cold
- After some time, remove the paper. You will get an unusual and interesting fence

As you can see, the variety of jewelry for a chocolate cake is diverse. Do not stop on one option, experiment. After all, it is so pleasant to delight loved ones with his own masterpieces.
Video: How to collect and decorate a birthday cake?