We knit and sew a bag of fur with our own hands: detailed master classes with a photo.
Content
- How to choose materials for a bag of fur: recommendations
- Do -it -yourself knitted bag: recommendations for manufacturing
- How to sew an evening handbag of fur with your own hands: step by step master class with a photo
- Video: Skorny Govle with your own hands without a fussy car
- Video: sewing the author's fur bag made of fur with your own hands.
For those who monitor fashion trends, and want to match it - we offer to sew a trend fur bag with our own hands!
How to choose materials for a bag of fur: recommendations
We do not claim that sewing bags of fur with your own hands will cost a penny, since natural fur and accessories are a lot. But, firstly, you can create a unique bag in a single copy, and secondly, to make a replica of the eminent house of fashion, which will make it possible to look at the level by saving on the budget.
For you can choose a high-quality eco-fur, which is made of artificial fiber, but the latest technologies allow you to make it as luxurious as natural fur. We will dwell on this issue:
- How to choose materials for a bag? Natural fur should be fluffy, with a dense pile and a goodwill. If these are not matte types of fur, such as muton, lama, etc. The fur should shine and burst. Mesdra (the reverse side of the fur, the skin on which the pile and undercuts holds) should be elastic, dense and at the same time do not break when tension. You can choose for sewing a bag of fur with your own hands, both a whole piece and pieces of fur, which can be arranged in a pattern;
- Artificial fur choose high -quality. And he cannot be cheap. Remember, high -quality artificial fur of the latest generation is at the same price as natural. Why choose it? To protect wildlife. Such a fur goes with a pile of an identical natural, and a dense swoop. When choosing budget fur, remember that even if it looks excellent when buying, in the toe he will behave unpredictably.
- Also pay attention to accessories. Fur bags are worn for years, so choose high -quality metal accessories so that later it does not have to change it. Also, the cost of the bag is immediately estimated by accessories. Put budget plastic - and the price will instantly decrease by many times.
- What can you save on? Lining. It can be pulled out of any old bag, since most often the bag itself has already outlived, and the lining after light washing remains new. You can also save on the materials on which the fur is attached, since they will not be visible, and it makes no sense to overpay. Also, bags and backpacks can go into work, which are no longer relevant, but retained their original appearance.

Do -it -yourself knitted bag: recommendations for manufacturing
So, connecting two fashion trends: knitting and fur we get a unique fur bag made of fur with our own hands. To work, we need:
- Strips of fur. It can be a whole skin, or there may be remains, as well as an unnecessary collar or cuff. In general, anything! By the way, for those who love classic options - consider one type of fur, and for those who prefer brightness - you can mix the stripes as you like!
- Any thin, but strong thread for crochet. Choose the one that contains polyester, or another dense formula, wear -resistant and durable;
- Thin hook corresponding to the yarn;
- Lining for a bag;
- If you want a dense model - you will need a seal of synthetic winterizer, felt, thin foam rubber, etc.. What to choose depends on the desired rigidity.
- Furniture. This is lightning, a castle, if required, a pen, as well as a mount for it. An additional gloss will add decorative accessories on the front side of the bag;
- Scissors for cutting, threads and needles, As well as a sewing machine for stitching the lining and sewing lightning.
Now we move on to the process of work. The first thing to do is decide on the model of the bag and make a pattern on it.

Look at the photo. In this case, the bag consists of one elongated rectangle, folded in half. There are no castles, only lightning in the middle of the bag. This model is ideal for everyday tasks. So, we are determined from the size. Suppose we want the size of the bag without pens to be 40*35 cm. We will be vertical. So, we make a drawing.

- We need to cut the fur. To do this, we turn it with a pile down and draw a line of 1-1.5 cm wide. Pay attention to the direction of the fur growth line. You can do cutting both along this line and across, but consider that all the stripes should be cut in one direction, then the product will look holistic;
- Cut strips 40 cm long (knitting length). If you have pieces of smaller size, cut them into stripes and then sew them with each other to get the same 40 cm.
- Given that one strip is 1.5 cm, and our bag is 35 cm wide, it is necessary to cut 23 stripes. It is simple to calculate it: 35/1.5 \u003d 23.333 cm. We round the smaller way, since we still have a part of the area. Well, if you want, you can always add one or two strips;
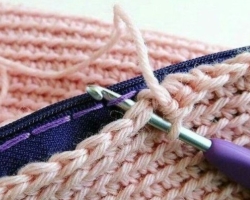
- Now go to knitting. We type a chain of air loops, the length of which is 80 cm. Make a chain stretched, so that then there is no protractedness on the edge of the product. We knit the next row with columns without crochet. Having tied it to the edge, repeatedly measure the size of the canvas. It should be 80 cm. We turn over and again we knit a number of columns without crochet, only this time we insert a strip of fur. The strip is placed from the wrong side to the working side and is started, pushing behind the mezra and piercing the undercurrent. At the same time, we do not hurt the pile. The thinner the hook and thread, the easier it is to do it;
- We continue to knit until the canvas is ready. Next, we cut out a rectangle from the lining of an equal 35*80 cm + allowances of 1 cm on each side. You can add a pocket or several departments as desired. We sew the zipper to the lining and put it off.
- On the wrong side, sew the side of the bags with each other and sew the handle of the bag at this stage. We hide the ends of the threads from the wrong side and carefully fix it. If you decide to attach decorative fittings on the fur - it's time to do this until access to the wrong side is closed;
- Lastly, sew the zipper To the upper edge of the fur and hide the ends on the wrong side - a knitted bag made of fur is ready.

And another option for knitting a bag of fur, only here the stripes are knitted horizontally. And a row that between the fur stripes is knitted with a pattern of “fur fur”. Also, an openwork, chains and other decorative elements are brought between the stripes with fur.
How to sew an evening handbag of fur with your own hands: step by step master class with a photo
Are there a little luxurious fur? There was a collar from the coat, and his hands stretch something and do something? We offer to work in the evening and sew an evening bag of fur with your own hands. For work, you need fur, liner fabric, a bag for a bag and a chain-a mines, as well as beads, beads, threads, fishing line and sewing tools. By the way, if the skeleton of the oak fur is required.

- So, let's get to work. The first thing to do is to decide on the handbag, its size and make a pattern on paper. To do it is simple, and since we have an element that cannot be changed - the fastener, we will draw from it. Put the fastener on a sheet of paper and circle it on the outer and inside, as shown in the photo. For simplicity, you can make a dotted line, and put it when you remove the fastener.

- Try a cut workpieceIs it ideal to sit in the fastener? This is important, since then on the stitched product you will have to stretch or pull it out.


- Now fold the pattern in half, make a clear bend and two cuts as shown in the photo. They will come in handy later.

- Now we attach our base on the sheet and glue with tape in the middle. We dilute the edges as in the photo and also fix it with tape.

- We make marks for the future pattern and be sure to mark the center of the bag.

- We note the depth of the bag depending on your preferences regarding spaciousness. But remember that it makes no sense to make a very deep bag, since it will not look quite proportional.


- Now give the width bag, it can be made either even and a little convex. The bottom can be both rounded and semicircular.

- Fold the paper in half and cut the pattern.

- Now we go to work with fur! Check the direction of the fur, it should go to the bottom of the bag. If it is one side or up, the product will look ridiculous.

- We apply the pattern to the fur, fix it on top of anything heavy, and circle with a pen or marker. The color is not important, since it will not be visible later.

Cut the fur in this way:
- Make an incision several millimeters with a blade, scalpel or stationery knife;
- Next, it is necessary to raise the skin slightly and cut only the skin, trying not to touch even the scrap. The less you hook, the less furs will be scattered;
- Having reached the perimeter before the start, make the last incisions easy so as not to tear a thin membrane, but cut it right.

- Ready -made fur parts
- Connect the two patterns of fur with a hair clip, so they will not slip. Season the fur on the front side and sew two products with a fussy seam. More detailed about him in a simple and short video.

Video: Skorny Govle with your own hands without a fussy car

- This is a finished result from the inside. Please note that the fur does not peek around the seam, so you will get the perfect fluffy joint on the front side, without any kind of seam. If the hairs are a little went inside or along the seam, with the help of an awl or needle you need to pick them up from the front side and pull them out.

- Now cut the blanks of the lining of fabric. If you want an original handbag - choose a bright, colorful lining. This is now at the peak of popularity!

- Stitch the lining and process the edges.

- Attach the lining to any dense surface by the wrong side. Attach the pattern and mark the steps. Make soft backs. Make the same wrapping and wrapping on the fur part.

- Now on the fishing line (it is much stronger than the thread is suitable for these purposes), pronounce beads and beads in the desired order. Attach to the chain and fix the handle-decor on the clasp. If you want a thin chain over your shoulder, fix it on the side parts of the fur bag at this stage.

- Connect the lining with fur and sew together as in the photo.

- Pick the threads to the tone of the fur (we used a different color for contrast, so that it is better to see how to sew) and sew a lining with fur to the clasp, leaving about 1 cm of free space (the photo can be seen).

- Now tighten the thread in each stitch and stretch the fur, helping yourself with an awl. Work carefully pulling the thread until you sew everything. It remains to fix the thread and season. DIY fur bag is ready!


And in conclusion, we offer to see another master class on how to sew a bag of fur with your own hands.