In this article, we will consider a master class on how to make and attach a fur edge to the hood.
Content
- How to make a fur edge yourself: a few tips on the design of the edge
- How to make a fur edge on a hood with your own hands with a zipper: how to insert a zipper?
- How to make a fur edge on buttons or buttons?
- How to make a fur edge sewn directly to the product?
- How to sew, make a fur edge of pieces, tails?
- Video: How to make a removable fur edge?
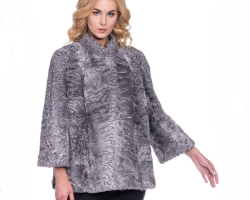
To decorate your jacket or coat, you can use various accessories. But it is precisely the fur edge that gives a solid and expensive look, emphasizes the silhouette, due to which the image seems perfect and finished. In addition, the edge warms up well and protects against wind and frost. And you can easily make a fur edge yourself, without even having a large amount of fur material at its disposal.
How to make a fur edge yourself: a few tips on the design of the edge
- Before making a fur edge, Think about the issue with the mount. It can be sewn directly to the product, and also make it removable. It is best to fix it to the hood on the zipper, but you can use buttons and buttons. The removable edge is much more practical to use, because a jacket or coat can be washed, simply withdrawing an accessory from it.
- It is better to choose the edge for the edge with a long pile, as it looks expensive and will warm well. But it is worth considering that too long a pile can cover his face, which will bring discomfort and inconvenience. Too short fur, can ruin the whole impression of outerwear. Therefore, when choosing a fur for the edge, it is better to try on it.
- As for the color, then The contrast fur looks most profitable to the color of the main product.But when choosing artificial fur, you can take a coat, parks or jackets. If doubts arise, it is better to take beige or gray fur - so you definitely will not lose.
You will also be interested in reading an article "Basic requirements when working with fur: how to sew fur on gloves?"

How to make a fur edge on a hood with your own hands with a zipper: how to insert a zipper?
To make a fur edge, you need to prepare all the necessary materials, tools and correctly remove the measurements. The measuring tape should be measured the distance along the edge of the hood from one end to the other. Basically, this length is from 65 to 70 cm. The width should be at least 10 cm. At the same time, do not forget to add 1-2 cm to the allowances.
After measurements, you need to perform the following:
- Carefully cut a rectangle from fur corresponding to the sizes with a blade. Also act with lining fabric;
- Apply the lining with the wrong side with the front part of the fur, set the zipper between them. Keep in mind that lightning will be inside between fur and lining. And sew with a fussy seam manually or on a special machine. At the same time, do not forget to refuel a long pile of fur inside so that it does not get into the seam;
- If you want to perform this procedure on a regular sewing machine, then first notice everything;
- You also do everything from other parties, gently straightening everything. In this case, you need to leave a small area, So that you can turn out the product.After you turned the edge, you should sew the site manually.

How to insert a zipper to a fur product?
This scheme is also suitable if you do not want to use the lining. You can make a gorgeous fur edge with lightning even easier!
- To do this, sew one part of the zipper between the two segments of the fabric
- Then sew this part to the fur, folding the products with the front sides of the product. That is, sew one part of the fabric to one side of the fur, and the other to the opposite. At the same time, the pile inside!
- Sew up one side part, turn and sew the second part from the side with your hands

How to make a fur edge on buttons or buttons?
If you want to make a removable fur edge, but you do not want to mess with lightning or this option is not suitable for you, then it is even easier to sew with loops.
- The hats are best suited as loops. The extreme loops should be located, retreating from the edge of 2 cm, provided that you left 1 cm for allowances.
- The distance between the loops can be determined by measuring the middle, and then put the tags at your discretion. The most optimal and convenient distance is 10 cm.
- The hat elastic should be cut into small pieces of approximately 3 cm, so that in the finished form the loop is 1 cm long.
- In order for the edge to be more magnificent and more voluminous, in addition to the lining, you can put a layer of insulation between the two layers. Squeezed insulation with a density of 200 gr. First you need to sew it to the lining, and then to the fur.
- The loops should be discouraged to the lining fabric, so you should first arrange the marks, and then attach the loops with clamps. Then sew them on a typewriter and cut off excess tails. After that, it is worth sewing the details, as well as in the case of lightning. And if necessary, sew the buttons to the hood.

How to make a fur edge sewn directly to the product?
The simplest ways were shown above to make a fur edge on the hood. But it can also be sewn without lining or sewn directly to the main product. Although these methods seem very easy, they have their own nuances. And the main minus - it will need to be sewn every time before washing.
- We take a segment 70 cm long. If you make two pieces, then look to When stitching, the pile looked in one direction!
- With this seam, putting our Mazra on the front side, we touch the middle of the hood. And we begin to sew a sewing seam, but working up and down, not in one direction! That is, they captured the skin, made a seam into the fabric, then, on the contrary, they captured the fabric, made a seam into the skin. This option is somewhat similar with a hidden seam when you only capture the edges of matter.
- We sew the edge of the one side, after which we cut off the extra segments, if any. We remind you that this can only be done from the side of the Mazra and a sharp blade. With scissors you will damage the pile itself!
- Next, we sew in the same way from all sides. The fur will close all the seams and possible irregularities.
Advice: If you want to make the edge more magnificent, then you can put the thin layer of synthetic winterizer for volume inside.

How to sew, make a fur edge of pieces, tails?
Yes, you can make a fur edge of ponytails or remnants of fur. You will spend a little more time, but the result will surpass all your expectations and efforts!
- We reveal our tails, as in the example, or smooth the available pieces. As a result, we should get even strips. For smoothing, we use Alastin solution.It is more convenient to use a sprayer for uniform spraying.
Important: Do not use ordinary water! After drying, the skin becomes very rough.

- Now we cut off pieces of skin or natural suede of the desired length, but No more than 1 cm in width! If you make a greater distance between pieces of fur, then in the end the edge will turn out to be a harmonica with creases in the transition sites.
- The example shows work with tails, but with any pieces the situation is similar! You sew a strip of fur, a strip of skin. And so alternate to the desired length (about 70 cm).
Important: When stitching the pieces, we pay attention that the fur should be in one direction!

Advice: If you do not have enough fur, then you can cheat a little - cut in half that have pieces or tails. And already sew them together, alternating with segments of fabric.

- After you cut off the desired width of the rectangle or simply cut off irregularities. And now insert a zipper, make loops or just sew onto the hood!
- If you have a thick and lush fur, then the lining can not be used. Bend the fur in half, Sew a segment of the fabric on both sides to a rectangle of fur. This segment can be from 0.5 to 1.5 cm in width. The longer the fur, the greater the segment, so that the lightning does not “burn” the pile at each opening.

- And already on these segments of the fabric sew the zipper. As if insert it between these segments of the fabric. Ideally, so that they are in the color of the upper product.