Make a spider with your own hands from a mastic for a cake, beads, fabric, cardboard, paper or other materials. It will turn out a funny and beautiful craft.
Content
- How to make a spider from mastic: master class for beginners
- DIY paper spider: scheme, photo
- Video: how to make a spider out of paper (Origami Spider)
- Spider Origami: Scheme, photo
- Video: Origami Spider of Paper
- Spider of plasticine
- Video: Spider of plasticine. Living plasticine | Video modeling
- How to make a spider out of beads?
- Video: Spider (Spider). Bisser -saving. Master Class
- How to make a spider of fabric?
- How to make a spider of threads?
- Video: Spider for the decor of the Halloween holiday. Putting from yarn.
- How to make a spider from foil?
- Video: Volga Spider
- How to make a spider of cardboard?
- How to make a spider out of gum?
- Video: a figure of rubber bands. Spider without a machine. Video tutorial No. 45 How to weave figures from elastic bands
- How to make a black spider?
- Video: Training: How to make a spider of plasticine?
For many people, Spider is the personification of something terrible and unpleasant. But in children, an association with a multiplier character is immediately taken about a person-beam. Therefore, for boys 5-8 years old, a cake with the image of this character and with black spiders around will be the best gift.
- Spiders can be made not only from mastic, but also from plasticine, paper, beads or fabric.
- This character will be a great decoration of Halloween or Birthday, if the birthday person loves spiders.
- Especially by the way, such a present will have to be a person who collects these insects made of different materials. But, and if he has a large spider of a rare appearance at home, then this gift will be remembered for life and will be stored in the most prominent place.
- So, let's start with little breakdown. Congratulate your son and make him a cake with your own hands with mastic - it's simple and fast. Read step by step instructions in this article.
How to make a spider from mastic: master class for beginners
For Spider-Man himself, you can buy color confectionery sprinkling. Make the contour ordinary chocolate icing, and a suit made of red and blue balls of sprinkle. Spider and some other decorative elements make from mastic. Inside them, you can put a yelch candy - this will be a great surprise for children. How to make a spider from mastic - a master class for beginners:
This is what the cake will look like in the end. But you can make spiders in your own way, a little imagination and the original and delicious masterpiece is ready!

First draw a spider on paper. According to this sketch, it will be convenient to sculpt from mastic.

Now follow the following:
- Buy in advance in a confectionery store mastic from Marshmallow black The size of an egg, as well as 4 pieces of jelly sweets.
- Divide the mastic into 4 parts.
- Divide each part into 4 more parts (2 - torso, 1 - head and 1 - legs). Roll one part into a cake, as if on dumplings. Put the candy in it and form a voluminous ball. From the other two parts, make two smaller balls for the head and the second part of the body.
- Combine all parts of the body together. In order for them to stick well to each other, you need to lubricate with confectionery glue - this is sugar syrup, welded from a tablespoon of sugar and 10 grams of water.
- Do this with the rest of the spider.
- Then divide the remaining 4th part of each spider by another 4 parts and roll out thin sausages - These will be the paws of the spider. Divide these sausages into 8 parts, form your paws and glue it to the body with confectionery glue.
- Do this with every spider. If you have small crumbs or pieces of mastic, then you can make a jaw on the head, if not, then you can do without them. Eight legs will be enough, because we have a real spider.
Tip: if you have few black mastics or you found only a marching marial marshmallow, then make such cookies from cookies. The filling is any cream with the addition of food dye, and the eyes are glazed sweets.
Set such spiders on the cake or serve separately - childhood delight and admiration will not be limited.

DIY paper spider: scheme, photo
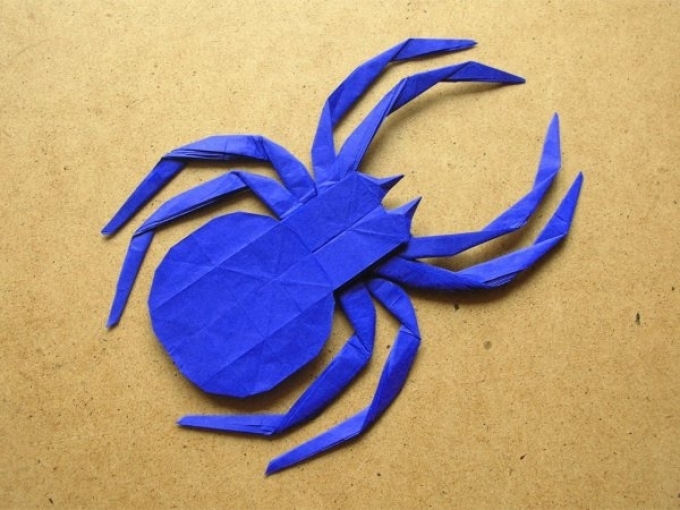
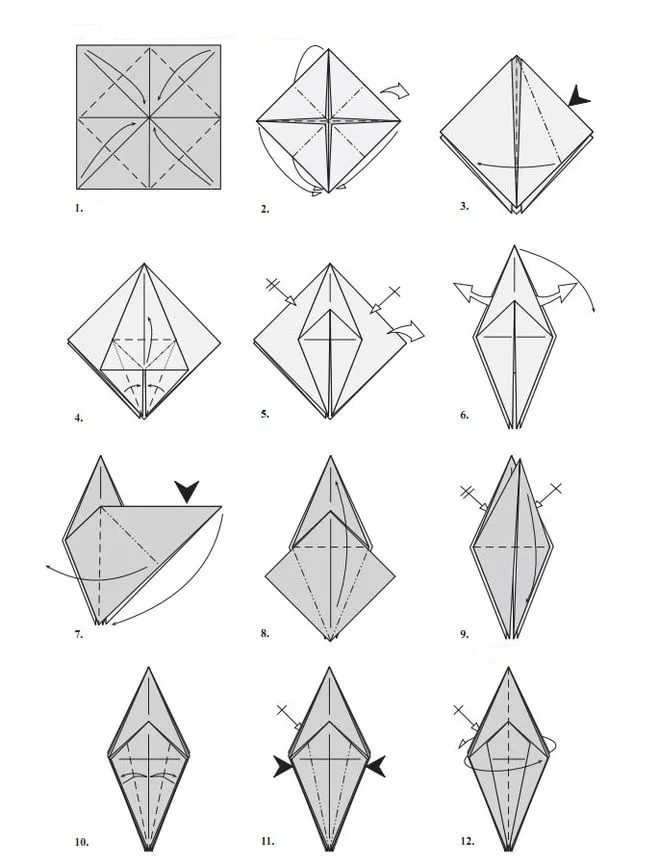
Crafts from paper are delighted with their beauty. To create them, patience, perseverance and a little skill are required. Our schemes and photos will help to make a pretty spider from paper with your own hands. Follow all stages and you will get a real spider that can be presented to a friend or a friend or just put in a prominent place in the house. The admiration of the guests will not be limited! We start from the 1st to the 12th step:
- Take a square sheet of paper, and fold the corners to the center - along the diagonal lines.
- Then bend it as shown in the diagram.
- Bend the right angle to the left, and the bottom is upstairs.
- Do the same with other three parts of the workpiece.
- Pull the inner layer outward.
- Bend the corner inside.
- Expand it.
- Turn up.
- Bend the upper angle, and repeat the manipulations with the 9 remaining parts of the workpiece.
- Bend as shown in Figure 10, and then bend.
- The sides to which the black arrows show are inward. Make the back side as well.
- Turn the workpiece and repeat.
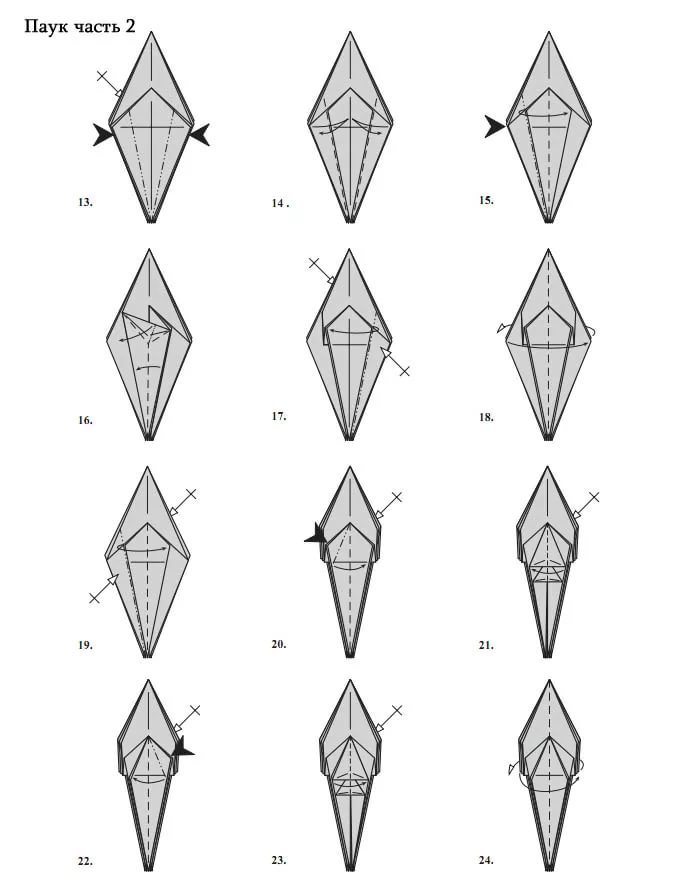
Continue from the 13th step in the figure on the 24th:
- Fold inside on both sides.
- Bend and intertwine in the direction indicated by the arrows.
- Fold the right.
- Fold the middle to the left side to the level shown by the first arrow to the second arrow.
- Repeat with other sides.
- Turn over.
- Repeat on the rest of the sides.
- Fold the corner to the right in front and behind.
- Bend and repeat the lower corner.
- Fold the upper corner to the left and also do behind.
- The angle indicated by the arrow indicates to the right and repeat from the angle behind the workpiece.
- Turn the workpiece over.
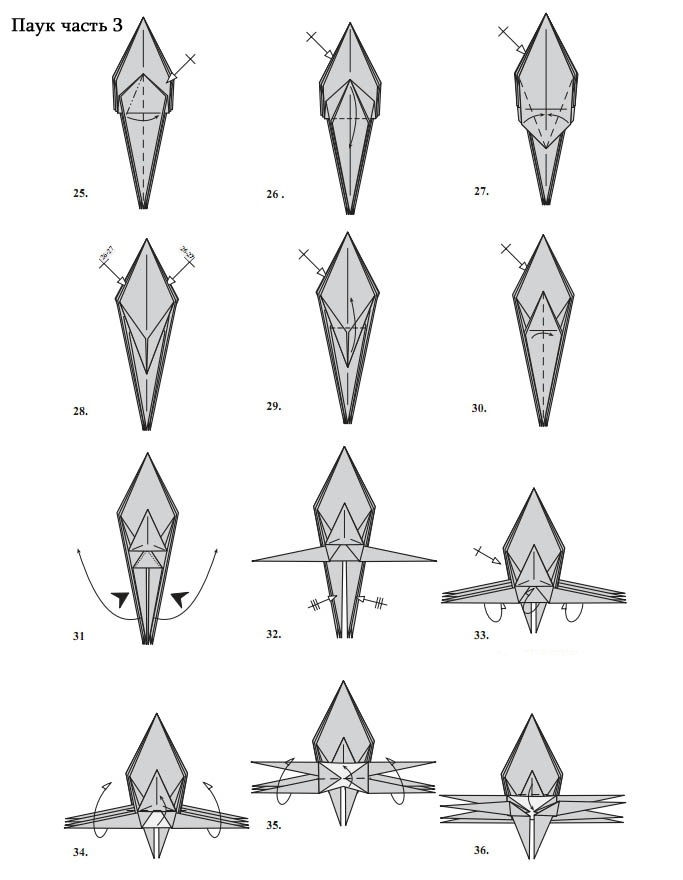
Continue in steps 25-36:
- Fold the next corner and repeat the procedure from behind.
- Bend the corner downward. Do it also from behind.
- Bend part of the workpiece on both sides to the middle.
- Repeat one more time.
- The angle located in the middle, bend it up.
- The figure was already similar to a spider. Bend its left corner to the right. Also do behind.
- Take the resulting paws of the spider to the sides.
- Do the same with other paws.
- Pull the layer as shown in the diagram and expand. Also do behind.
- The resulting elements, as in the figure, bend up.
- Once again up.
- If everything is done correctly, then the corner will be below.
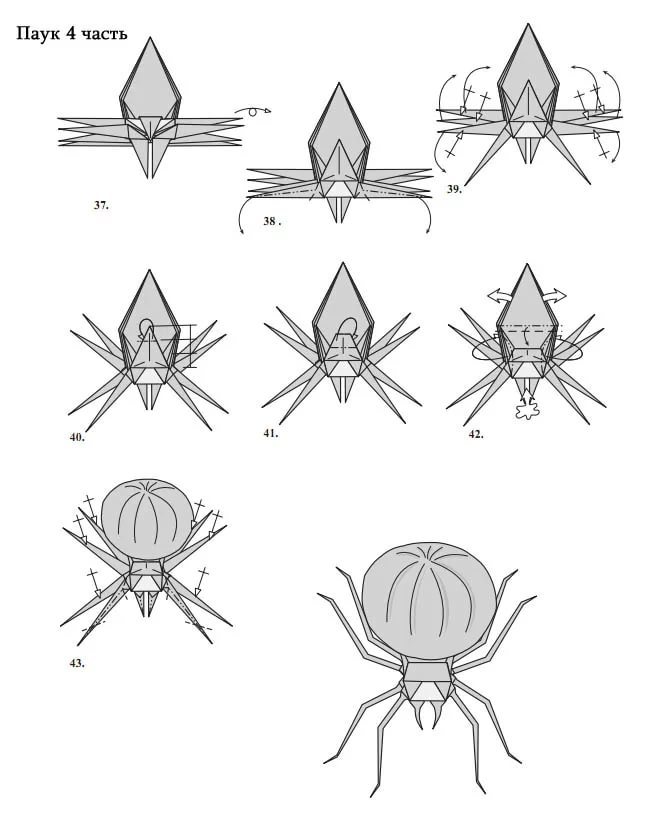
The last part of the craft:
- Turn the spider over.
- Make your jaws.
- Distent paws to the sides.
- Bend them back.
- Bend back the corner again.
- High up inside the body of the spider so that it straightens and pouts.
- Bend the paws so that they look natural.
- Spider is ready!
Watch the video how you can make another spider, but also very original and beautiful. Such a craft can be done with the child - it will be fascinating and funny.
Video: how to make a spider out of paper (Origami Spider)
Spider Origami: Scheme, photo
Many people are fond of origami technique - this distracts from the fuss and helps to relax. Psychologists advise doing such crafts after a working day. If you do them with the whole family, then this brings together. It is simple to perform spider in the technique of origami. Photos and scheme from 1st to 7th stage:
- Prepare a square sheet of paper. Fold it with "accordion." Cut the corners as shown in the figure.
- Wrap the corner first up, then down.
- Wrap the corner to the left, as the arrow shows.
- Turn the bottom of the workpiece to the top.
- Wrap the corner from the bottom up.
- Do this with each resulting corner of the workpiece.
- Fold all the corners by the middle that are shown by arrows.

Scheme from 8th to the 19th stage:
- Remove the upper corner to the left.
- Then turn the resulting parts to the middle, as shown by arrows.
- Do it also from the back.
- Front corners wrap up.
- Fold the upper front part.
- Now wrap it up.
- From 14 to 19, fold all small details, as the arrows show. The dashed line is the bending line.

Completion of work:
- Expand the workpiece 90 degrees, and begin to bend along the arrow, making the paws of the spider.
- Wrap the corners to the top.
- Wrap the corner of the future head down.
- From 23 to 28, make the paws. So that they are thin and seem natural, turn them inside. Do this with each paw.
- Spider is ready!

The video below shows how to make another spider using the original technique.
Video: Origami Spider of Paper
Spider of plasticine
Modeling plasticine helps children develop motor skills. Accordingly, the baby begins to think, he develops creative abilities and the ability to think creatively. Blind the spider of plasticine with the baby - this is easy, simple and fast. Prepare plasticine of any color that you like, and a slightly different color (for example, yellow) for the eyes. Stages of execution:

Roll one large ball - for the head and eight small ones - for the legs.

On a large ball, draw a smile with stack, and attach eyes from yellow plasticine. From small balls, roll sausages - these are future legs.

Bend the paws in the form of digits 2 and stick them to the head - 4 on one side and 4 on the other.

With the help of the same stack, decorate the paws. Get your eyes using a little black plasticine and jaws of white plasticine.

Such a spider and this sculptor will like your baby. Next time, he will be able to make a spider on his own.
Video: Spider of plasticine. Living plasticine | Video modeling
How to make a spider out of beads?
To see a spider in the house, since ancient times, was considered a good sign. In the morning - to wealth, during the day - a good fate, in the evening - to a gift. But now do not start real spiders. Make an original bead spider. He will decorate your home and attract happiness.
You will need:
- two beads of any color - for the head and body;
- black beads - jumpers on the paws;
- long glass of red - the paws themselves;
- two blue beads for the eyes;
- one beads in the color of the beads of the body - for the tail;
- wire.
Instructions:

- Prepare 1 meter of thin wire. Drive one bead, which is the color of the body, and place it exactly in the middle.
- Then fold the wire and already on its two ends put on a large bead of the body.
- Divide the wire, and begin to wear beads and glass for creating the legs, as shown in Figure B.
- Propes the wire back in the first foot and make a second foot on the same principle.
- Continue so until you get 4 legs on one side. Do the same on the other side. As a result, there should be 4 paws on the one hand and 4 on the other.
- Now pass the two ends of the wire into the bead for the head. Divide the ends and put on the blue beads - the eyes turned out.
- Twist the wire with the help of round -liners and cut.
- The spider is ready. Spread and bend the paws so that they look natural.
When you learn to weave such a simple spider from beads, go to more complex models. A detailed description in the video.
Video: Spider (Spider). Bisser -saving. Master Class
How to make a spider of fabric?
Few people know how difficult it is to contain a spider at home. But many children and even adults want to have this exotic pet. So that the baby does not ask the parents of such a friend, you can sew for him a spider made of fabric - cute and funny.
Making a spider from fabric is simple. Prepare the following:
- a little black fur;
- dark knitwear;
- eye beads;
- decor in the form of socks.


The socks can be crocheted or sewn from fabric of different colors. The result is a toy that will be loved for your baby. To sew a spider, follow the stages:
- Cut the 2 parts of the body, sew, leaving a short period so that you can fill with synthetic winterizer or cotton.
- Cut the eyes of white knitwear and pull it with a thread along the edge. Follow with cotton wool, and sew it to the body.
- Fold the legs in half and sew. Insert the wire inside. Sew the legs to the body and bend for naturalness.
- For socks you can take any bright fabric. Hide 16 parts, sew and put on the legs.
- With the help of white threads, make a mouth. Spider is ready!
Sewing a spider of fabric is quickly and easy. You can come up with your toy model. It can consist of the body and head, only one torso, jaws and different decorative elements. The legs in the amount of 8 pieces must be made flexible so that you can bend. After all, the real spider has exactly the same.
How to make a spider of threads?
A spider of threads consists of a pompon, legs with wire and two eyes. How to make a spider of threads so that it turns out funny and beautiful? Prepare the following materials:
- a little black yarn;
- wire for the legs;
- beads for the eye.

Make a pompom of yarn: wind the threads on the palm or cardboard cut at the edges. You can wind the yarn on the plug on the spider. Pull the thread and tie it. Cut along the edges - the body of the spider turned out.

Wash the threads of the same color from which you made the body to the wire. Attach the paws to the body. Sew two beads to the eye.

The result was an interesting toy that will decorate any extravagant interior. You can give such a spider made by yourself.
Video: Spider for the decor of the Halloween holiday. Putting from yarn.
How to make a spider from foil?

Foil is an improvised material that is in every house. It costs inexpensively, and you need only 20 cm per spider. Such a craft will decorate the interior in your house. It can be attached to the picture, tulle or curtain. So, how to make a spider from foil?
Prepare foil and scissors. Next, follow the stages:
- Cut 20 cm from a food foil roll.
- Tear off or cut four stripes of 5 cm along the entire width of foil. These are future spider paws. The rest will be the body.
- To make the paws, you need to roll each strip with a sausage.
- Then do this with each strip. Fold all the resulting paws on the trunk for the body so that future legs protrude around the edges.

Now turn the body so that it covers the legs. In doubt the foil and form a spider paw.

Watch the video how you can still make a spider from foil. The master shows clearly how to form a body and legs.
Video: Volga Spider
How to make a spider of cardboard?
To make a spider, it is not necessary to specially buy materials. You can make a craft from an old cardboard box. Cut a piece of cardboard and draw a workpiece with a felt -tip pen.

- Then pass the thread from above the head using a needle. This is necessary so that the spider can then be suspended and decorated with the interior.
- On one side of the workpiece, apply glue over the entire surface of the cardboard.
- Glue cotton with a small layer onto a layer of glue, but so that parts of the spider on the paws and torso are released.
- Also do with the other side of the workpiece.
- Now prepare a solution with black paint. Such paint can be bought at any craft store.
- Dip the spider in the solution and hang dry.

When the paint dries, the craft will be ready. You will get a great attribute for Halloween. Now you know how to make a spider from improvised materials, for example, cardboard.
How to make a spider out of gum?
Almost every girl was fond of weaving from elastic bands. From them it was possible to make a bracelet, a ring, and the most resourceful figures of animals or insects. It will not be difficult to make a spider out of gum, and the toy will turn out to be similar to a natural insect. It will be possible to scare a friend or give him such a craft for memory. Stages of performing a spider on a special machine for elastic bands:


- First weave the legs without a crochet on the hook.
- Attach the beads to two elastic bands and put on the machine. Throw the elastic bands along the contour and in the center so that the spider turns out to be dense.
- For the abdomen, throw down from the head in the center, left and right edges.
- Then weave the figure, hooking the bottom layer with a hook. Throw the gum forward, clinging the blanks of the legs.
- Make a loop, tighten and remove the finished figure.
The video shows how to make a spider of elastic bands without a machine. If you only learn weaving, then use this method.
Video: a figure of rubber bands. Spider without a machine. Video tutorial No. 45 How to weave figures from elastic bands
How to make a black spider?

If you want to make a craft for a child, then it is better to perform it with the addition of bright material. If you need to give a spider to a friend who already live at home tarantulas or poultry houses, then it is better to make a black spider. It will certainly turn out, like a real one - formidable, frightening in appearance, but completely harmless.
Such a craft can be made of rubber bands, beads, paper, cotton yarn, which can then be painted or even plasticine. Choose the material that you like and create a real masterpiece of your skill.