

The European tradition of making cards has more than one hundred years. A postcard made by personally is a great way to show another person how he is dear to you and how you appreciate everything that he has done.
Especially such a sign of attention is necessary for people who have passed the hell of war. The article: an overview of available techniques and materials, ideas, master classes, tips for creating postcards by May 9.
Content
- Symbols of the holiday
- How to make a clove for a congratulatory postcard?
- Cards for veterans for May 9 for children with their own hands
- How to make tulips in the technique of origami for a congratulatory postcard for May 9?
- Volumetric cards for May 9
- How to make a voluminous star for decorating a congratulatory card, a template?
- Cards by May 9 with your own hands "Star"
- How to make a pigeon in the technique of origami for designing a postcard "pigeon of the world"?
- Origami postcards for May 9 "Dove of the World"
- Card-Conduct for May 9
- Cards Triangle by May 9 with your own hands
- Light cards for May 9 with your own hands
- Postcard application by May 9
- Cards by May 9 with your own hands templates
- Cards for May 9 with your own hands scrapbooking
- Video: Hand Made Postcard on May 9 "Victory Day"
- Video: Hand Made Photo Comination by May 9 "Veteran"
- Video: Hand Made Postcard-Flag "Happy Victory Day!"
Symbols of the holiday
Symbols of Victory Day are considered
- the number "9"
- cloves. Florists consider cloves a male flower. This is a symbol of courage, courage, victory. In many pre-Christian cultures, cloves were a male flower
- tulip. The flower symbolizes pride and happiness, glory
- salute. The first victorious salute of 30 volleys was given in the evening of May 9, 1945. Since then, the tradition of holding a salute in honor of Victory Day remains unchanged
- a five -pointed Red Star is a heraldic symbol of the Soviet Army. For postcards, the image of a star in gold colors is often used
- dove - a bird carrying the world on its wings
- thematic images related to the period of the Great Patriotic War
- the song "Victory Day"
- letters-triangles
- eternal flame
- modern symbol - St. George ribbon
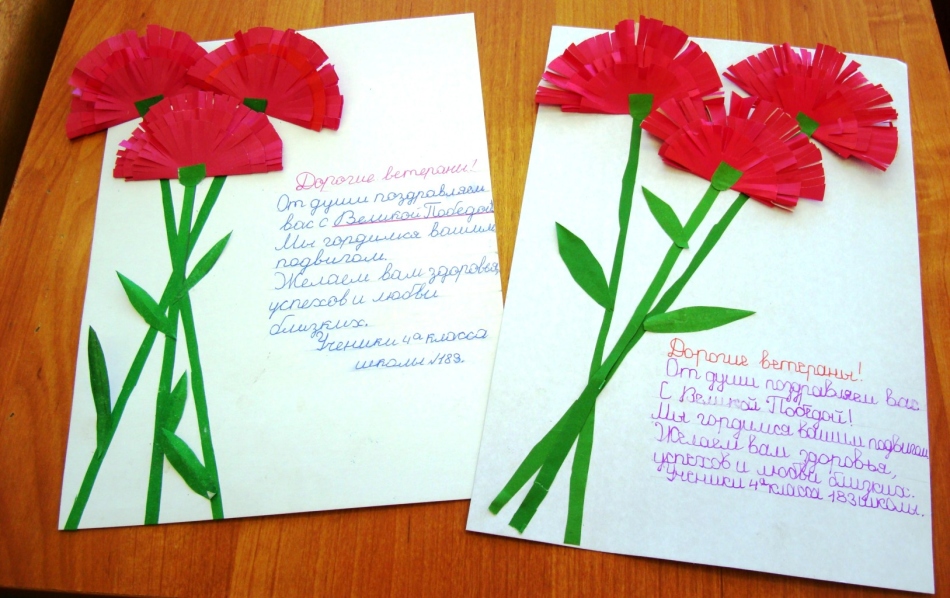
How to make a clove for a congratulatory postcard?

A postcard with a bouquet of scarlet carnations and words of gratitude for a long time warm the heart of your addressee
Below are two options for creating paper cloves
Option 1
Necessary materials:
- A three -layer red napkin
- Scissors
- Threads
Important: from one napkin it can be obtained 8 flowers with a diameter of 7 cm
- Take a napkin and carefully tear off the thin strips (up to 5 mm) from each edge along the perimeter of the napkin
- Fold the resulting square with “shaggy” edges in half and make a bend. Torn the square into two parts along the fold line. You should get 8 identical rectangles
- Fold each rectangle with an accordion. Fasten the center in any available way: using a thread, wire or paper strip
- Gently relax each layer of napkins, raising the forming petals up, forming a flower

Option #2
Necessary materials:
- Corrugated/strength or colored bilateral paper for a flower of preferably red shades
- Green colored paper for the stem and leaves
- Dense colored cardboard for the background
- Glue or stapler
- Ordinary or curly scissors

How to do:
- Cut circles from paper. The diameter of the circle depends on the size of the postcard and may vary.
If you use
- colored paper-you need 3-4 circles
- corrugated paper-5-6 circles
The splendor of the finished flower depends on the number of circles and the density of the paper

- Drop a drop of glue into the center of one of the paper circles, put the next circle on it, slightly press the gluing. Similarly, glue all the circles. And you can go in a simpler way and fasten the circles with the help of an ordinary stationery stapler
- Fold the glued stack in half. You will get a semicircle. Fold the semicircle in half again

- Make cuts with sharp scissors. Direct direction: from edge to center

- Expand the workpiece. So you get a loose flower. You will receive a half -elated bud if you leave the workpiece of the folded

- Cut the stalks with a cup and leaf from green paper


- Lay out the stem and flower on the sheet-one, creating the desired composition
- Glue the details to the leaf-one. Gently flush the paper petals, forming the head of the flower. Your clove is ready. So you can create a bouquet of 3-5 colors

Cards for veterans for May 9 for children with their own hands
To make a wonderful card using paper cloves and several additional elements, for example, the St. George ribbon, is quite simple. But such a postcard looks very festive and solemn

How to make tulips in the technique of origami for a congratulatory postcard for May 9?
Step 1. Make the base model of origami - a triangle. Focus on the scheme and explanations in the figure

Step 2. Start folding the bud

Step 3. Form the petals of the future tulip

Step 4. Design of the finished flower in the technique of origami

As a stalk, you can use tubes for a green cocktail. The leaves of the plant can be made of green paper.
Volumetric cards for May 9
A do -it -yourself postcard accumulates the energy of its creator in itself and gives many pleasant emotions to the recipient

How to make a voluminous star for decorating a congratulatory card, a template?
- Print a color or black and white template. You can print a b/b option directly on colored paper

- Cut the star and carefully squeeze the fold lines with a sharp tip of toothpick. Bend the lines, focusing on the diagram below

Cards by May 9 with your own hands "Star"
In the photo below are examples of the design of the postcards "Star"
A postcard may be accompanied by congratulatory text. For example, such poetic lines:
On the Great Day, on Victory Day
We want to wish you:
More happiness, more laughter
And fight less.
More peace in your house
And, of course, do not get sick.
More sun, more colors
And do not grow old with the soul!


How to make a pigeon in the technique of origami for designing a postcard "pigeon of the world"?
A step -by -step scheme with explanations will help you create an elegant paper dove, which will decorate both a festive postcard and a thematic craft


Origami postcards for May 9 "Dove of the World"
Below is the idea of \u200b\u200bdesigning Origami postcards and crafts for May 9

Card-Conduct for May 9
A step-by-step photo instruction will help create an unusual postcard-convert

Cards Triangle by May 9 with your own hands
Writings-triangles are also symbols of the past war. How much happiness and hope they brought! How they were waiting for them in every house!
A postcard stylized under a three-triangle letter will become a symbol that the modern generation remembers the exploits of the victorious heroes.
- Before starting to create a postcard, think about what will be contained in your letter. The text of the letter can consist of poetic lines, words of gratitude, etc. Write the text (it is better if you do it yourself) and only then proceed to the design of the triangle
- Put a sheet with the written text filled up and fold one of the corners of the sheet in half. Thus, the text will be inside the folded sheet

- Make a double triangle, folding the resulting large triangle in half

- Wrap up the lower corners of the rectangular part of the letter

- Turn the resulting wedge in a triangular pocket

- Garnish a triangle letter with decorative elements

Light cards for May 9 with your own hands
The version of the postcard proposed below is very light and very symbolic. A salute created by children's hands is not only a tribute to memory, but also an invisible connection between generations
1. Take a sheet of watercolor paper. Using a conventional paraffin candle, apply a line and strokes on a sheet in random order. Paint the sheet with multi -colored watercolor. Let the watercolors dry

2. Circle your palm with open fingers and cut it out. Prepare a blue von-Osnov (evening sky) and small squares of bright multi-colored paper

3. Glue a colorful palm to the base. Each of the squares doubt the colored lump

4. With the help of paper lumps, make fireflies of salute, decorate the card with decorative elements

Postcard application by May 9
For postcards, all of the above thematic images are used


Cards by May 9 with your own hands templates
To create postcards, you can use the elements of thematic coloring


Cards for May 9 with your own hands scrapbooking
The fashionable direction in needlework - scrapbooking - allows you to create individual and very beautiful things. A little fantasy, printed photos or documents of the war years, several decorative elements and a wonderful postcard is ready


The video at the end of the article will tell you not only the secrets of work in the Scrapbooking technique, but also several ideas for creating a small masterpiece

Super