DIY Baby Book for kindergarten, school. Developing book for the smallest with their own hands, for children from 1 year old

DIY Baby Book for kindergarten, school. Developing book for the smallest with their own hands, for children from 1 year old

How to sew a book for the smallest, for schoolchildren. Book Baby of Paper.

For a needlewoman, the appearance of a baby is an additional incentive for creativity. Unknown edges of needlework. Even if earlier the craftswoman did not work with these materials, she will be happy to take up a new project: she will master a new type of needlework, plus will create a unique thing for her small treasure.

Developing book for the smallest with their own hands from felt: step -by -step instructions

The baby is almost six months. Many parents know that knowledge in moderate proportions should begin to be given not in preparation for school, but as soon as the baby began to study the world around him with pleasure. Do not be alarmed if the baby wants to “tear and throw” a new book, the child learns the world initially tactfully, and only then visually.

In order to create a felt book for the baby, it will take a little free time (when creating the first book, it may take days, but you will most likely do in the second or third in just a couple of hours).

We are for the master class, and you need to create a book: to create a book:

  • Felt, all kinds of colors, both in the cut and in pieces for small details
Developing book for the smallest with their own hands from felt: blanks
  • Threads, also all kinds of colors, since it will be necessary to sew both in the tone of the felt and with contrasting logs
  • All kinds of sewing accessories: beads, lightning, buttons, buttons, etc.
  • Ribbons, ribbons, lace
  • Sewing machine or crazy handles with love for manual sewing
  • Clothes and curly scissors

We begin to create a creation

The first page "Mouse and cheese":

  • From the yellow felt we cut out a square 12*12 cm and duplicate one more
Developing book for the smallest with their own hands from felt: Step 1
  • We take out a coin from the wallet and circle the mug of each
Developing book for the smallest with their own hands from felt: Step 2
  • We arrange with a zigzag or sheathe hands (then we will only indicate the machine)
Developing book for the smallest with their own hands from felt: Step 4
Developing book for the smallest with their own hands from felt: Step 3
  • Cut the circles, leaving one small -cut small size
Developing book for the smallest with their own hands from felt: Step 4
  • We attach to the second square our "leaky"
Developing book for the smallest with their own hands from felt: Step 5
  • From white fabric we cut a page in size 23*23 cm
Developing book for the smallest with their own hands from felt: Step 6
Developing book for the smallest with their own hands from felt: Step 7
Developing book for the smallest with their own hands from felt: Step 8
  • We place our 2 pieces of felt on a white “page” and sew a zigzag on a typewriter
Developing book for the smallest with their own hands from felt: Step 9
Developing book for the smallest with their own hands from felt: Step 10
  • Cut the mouse from paper
Developing book for the smallest with their own hands from felt: Step 11
  • Transfer to gray or pink felt and cut out
Developing book for the smallest with their own hands from felt: Step 12
  • We sew it to the page, where we sew the eyes of the black beads
Developing book for the smallest with their own hands from felt: Step 13
  • Instead of a tail - a ribbon
Developing book for the smallest with their own hands from felt: Step 14
Developing book for the smallest with their own hands from felt: Step 15
Developing book for the smallest with their own hands from felt: Step 16
  • On the second tip of the ribbon, string a pair of large beads and sew it as in the photo
Developing book for the smallest with their own hands from felt: Step 17
  • The first page is ready!
Developing book for the smallest with their own hands from felt: Step 18

The second page "Apple tree":

  • Cut the tree from paper (circle or print)
Developing book for the smallest with their own hands from felt: Step 19
  • We circle the felt and cut out
Developing book for the smallest with their own hands from felt: Step 20
  • We cut the new white page of size, like the first
Developing book for the smallest with their own hands from felt: Step 21
  • Sew the green part of the tree - crown
Developing book for the smallest with their own hands from felt: Step 22

  • We sew our pillar
Developing book for the smallest with their own hands from felt: Step 23
Developing book for the smallest with their own hands from felt: Step 24
  • We take five buttons and sew the randomly
Developing book for the smallest with their own hands from felt: Step 25
  • Figure scissors cut apples from red felt
Developing book for the smallest with their own hands from felt: Step 26
  • We take gray/brown narrow ribbons/laces cut off five segments 2 cm
Developing book for the smallest with their own hands from felt: Step 27
Developing book for the smallest with their own hands from felt: Step 28
  • Sew the second part of the buttons to apples
Developing book for the smallest with their own hands from felt: Step 29
Developing book for the smallest with their own hands from felt: Step 30
Developing book for the smallest with their own hands from felt: Step 31
Developing book for the smallest with their own hands from felt: Step 32
  • The second page is ready!

Third page "Accounts in the bag":

  • A piece of felt and 5-6 colorful beads of different colors and textures
Developing book for the smallest with their own hands from felt: Step 33
  • On a dense thread or lace, string the beads and sew along the felt
Developing book for the smallest with their own hands from felt: Step 34
Developing book for the smallest with their own hands from felt: Step 35
Developing book for the smallest with their own hands from felt: Step 36
  • We take a contrasting color fabric (we have pink) and cut out a square 28*28 cm. We draw a circle with a diameter of 8 cm in the center
Developing book for the smallest with their own hands from felt: Step 37
  • We open the corners
Developing book for the smallest with their own hands from felt: Step 38
  • Pick up and sew so that you can put the tape
Developing book for the smallest with their own hands from felt: Step 39
  • We find the middle of the page, fasten the fabric and add a circle of 8 cm to the page. Tighten the lace into the edges
Developing book for the smallest with their own hands from felt: Step 40
Developing book for the smallest with their own hands from felt: Step 41
Developing book for the smallest with their own hands from felt: Step 42
Developing book for the smallest with their own hands from felt: Step 43
  • Sure beads chaotically at the edges
Developing book for the smallest with their own hands from felt: Step 44
Developing book for the smallest with their own hands from felt: Step 45
  • The third page is ready!
Developing book for the smallest with their own hands from felt: Step 46

The fourth page of "God's cow"

  • We take white braid, a little zipper and felt red and black
Developing book for the smallest with their own hands from felt: Step 47
  • On black, cut a circle with a diameter of 10 cm
Developing book for the smallest with their own hands from felt: Step 48
  • We also make a semicircle "muzzle" for God's cow
Developing book for the smallest with their own hands from felt: Step 49
  • From the red felt we draw a circle with a diameter of 10 cm and cut it also in half
Developing book for the smallest with their own hands from felt: Step 50
  • Duplicate from a bright color lining the same 2 halves
Developing book for the smallest with their own hands from felt: Step 51
Developing book for the smallest with their own hands from felt: Step 52
  • We cut out 6 small circles from black felt
Developing book for the smallest with their own hands from felt: Step 53
  • We sew up to the wind and lining lightning
Developing book for the smallest with their own hands from felt: Step 54
  • Sew the mugs on the red felt
Developing book for the smallest with their own hands from felt: Step 55
  • On a dark felt we apply lace and sheathe
Developing book for the smallest with their own hands from felt: Step 56
Developing book for the smallest with their own hands from felt: Step 57
Developing book for the smallest with their own hands from felt: Step 58
  • We put the braid and sheathe
Developing book for the smallest with their own hands from felt: Step 59
Developing book for the smallest with their own hands from felt: Step 60
Developing book for the smallest with their own hands from felt: Step 61
Developing book for the smallest with their own hands from felt: Step 62
  • We string the beads on 6 ribbons and sew the “paws”, sew 2 more ribbons to the head of the ladybug
Developing book for the smallest with their own hands from felt: Step 63
Developing book for the smallest with their own hands from felt: Step 64
  • We sew it to the page and she is ready!

Fifth page "Butterflies"

  • This page is a butterfly in a clearing. We will need to work a butterfly (can be bought in the fittings or removed from the hairpins), chiffon or organza, small beads, ladybugs and other small attributes for the clearing
Developing book for the smallest with their own hands from felt: Step 65
  • We cut off a new page and a piece of chiffon protruding by a page for 1 cm on each side
Developing book for the smallest with their own hands from felt: Step 66
  • Draw "waves" and stitch/embroider fantasy patterns
Developing book for the smallest with their own hands from felt: Step 67
  • Between the page and the chiffon turned out to be a wave -shaped gap, we fill it with a variety of fittings and insure the edges
Developing book for the smallest with their own hands from felt: Step 68
Developing book for the smallest with their own hands from felt: Step 69
Developing book for the smallest with their own hands from felt: Step 70
  • We sew the butterfly and beads on the upper corner
Developing book for the smallest with their own hands from felt: Step 71
Developing book for the smallest with their own hands from felt: Step 72
Developing book for the smallest with their own hands from felt: Step 73
  • We process the edges of the page and it is ready!
Developing book for the smallest with their own hands from felt: Step 74

Sixth page "Rainbow and Sun"

  • We cut a page and again a chiffon or organza slightly protruding beyond the edges of the page
Developing book for the smallest with their own hands from felt: Step 75
  • Cut the blue cloud and sew
Developing book for the smallest with their own hands from felt: Step 76
  • Cut the sun and rays, also sew on top of the chiffon
Developing book for the smallest with their own hands from felt: Step 77
Developing book for the smallest with their own hands from felt: Step 78
Developing book for the smallest with their own hands from felt: Step 79
Developing book for the smallest with their own hands from felt: Step 80


  • In a circle, the sun sew firmly paces of gold color
Developing book for the smallest with their own hands from felt: Step 81
Developing book for the smallest with their own hands from felt: Step 82
Developing book for the smallest with their own hands from felt: Step 83
Developing book for the smallest with their own hands from felt: Step 84
  • We sew a few rows from the cloud as in the photo with beads "droplets of water"
Developing book for the smallest with their own hands from felt: Step 85
  • Embroider a rainbow with bright threads
Developing book for the smallest with their own hands from felt: Step 86
Developing book for the smallest with their own hands from felt: Step 87
Developing book for the smallest with their own hands from felt: Step 88
Developing book for the smallest with their own hands from felt: Step 89
  • We sew a bunny or any other animal that you will find in your blanks. From the tape you can make decoration a bow for a bunny
Developing book for the smallest with their own hands from felt: Step 90
  • The page is ready!
Developing book for the smallest with their own hands from felt: Step 91

Seventh page "Forest in the fall"

  • Cut the page and begin to sew the application
Developing book for the smallest with their own hands from felt: Step 92
Developing book for the smallest with their own hands from felt: Step 93
  • According to the template, we cut out a hedgehog, mushroom, tree trunk, tree crown and leaves from the felt of the hedgehog.
Developing book for the smallest with their own hands from felt: Step 94
  • We sew everything on the page, sew a few beads on the branches
Developing book for the smallest with their own hands from felt: Step 95
Developing book for the smallest with their own hands from felt: Step 96
Developing book for the smallest with their own hands from felt: Step 97
Developing book for the smallest with their own hands from felt: Step 98
Developing book for the smallest with their own hands from felt: Step 99
Developing book for the smallest with their own hands from felt: Step 100
Developing book for the smallest with their own hands from felt: Step 101
Developing book for the smallest with their own hands from felt: Step 102
  • The page is ready!

Assembly:

  • The first page can be any. To each page we sew a wide tape on the left side
  • With the same tape we framed all the pages around the perimeter, to give stiffness
  • We conjure the ribbons sewn on the left side to get a book, weak with an iron and hasten to give our child!
Developing book for the smallest with their own hands from felt

DIY Baby Book for a kindergarten from fabric

For a nursery group, soft books are often asked. If you like to do something with your own hands, then such a book can be created by yourself.

DIY Baby Book for a kindergarten from fabric

Be sure to keep in mind that such books instill that very love for books for the rest of their lives. They should cause vivid emotions, the plot is interested, and there should also be a desire to touch the pages, for the complete perception of the plot according to the age.

DIY Baby Book for a kindergarten from fabric: Watch

The manufacturing process is as simple as possible:

  • We take cotton rectangles in size 12*22 cm (each page in this case will be 10*10 cm)
  • We sew applications on them, depending on the subject of the book, taking into account that 1 cm should remain at the edges and in the middle of 1 cm not touched
DIY Baby Book for kindergarten from fabric: Cosmos
  • Next, fold the 2 rectangles (the total should turn out 4 pages) between them we lay a thin synthetic winterizer 10*20 cm, bend the edges and sew
  • So we fold a few rectangles, but we recommend in a total of 8 to 12 pages, then they simply will not close
DIY Baby Book for kindergarten from fabric: garden and score
  • The last step - we fold with a pile and stuck in the middle “sewing” the book among themselves into a single whole
  • If desired, you can make a fastener with a button
DIY Baby Book for a kindergarten from fabric: Seasons

DIY Soft, developing book of home -made book: Patterns

Inspiration is good, but it needs to be drawn somewhere. Below we have placed a lot of examples and templates for patterns of books-boys.

DIY Soft, developing book of home -made book: Patterns

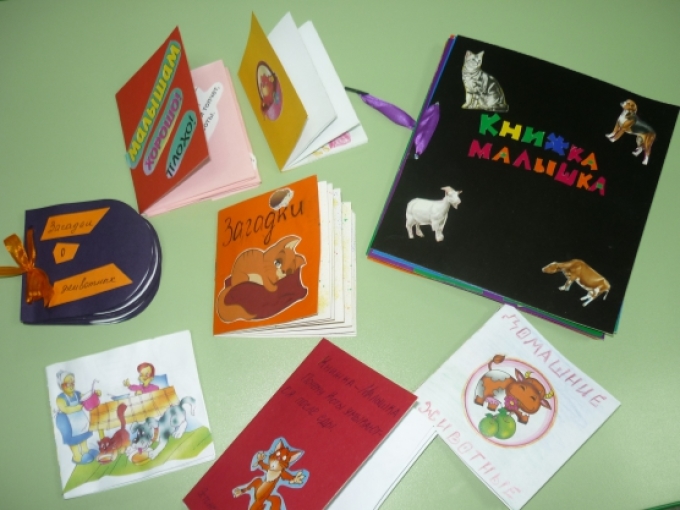
How to make a book with your own hands from paper?

Do -it -yourself book is not just a masterpiece, it is incomparable energy, as well as the ability to create a unique work for your child.

We propose to create two options for a paper book for younger and older children.

Book in the box

To create it, you will need a dense sheet of paper or a thin cardboard of A4 format, a small finished box (from under hours, jewelry or other), decoupage paper, printed or painted variegated thematic pictures.

How to make a book with your own hands from paper
  • We come up with the plot, we decide how many pages in the book will be
  • We cut the sheet in this way: the height of the sheet is equal to the height of the box -1 cm, the width of the sheet is equal to the number of pages, while the page width is equal to the width of the box -1 cm
  • We bend the sheet as many times as the pages should turn out, if it is cardboard, then by the fold on the back of the ruler, draw a sharp tip of the circul or back of the clerical knife
  • We glue the application, sign the pictures
  • We glue the first and last page to the box, which we pre -decorate
  • The book is ready!

A book for a schoolgirl

Babies first -graders are very fond of their stories, and with the acquisition of the skill of writing, she can record her story herself, in her own book! And mom will definitely help her in this. Creating the same book.

  • We take several sheets of paper of the desired format, we have 10*10 cm and pierce it with a hole punch. If you wish, each leaf can be tinted with paints or tea to give a certain effect. We have in pale blue tones and snow-white ones are quite suitable
  • Sew all the sheets together
  • Now we make the cover: cut the cardboard in our size 11*24 cm
Book for schoolgirl: work process
  • In the middle we draw a flat line and make a bend with a circuit or the back of the stationery knife. In this place, the cardboard should be thinner, but not to break
  • We take wrap paper or printed pattern and glue the cardboard as in the photo. First in the corners, then bend and fix it with glue
  • The inside can be glued with white or colored paper
  • We bend the cover in half, and then another bend of 1 cm as in the photo. We wrap the middle inward and attach the stitched sheets to it. We fix the book with glue or stitching with a thread
  • The book is ready! It remains to write its story in it!
DIY schoolgirl
DIY schoolgirl

How to make a book a baby with your own hands for a school?

Today, the development of creativity at school plays an equally important role as other tasks. Do -it -yourself book is one of the most common classes. It is made simply, and we give a lot of joy to the children.

How to make a book a baby with your own hands for school
  • We take sheet A4, divide along in half and cut
How to make a book a baby with your own hands for school: Step 1
How to make a book a baby with your own hands for school: Step 2
  • We glue 2 pieces
How to make a book a baby with your own hands for school: Step 3
How to make a book a baby with your own hands for school: Step 4
  • Fold the accordion
How to make a book a baby with your own hands for school: Step 5
  • We make a cover of bright colored paper
How to make a book a baby with your own hands for school: Step 6
  • Glue the first and last pages to the cover
How to make a book a baby with your own hands for school: Step 7
How to make a book a baby with your own hands for school: Step 8
How to make a book a baby with your own hands for school: Step 9
  • We start design: glue or draw the name
How to make a book a baby with your own hands for school: Step 10
  • We take out old little books. We cut out poems, nursery rhymes, pictures and funny figures from them. Glue in our book
How to make a book a baby with your own hands for school: Step 11
How to make a book a baby with your own hands for school: Step 12
How to make a book a baby with your own hands for school: Step 13
  • We glue the middle with glue PVA so that the book does not break up. And you can read it right away!
How to make a book a baby with your own hands for a school: ready!

Video: Book Baby with your own hands


Author:
Evaluate the article

Add a comment

Your e-mail will not be published. Mandatory fields are marked *