Make a paper aircraft that will fly well is simple. You need to adhere to step -by -step instructions and smooth all the bends lines well.
Content
- How to make a plane from paper, step -by -step instructions?
- How to make a steep plane from paper?
- Make a military plane from paper?
- How to make a light paper plane?
- How to make a simple plane plane?
- How to make a plane with a paper propeller?
- How to make a boomerang paper, scheme?
- How to make a fast paper plane?
- How to make a well -flying paper plane?
- How to make a fast and light paper plane: tips and reviews
- Video: Paper aircraft
- Everyone has memories from childhood associated with the manufacture of paper aircraft. We liked to do them with our own hands, and then run them up
- Many children have a craving for creativity. If they independently make airplanes, then this will help to develop the baby's fingers
- The child will learn to concentrate, creatively think and include imagination. On children's Birthday you can arrange a competition between children, who will make the aircraft faster
Important: it is a pleasure to work with paper - it is soft and supple. A model with correct and even bends will be able to fly high and will keep shape for a long time.
How to make a plane from paper, step -by -step instructions?
Such a paper “flight apparatus” can be made from any paper: printed A4, a notebook page or even from a newspaper.
Important: try to first learn to make simple layouts, and then move on to complex ones. Kids are very fond of doing origami, so they will be happy to help.
So, if your baby approached you with the question: “How to make a plane from paper?”, Prepare a small piece of paper and follow the next stages. Step-by-step instruction:
1. Put a paper cut on you smaller side
2. Bend the sheet strictly along the central line and make a mark in the center. It will turn out to be a bend, it does not need to be smoothed out
3. Expand the paper cut and fold it so that the upper angle is in contact with the center
4. Do all this with another angle of sheet
5. Once again, open the sheet. Now fold the corners, but so that they do not touch the center
6. Now bend a smaller corner. It will serve as a holding element for all angles folded earlier
7. At the last stage, bend the resulting product on the central line - the triangular part will be visible outside. Bend the sides to the center. Everything is the plane is ready
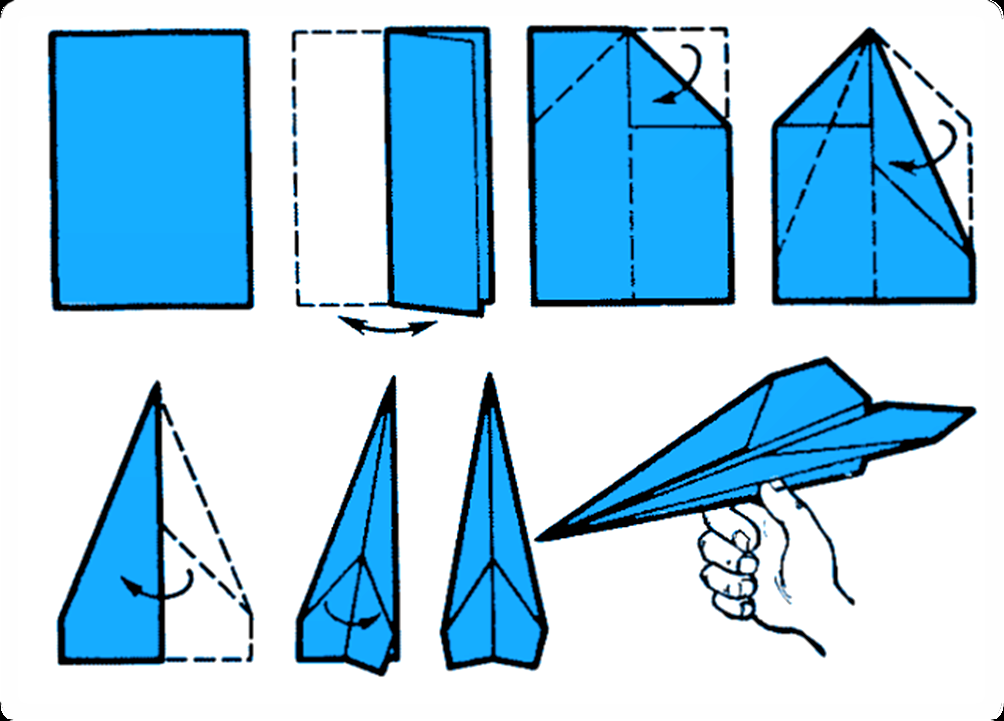
How to make a steep plane from paper?

After you have learned to make classic paper models, you can try to fold something unusual and complicated. The Aircraft "glider" will maneuver high and far.
So, how to make a steep plane from paper? Step-by-step instruction:
1. Take a paper section and roll in half
2. Then open it in its original position and put it with a fold to the top. Bend the corners of the paper inside - the mark was obtained in the middle of the sheet. Now the triangles will turn out even, and this will help make a layout with good flight qualities
3. Draw a visual line in the center and make a bend in this place. You will get a sharp nose of the product
4. Fold the nose in such a way that it peeps over the edges of the corner bends a couple of millimeters
5. Fold the product in the center so that the back side is inside
6. Bend the wings - they can be made small or, conversely, hollow. Experiment with a width as you want. Everything is the plane is ready
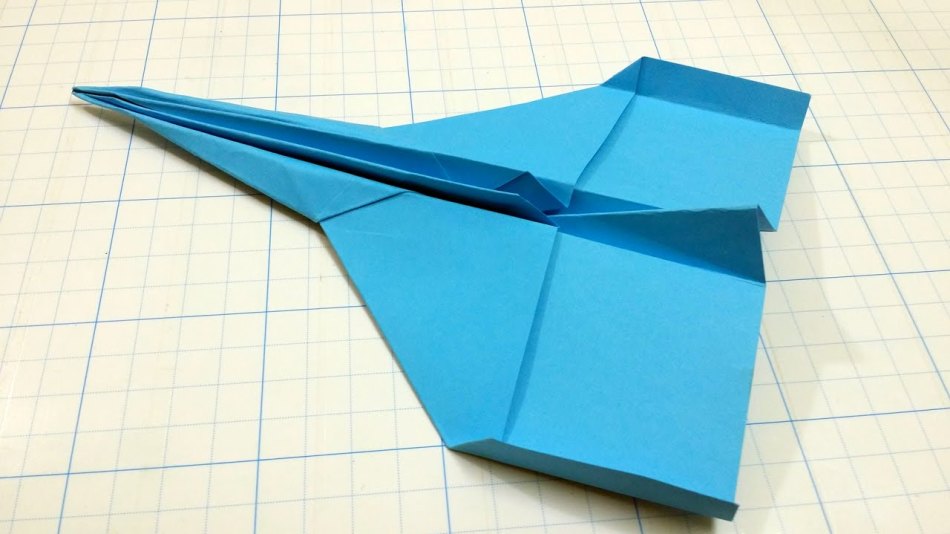
Make a military plane from paper?

A little more complicated model of the hawk model. But you have already learned how to make simple models, which means that this paper sample will manage to add.
Phased instruction on how to make a military aircraft from paper:
1. Prepare a paper cut and put it on the table with a smaller edge to yourself
2. Fold on the central line. Bend the upper corner. The top of the paper leaf should match the side. Do the same with the second corner element
3. A part in the form of a cross should be obtained. Press its lateral elements to the central line of paper and reward all the prevailing lines. Bend the right upper corner so that it is at the same level with the upper part of the sheet. 1 centimeter should remain from the bend to the midline. Repeat the same with the other side
4. The “horns” were obtained, which need to be folded in half, and wrap the excess part of the paper inside
5. The lower corner is wrapped in the opposite direction from you. Make the fold line to the place of "horns"
6. Fold the aircraft in half - he is ready. Color it with paints and you get a real military fighter
Important: you can make other models of military aircraft according to the drawings presented below.

How to make a light paper plane?
If your baby constantly asks to make a paper aircraft, teach him to fold it on the technique of origami on your own. The scheme below will help to make a light paper plane.
Tip: Follow the drawn instructions with the child. He will like to make such planes, especially from colored paper.
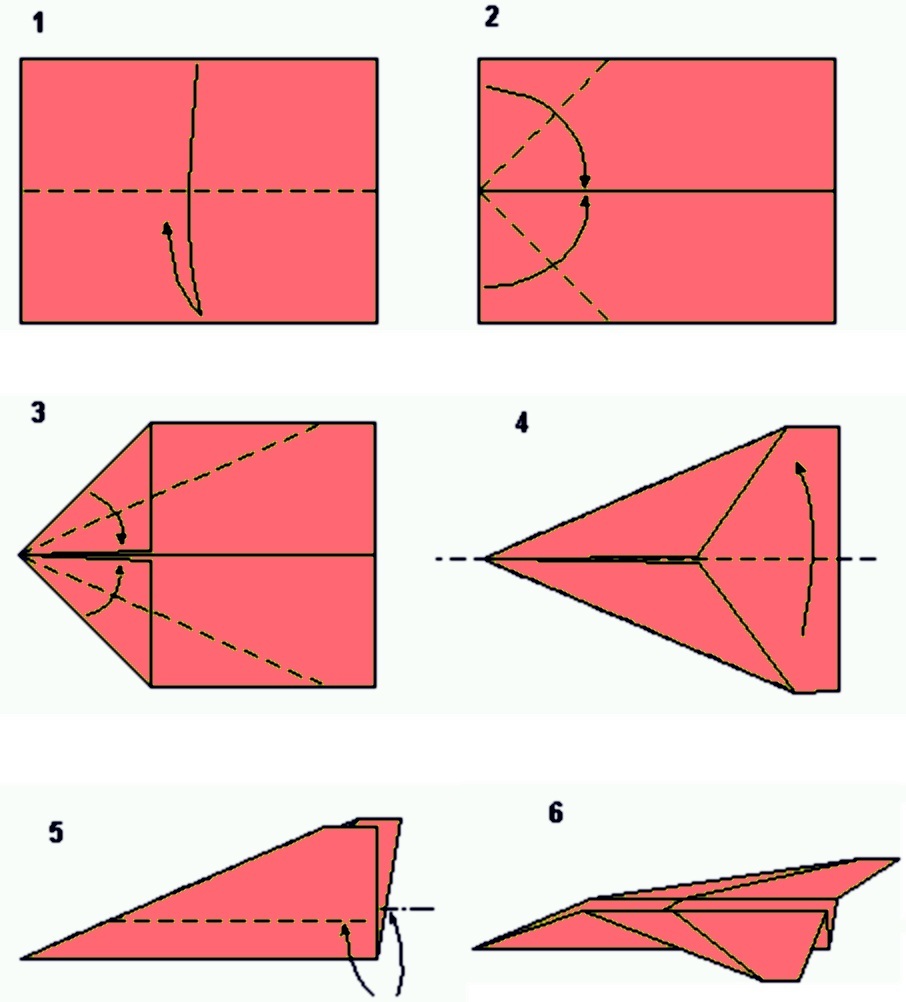
How to make a simple plane plane?
Here is another version of the light model. Many people often wonder: how to make a simple paper plane?
Important: this schematic image will help to fold the product in 10 seconds. The result is a well -flying paper layout - simple, fast and interesting!

How to make a plane with a paper propeller?

To fold such an airplane, you need to prepare a paper sheet, a paper knife, a pencil, a needle with a bead at the end. Step -by -step instructions will tell you how to make a plane with a paper propeller:
1. Take a flat sheet and fold it diagonally twice
2. Expand the paper cut and fold it along the line that will divide the diagonals into two parts. Open the sheet again, raising the corners along the resulting lines
3. The left edge of the corner turn right and bend it. Return it to the initial position and make a bend on the right edge up
4. From the left edge, make a bend again - the bottom should lie on the line of the bend of the triangle that was made at the previous stage. Bend the edge of the corner for the resulting part
5. Expand the right side and bend to the center
6. Perform another bend to the center, and season the top of the corner inward
7. Bend the right side to the center, then bend it again. Turn the left corner over and fill the lower edge into the hole of the right part
8. Bend the resulting product in the center and fold the wings
9. It remains to make a propeller: take a sheet of paper in size 6 cm x 6 cm. Draw it along the diagonals with a pencil. Make cuts along the drawn lines, not reaching the middle of 7 mm
10. After one corner, fold the propeller and fix it with a needle with bead
Important: the part can go back, so glue the corners in the middle or rush the propeller into the place of bending
11. Fasten the part on the "tail" of the aircraft. The product is ready, you can run it or give it to the child
How to make a boomerang paper, scheme?

There is another model of a paper “flight apparatus” - this is a boomerang. Imagine a product made by your hands that returns to you after starting.

The scheme and step -by -step instructions will tell you how to make a plane boomerang from paper:
1. Fold the paper cut four times and press the angle with your finger
2. Drive one half of the paper cut to the central line and squeeze the angle on a quarter of the paper
3. Fold the sheet inside from the fold to a quarter to the upper corner. It will turn out to be a bend in the form of a triangle. Press your finger along the edge
4. Spread the triangle, and raising it, put your finger between the resulting details. This is necessary in order to make sure that the folds have developed perfectly evenly
5. Turn the product over and bend the other side of the triangle inward. Bend the wide end of the paper in the opposite direction
6. Do all this on the other side of the product
7. It turned out "pockets". Raise his top and bend to lay the edge exactly along the length of the paper. Put the angle in the "pocket". Bend the upper corner down
8. Make the above stage on the other side of the aircraft - both sides should look the same
9. Bend the part from the side of the “pocket” upstairs. Do the same from another side
10. Expand the product and put the front edge inside. The protruding segments will appear in front - bend them. Remove the rear appeared parts in the form of fins
11. Turn the product and bend the front part. Bend in half and reward the bends
12. Make part of the fuselage: bend one side of the product down the line, which goes parallel to the central fold. Do the same with the second side
13. Bend a small piece of one and second wing up. Bright the product. He already has a base and flat wings
14. Run with your fingers on the front of the wings - you get a bend. The plane is ready and it can be launched
How to make a fast paper plane?
A paper aircraft will fly quickly, thanks to a folded tail in a special scheme. The nose of such an aircraft should be sharp and thin.


Below is a step -by -step instruction on how to make a fast paper plane:
1. Bend a sheet of paper along. Expand it
2. Now fold the sheet in half. Fold both edges from the middle, and then straighten half of what you bent
3. Expand the sides that are located on the side and bend each lapel inward. First, do this with internal lapels, then with external
4. Put part of the wings back. Bend the wings from the bottom at a short distance
5. Spend a finger or ruler along the fold line and straighten the wings
6. Bend the resulting bends parallel to the bends of the wings. The plane is ready
How to make a well -flying paper plane?

Any plane from paper, if it is folded correctly, will fly well.
Tip: all lines of bends clearly iron it with hard objects or fingers.
Tip: To perform origami products, use only even sheets of paper.
If a child is suitable for you and asks how to make a well -flying paper plane, advise him to make a product with flaps or a complex “tail”. Such models fly far and high.
Important: the schemes of these models are described above, so you can start creating yourself or with your child.
How to make a fast and light paper plane: tips and reviews

As you have seen, there are many ways to perform paper aircraft. Making a quick and light paper from paper is simple. Tips and reviews will help prevent mistakes and become a master of origami.
Tip: If you are a beginner in the technique of origami, try to do only simple models first. When the paper begins to “obey” you and you will feel that the aircraft models are well flying, then begin to master more complex and unusual models.
Important: before starting to make a plane, prepare the paper. Prepare a few sheets, since at first you will be bad to go out - everything comes with experience.
Tip: Do not use crushed sheets of paper. The aircraft will not work from bent and torn sheets.

Tip: try to make the product symmetrical relative to the axis (imaginary or real). If this is not observed, the plane will fall on the side when flying.
Make a few models and on the street with your child arrange a real air show. Remember your childhood - run a paper aircraft!