

Recommendations for the manufacture of different types of volumetric snowflakes.
Content
- How to make a volume snowflake 3D for the New Year from paper?
- DIY snowflakes of paper: step -by -step instructions
- Types of volumetric snowflakes - origami: photo
- Volumetric snowflakes from strips of paper: schemes
- Beautiful volumetric snowflakes - balls: schemes, photo
- Large volumetric snowflakes from paper: templates
- Video: DIY snowflake
There are only a couple of weeks left before the New Year, which means that it's time to think about how you will decorate your house. If you think that Christmas trees and festive garlands will be enough, then you are deeply mistaken. Forest beauty can become a decoration of the living room, but in all other rooms a festive mood is felt will not.
If you want to recreate the New Year atmosphere in every corner of your house, then do not be lazy and decorate everything around with New Year's attributes. Volumetric snowflakes made of paper are best suited for this. And although such a decor at first glance seems very simple, it is he who can turn your house into a fabulous snow kingdom.
Therefore, find a little free time in your dense working schedule, stock up on white paper and scissors and begin to create a New Year's fairy tale for yourself and your family.
How to make a volume snowflake 3D for the New Year from paper?

If you want to truly surprise your household, then decorate the house with voluminous 3D snowflakes. Such a craft, depending on the size, can be placed on a Christmas tree, window, wall or even on furniture. A garland made of such man -made decor will look very beautiful.
Try to make snowflakes different in size and fix them on the thread so that they are all at different levels. If you are not lazy and make several such garlands, you can make an imitation of snowfall in some room.
Materials for the manufacture of volumetric 3D snowflakes:
- White paper (if desired, you can use any other color)
- Chancellery Stapler
- Paper cutting scissors
- Ruler and simple pencil
- Any glue
Production recommendations:

- First of all, deal with the manufacture of a stencil, with which in the future you can make separate blanks of the future jewelry. To do this, take a thick sheet of paper (you can even cardboard) and draw six straight lines on it at a right angle on it. Follow that they are placed on the sheet parallel to each other and do not intersect anywhere. Draw them at a distance of 1 centimeter from each other.

- After that, take six sheets of the same size (square shape), fold each of them individually diagonally and, using a pre -made stencil, cut into them three cuts. If you did everything right, then you should have six isosceles triangles with parallel cuts on the table.

- Take one of the workpieces and gently expand it. On the table in front of you should be a square consisting of several smaller squares. The corners of the smaller square (it is located in the very center of the workpiece) must be carefully tucked to the center and fastened with glue.

- After that, the sheet must be turned over on the next side and in the same way to fix the free corners of the next square. You need to continue such actions until you get a semblance of a multi -layer icicle. Thus, it is necessary to glue all the remaining five parts.

- Next, we take ready -made icicles and carefully fasten them with each other with a stapler. We do this in two stages. First we fasten three icicles into one. Then all the same stapler, we fix the two formed halves with each other. Do everything as carefully as possible, but do not spare the brackets, if you are not fixing them poorly, then the finished product will simply fall apart.
DIY snowflakes of paper: step -by -step instructions
Volumetric snowflakes always look very beautiful, but unfortunately, their manufacture takes a lot of time. In view of this, if you want to decorate your house by the New Year with such a festive surroundings, then try to make a simpler version of the volumetric decoration. It will have a slightly different forum, but most importantly, you will spend a minimum of your time on its manufacture.
Materials:
- Sheets of paper
- Thread and needle
- Compass
- Pencil and ruler
- Red or yellow fabric
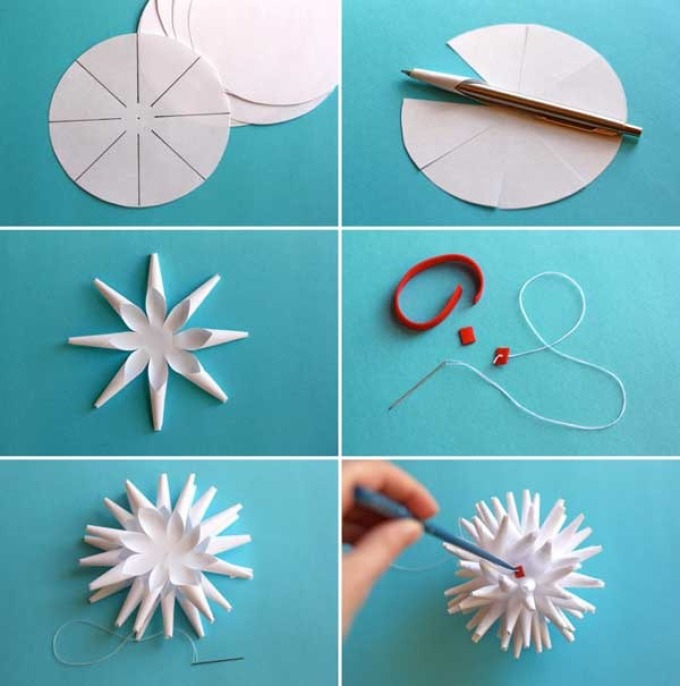
Production rules:
- Take a sheet of paper and draw four identical in diameter of the circle on it. For the manufacture of small snowflakes, 5 centimeters diameter will be enough, and to create larger products, this indicator can increase even to 10 centimeters.
- Gently cut the drawn circles with scissors, and then use the ruler and pencil divide each circle separately into eight equal parts. According to these sheds, the workpiece will need to be cut with scissors from edge to center.
- Then the ends of the formed petals should be carefully bend to the center and fixed together with glue. If you can’t give the petal the correct shape, try to help yourself with a simple pencil.
- Thus, make three more such paper flowers, and then begin to fix all the blanks among themselves. This can be done with glue or take a thread with a needle and just sew all parts of the snowflakes.
- In order for such a snowflake to look finished, be sure to cut a small circle from the fabric and attach it in the very center of the product. If there is a desire, you can decorate it a little with sparkles and small shade.
Types of volumetric snowflakes - origami: photo


- Many of us have origami associate with something very complex and incomprehensible. But in fact, this technique simply requires a little more concentration than any other man -made process. Therefore, if you show quite a bit of patience, then you can probably make voluminous snowflakes in this way. But in this case, there are several methods of creating New Year's decorations.

- The first type includes ordinary origami, which involves the folding of paper sheets in a certain order, subsequently which is the volumetric product with a 3D effect. In this case, you do not have to glue and fix anything. All that will be required of you to create decoration, just fold the sheet correctly.

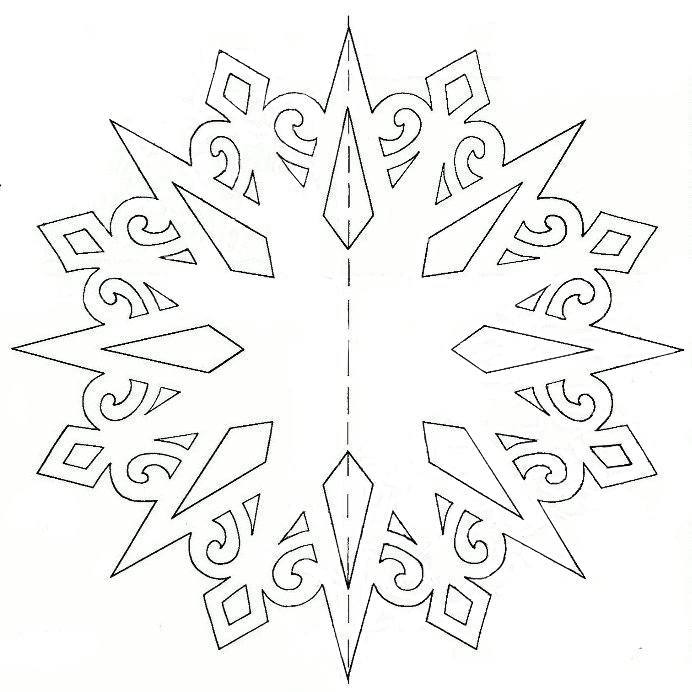
The second and more complex type of this technique is the so -called carigas. In this case, the process involves the correct folding of the sheet and the most accurate cutting of the pattern. If you make such a snowflake-organs for the first time, then it will be better if you will first draw a future pattern and only then begin to cut it out.
This can be done both with standard scissors and manicure. The last option for beginners is preferable as they will give the opportunity to correctly cut out the most intricate pattern. After cutting, you only have to bend some parts and the voluminous snowflake-carigas will be ready.
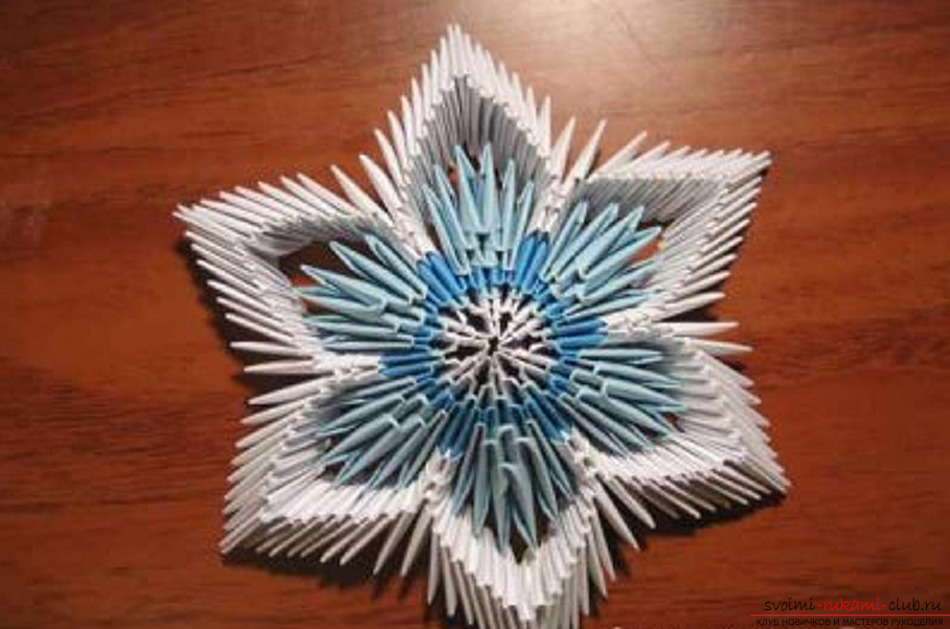

- The last way to create snowflakes is the most difficult, but the finished jewelry is really fabulous. This species is also called modular origami. In this case, you will first have to make quite a lot of different small parts, and then connect them in the correct order. The disadvantage of this method of origami is that if during the connection process you make the most minimal error, then this is enough to spoil the visual perception of the jewelry.
Volumetric snowflakes from strips of paper: schemes

If you want to get the most voluminous snowflake, then make it from paper strips. In this case, you can independently regulate how much this or that part of the product will perform, but, most importantly, you do not have to follow how you bend or draw the lines.
To create this decoration, you will need scissors, glue and thin strips of paper of any color. If you want to make an air snowflake as much as possible, then use strips from 3 to 5 millimeters wide to make it. If you plan to decorate the house with large voluminous snowflakes, then cut the strips with a width of 8 millimeters.

Volumetric snowflakes from strips:
- So, first of all, we take a sheet of paper and cut off five strips of the same width from it. The length of these blanks will be different. In order to make one part of the snowflake you need 1 strip 25 cm long, 2 21 cm long and two - 19 cm.
- At the next stage, we smear the ends of the blanks with glue and carefully fasten them. Let the petals dry a little, and then begin to form a voluminous leaf from them. Be sure to check whether all the parts have been recorded well and, if necessary, then additionally fix them with a thread or ordinary clothespin.
- Thus, we do at least eight paper leaves. If you want the finished product to be more voluminous, then make 10 or 12 leaflets. Give the workpieces to dry well and start collecting the product.
- Cut a strip of 1 cm wide from thick paper and glue it into a circle. To this circle, you need to carefully attach all previously made blanks. If you see that the design is not very strong, then try to glue the leaves themselves first and only then fix them on the core.
The next way to create a volumetric snowflake is considered quite complicated, but still if you decide to make a decoration with this particular method, you will be satisfied with the result (Scheme No. 2). To create an average decoration, you will need 6 strips 25 cm long, glue and paper clips.

So:
- At the first stage, we begin to weave the stripes among themselves so that a square forms in the center. We fix each strip with glue or stationery.
- At the second stage, we begin to interconnect the strips close to each other. To do this, we first lubricate their ends with glue, and then carefully fasten them together. After these actions, you should get a kind of leaf.
- In this way we form the three remaining parts of the workpiece and proceed to the creation of another such part of the snowflake. After it is ready, you will only have to fold them together in such a way that your product is visually resembling a flower. After the glue dries, the paper clips can be removed, and the snowflake should be hung on the Christmas tree or attach it to the window.
Beautiful volumetric snowflakes - balls: schemes, photo


A little lower, we will tell you how to make a New Year's snowflake-Shar from colored paper. If you want it to be more like a snowflake usual, then before starting to glue all the parts of the product, cut an interesting drawing on them. This will help make the decoration easier, airy and festive.
Production recommendations:

- Take the paper of any color and draw 12 circles on it. In order for your New Year's decoration to get ideal all of them should have the same diameter.

- Bend all the blanks in half and fold them into one neat pile. If you use multi-colored paper to create a snowflake-shara, then do not forget that the colors must be alternated.
- Put this workpiece for a while so hard and leave it there for 10-15 minutes. During this time, the line of overclocking the circles will become very noticeable, and you can correctly fix them with each other.

- To do this, carefully straighten the workpiece, and then use the stapler, connect all twelve parts together. Follow that the brackets are found on the fold line.

- When you finish with this process, you can proceed to create a form. Spread circles and begin to glue them with each other with glue. They must be seized in such a way that each separate half of the circle on the one hand on top, and on the opposite side, is attached to the neighboring part of the product.
Large volumetric snowflakes from paper: templates


Today we have already introduced you to the most common ways to create volumetric New Year snowflakes. And as you probably, if you wish, even a child will be able to make a beautiful New Year's decoration out of ordinary paper.
But finally, we still decided to introduce you to another method of creating a festive decor. Below we will tell you how to easily and quickly make a large voluminous snowflake.

Snowflake-harmonica:
- To begin with, take the paper and cut the strips of the same width from it. Their width can vary from 7 to 15 centimeters.
- Fold the blanks in half, and then draw the contour of the future ornament on them. Take the scissors (you can use manicure) and carefully cut the pattern.
- If you have chosen not very thick paper for the manufacture of snowflakes, then you can fold two parts at once and cut them together.
- Then fold each part separately with an accordion. Follow that all segments of the workpiece have the same size. If at least one of them will be more or less than necessary, then you simply cannot glue two parts together.
- When the accordions are ready, smear their edges with glue, cross and wait for complete drying. After that, take a snowflake and straighten it with smooth movements.
If you want the New Year's decoration to be brighter, then use paper of different colors to make it. For example, combine white with blue, pink, peach or mint. Also, if desired, you can glue several small beads or bright glass on the snowflake.


Very cool! I study to match the title "Grandmother-Mastein"