In this article, I would like to sanctify such a question that excites many women about how to choose a men's tie and how to tie it. Certain rules exist, but they can be easily learned.
Content
- How to tie a men's tie: scheme
- How to tie a tie? Step -by -step instructions in pictures and photos
- We tie a knot on a tie
- How to tie a thin tie?
- How to tie a tie on an elastic band?
- How to tie a butterfly tie?
- How to tie a children's tie?
- How to tie a tie quickly and correctly?
- Ways to tie a tie
- A simple way to tie a tie
- How to tie a tie - video
- Video: node New Classic
Specialists from the University of Cambridge made observations according to which 9 movements are usually used when tying a tie, and even with these movements you can combine 85 different variations of tie tie.
You are unlikely to need about a hundred combinations, but it is desirable to learn several ways - believe me, this can come in handy in life.
How to tie a men's tie: scheme
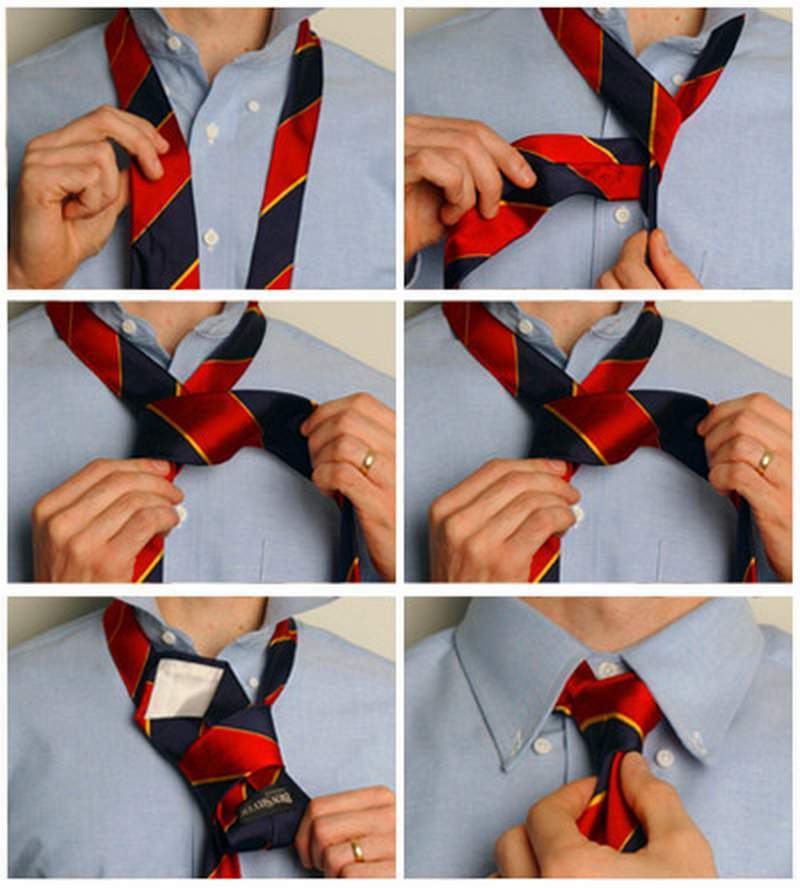
Eldridge node“, Which was born only in 2007, is quite unusual, but attracts attention. It is knitted with 15 steps that are easily reproduced due to orientation on the circuit.
Important: keep in mind that, unlike most of the nodes, Eldridge is tied not with a wide, but a narrow end. However, even if you do everything right, this capricious knot can quickly untie due to inaccurate wearing, so do not be afraid to tighten it properly.

- First of all, put the tie with the seams inward so that the narrow end is to the right of the wide. Wide arrange flush with belt buckle
- Put the narrow part on the wide, crossing them
- The wide edge should be moved from the left side to the right
- Raise and pass the narrow edge into the gap between the accessory and the skin
- Pull the narrow edge on the left
- Take the design of the visible side of the Eldridge - for this side of the tie we work on, move right and take the accessory collar
- Pull the narrow edge on the left side and pull it in the right under a wide edge
- Previously, you should have formed a front loop. Take a narrow end from right to left into it. Speak up at the same time
- Tighten the resulting knot, but not with all your strength
- Leaving a narrow part still on the left, throw it over the collar of the tie, pulling down
- Throw the end on the left side to the right, tucking it over the collar
- As a result of the previous action, another loop appeared on the visible side. Skip through it on the right side to the left narrow end, raising
- Tighten the knot a little
- As a result, the remaining small tip of the tie will stay. To mask this, unnecessarily season it
- It remains only to arrange the Eldridge knot in the middle

The Eldridge knot for Shirts that have a medium and long collar, as well as for a collar with small buttons or soft ends.

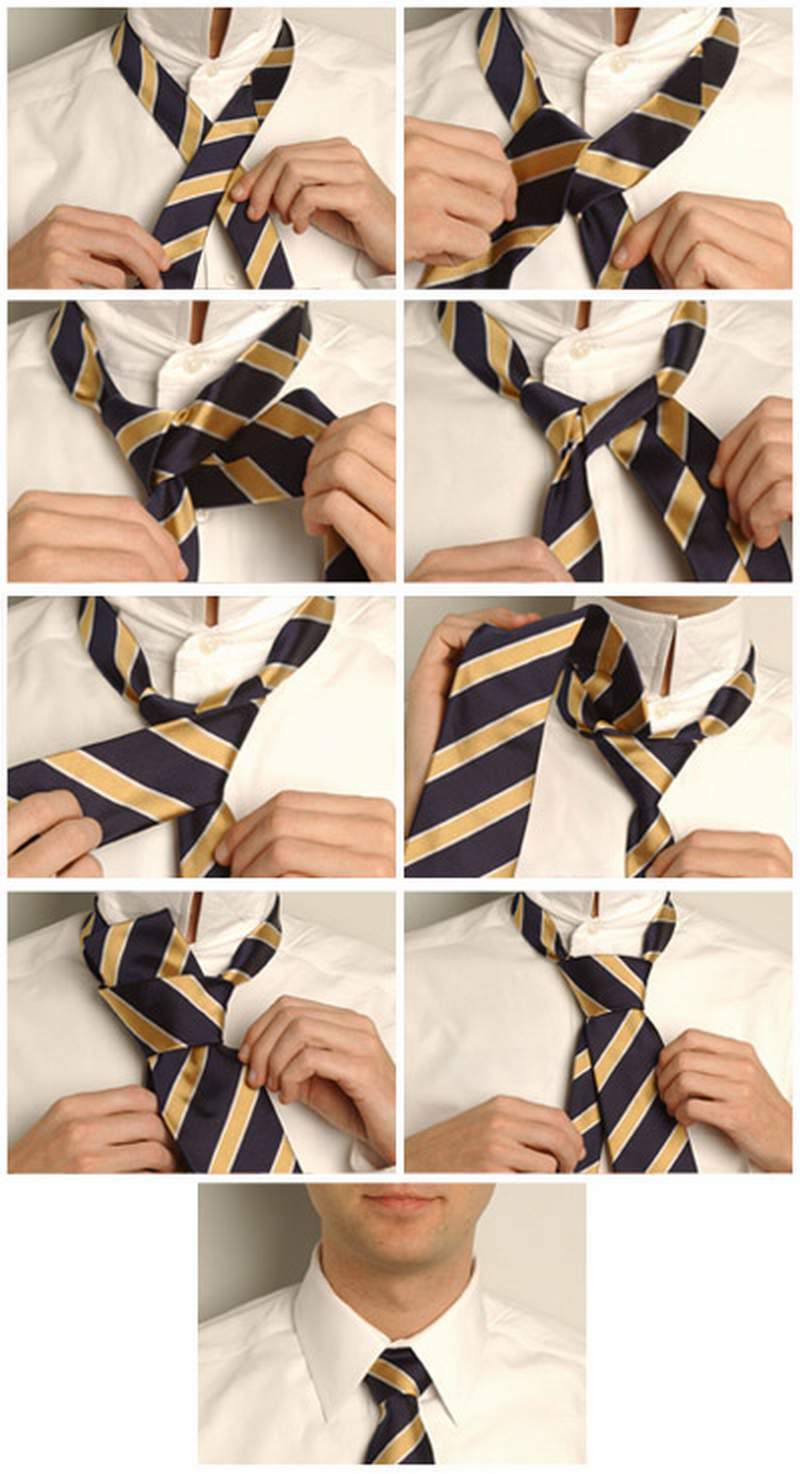
Trinity node It looks like Eldridge that he showed himself to the world recently, but has already become quite popular. This is explained by the external unusualness and similarity with the Varangian symbol, which is called a tricver. The formation process resembles an Eldridge node - all basic actions are performed by a narrow end.
Important: remember that the knot will turn out asymmetric and large.

- Throw a tie in the inside closer to the body. Make sure that a wide part is located on the left, and the narrow one necessary for tying is on the right. Place the wide so that it is just below the buckle or flush with it
- Cross the ends so that the largest is located under those that less
- Less stretch upstairs, extinguishing a tie in the formed collar
- Pull the smaller on the left
- The most part of the tie is wrap around the narrow on the right side to the right
- Pull the narrow part upward, sticking it into the collar of the accessory
- Pull the end on the left, lowering it
- The horizontal component of the node will be formed by pulling the narrow part of the tie on the right side under the collar. A strip of fabric should lie down horizontally
- During the actions of the previous paragraph, a loop formed. A narrow part of the tie should pass through it
- Stretch the tie again horizontally, the smaller part should pass under the larger
- Stretch the desired end in the loop, which turned out thanks to paragraph 9. Pull the end a little up
- The remaining free narrow part of the tie is quietly up to the collar - nothing should stick out
- The last stroke is to fix the tie

As you can see, this scheme is very similar to the Eldridge option, but it requires less manipulations. Trinity node suitable for clothes With a middle or wide collar, for a collar with buttons and a “shark” version.

If a man is more likely long nodes, we recommend a variety "Van Weik." He was invented by actress Lisa Van Wake, adding another turn to the appearance of Prince Albert.

- So, place a tie on the neck so that the seams are turned inside. Place the largest component of the accessory on the right, and smaller - on the left
Important: the smallest component of the tie should be at the waist level, but amendments are also possible - it all depends on the growth of a person. The value of the accessory also plays a large role.
- This time you will have to work with a wide part of a tie. Place it in such a way that it is crossed from another
- Place a wide part under a narrow one - as a result, the first wraps the second
- Move the wide component to the left above the narrow. Do not forget that the line is horizontal
- Return to the right to the right to the right, extending it now under the narrow
- And again make a turn from right to left - this is how the front component of the node is formed
- Wrap the tie again, but now slightly lower than before
- Now let's talk about the third layer of the front part of the node. Remember that the line should lie down horizontally
- Raise the tie, placing the end under the collar
- The loops of the outside will still be useful - through them you need to go through the largest component of the accessory down
- Pull the accessory better and correct it

It is recommended to combine With medium, as well as a wide collar. The option with buttons is also not bad.
The next knot - "Baltus" - Less intricate than the previous ones. He appeared in the last century thanks to Balthazar, who was an artist.

- Place a tie so that the narrow edge is on the left, and the wide - on the right side
Important: in this technique, the seams are located outside, that is, the thing must be placed with the front side to the body.
- Cross the ends, while the narrow will be located above the wide
- Smind wide
- Place it under the collar, pulling it out on the right
- Pull the same part upstairs
- Season the edge of the collar tie and pull it out on the left
- Raise a wide part
- Place it again under the collar of the tie and pull it on the right
- It was time to once again wrap a wide edge, stretching it to the left - as a result, the front part of the node will form.
- Direct the wide edge up, take it under the collar
- Pass the edge through the loops from the front side
- Correct the result of the work, not forgetting to pull the largest side down to the maximum to fix the knot tightly

Baltus is recommended for Things with a large collar or collar, which has soft ends.
"Murrell" Suitable for those who want to try something that is not related to the classics. In fact, this node that saw the world in 1995 is an inverted Windsor.
Important: the properly tied Murrell is symmetrical, its shape is an even average triangle.

- Throw a tie so that the inside is closer to the body. Place the wide component on the left, and the narrow component is from the right. The wide should be approximately at the level of the buckle
- Cross the ends
- The smallest prone behind the collar of the tie, pulling it upstairs
- Put a narrow part over the collar, directing it to the left
- Place this part under the wide, stretching to the right
- It was time to pull the part we work on again, upstairs
- Wrap her by the collar, stretching down from the bottom on the right side
- Drag the end to the right, placing it on top above the knot - this is how the front side is formed
- Pull this part upstairs by passing it under the collar
- In paragraph 8, the front loop turned out - it is through it now that the narrow part of the accessory needs to be pulled down
- Correct what happened. Please note: the narrow part should be on the wide

Suitable for Middle, wide collar shirt and for a collar with soft ends.
How to tie a tie? Step -by -step instructions in pictures and photos
"Four" - A wonderful choice for any things.
- Place a tie on the neck, placing one end on the other
- The largest end is heated thin from left to right. The loop should form. At the same time, keep in mind that a wide part will have to be under a narrow
- Turn a wide part on the left side over a narrow side. If everything is done correctly, you get a loop
- In a loop and you should go through the widest end of the tie
Important: it is better not to level the edges of the tie after it is tied with a “fourth” - it is useless, but you can do it worse.
«Half -Vindor " It is no more complicated than the "fourth", but it looks more interesting.
- Throw the accessory so that the wide end drops 30 centimeters lower than a narrow
- With this long side, it is worth it to go around the short behind so that the first can be taken upstairs. Do not forget that the tie should be removed upward. Pass the end in the throat loop
- Again wrap the wide part around the narrow, taking it down
- Pass the wide through the loop formed earlier
- Tighten the tie

"Windsor" It resembles the previous option in technology and is suitable for those men who love wide nodes.
- The wide end after the tie spreads through the neck, should be located on top of the narrow. In this case, the first needs to be made longer than the second approximately 30 centimeters
- Comele the narrow end on the inside of the wide, pulling the last upstairs through the throat loop
- Now lower the wide part down and, having circled it narrow, direct the end to the right
- Throw on the front side a wide part through a narrow left. Get the end through the collar
- Pass the end to the formed front loop
We tie a knot on a tie
When you tie the nodes, remember about the following nuances:
- Pay attention to the color of the accessory: for example, complex combinations will look more profitable in combination with calm pastel colors, but simple nodes are more suitable for brightness. This can be explained by the fact that the tying of simple combinations on motley models avoids refraction of patterns, shades


- Now take a closer look at the collar of the shirt, to the face of its owner - the cut will be well combined with a wide accessory, a voluminous knot. Use a complex node when the collar is wide, as well as if the face is wide. But if the face is elongated, and the collar is narrow, master the classic nodes that are thin

- Do not listen to those advisers who convince that you can tie a tie in your hands, and then put on your neck. In fact, the correct node will only turn out on the neck
- Keep in mind that simple classic nodes exclude the presence of folds. But as for the wide nodes, then it all depends on the preferences of the owner of the accessory - some like a slight negligence
- Pay attention not only to the tie palette, but also to its material - so, a complex node is best obtained on thin simple fabrics. Avoid synthetics, giving preference to natural fabrics - the nodes on them are best tied
Important: do not forget to ensure that the widest part of the node is perfectly flat
- Whatever knot you choose, it is impossible to tie it barely-it is better to tighten it to the extent of a tight state. But you should not tighten the knot too much - it can be explained by the fact that all overly protracted nodes look the same, so all ingenuity can go to dust
- The thick lining of the tie makes it difficult to establish it - consider this fact when buying an accessory
How to tie a thin tie?
The retro style again shows itself on the streets, and with it it reminds of itself and fashion for narrow ties, nicknamed "herring." They are stylish, original, perfect even with a business manner. Remember the following The nuances of wearing Such a tie:
- It is recommended to wear them to men of a slender physique
- Large chains or rings do not combine with accessories of this type. Remember that a thin tie involves minimalism. However, everyday jeans with sneakers are also not suitable
- The best selection of the node in this case is medium and asymmetric
- As for the color scheme, prints are excluded. Mostorn or checkered models look most profitable
- Pay attention to the jacket and shirt: the jacket should be narrow, and it is advisable to select the collar of the shirt so that it is not too large. Blazer with buttons is also perfect

A knot is remarkably suitable for thin ties "Granchester" - requiring dexterity, but excellently looking option:
- Throw the tie so that it is located to the neck, while the narrow part will be located on the left
- Put the narrow part on the wide
- Twice wrap a widest end more narrow
- Now take the end to which they made a moment, up and take it into the collar
- Make a turn around the loop, withdrawing a wide end to the right under the loop
- Direct the end with which all manipulations are performed to the left. The fabric should lie down horizontally
- Bring the end up, stretching into a loop between a tie and neck
- Pass the end into the loop, directing it down, and correct it

How to tie a tie on an elastic band?
A tie on an elastic band is a favorite accessory of schoolchildren and young office workers who cannot or do not want to mess with daily tie of the nodes. It turns out that there is no need to tie a tie on an elastic band at all, instead of that it is worth folding in a certain way and sew up.
Important: always remember that the fabric in this case should turn around the elastic band.
- In order to fold the thing in the right way, place it on any surface with an elegant side down, and place the elastic band across
- Turn the tie over the elastic band with a thin end
- The specified end wrap back and on the left side
- Spend it under the gum, directing down
- Gently pull all the ends - this is how the knot will form
- Combine the lower components of the node together. As a result, an inverted triangle is formed. Sew what happened. If you are all manipulations correctly, a small knot will flaunt on the front side of the accessory

How to tie a butterfly tie?
Previously, such a tie was worn exclusively with tuxedos, but now it can even be worn not only at business events, but also at the festive ones. Suitable for Boat collar, as well as for a short and middle collar.
- First of all, wrap the fabric around the neck. In this case, the left end should be longer than the right by 4 or 5 centimeters
- Cross the left with the right, forming a loop
- Meanwhile, put the right end in the form of an accordion - it is it that will turn into the front side of the butterfly
- Lower the left side down so that it is perpendicular to the accordion
- Twice fold the left end following the example from the scheme
- Pass this end to that loop that was formed earlier
- Holding the ends, pull them in different directions - so it turns out to tighten the knot
- Give the butterfly in the front door, correcting it

How to tie a children's tie?
For children, adults most often acquire it precisely assessoir on an elastic band. It is good for several reasons: firstly, there will be no need to suffer with tying each time, and secondly, there will be no need to buy a new thing due to the rapid growth of the child. An ordinary tie will be small in just a couple of months, so the elastic band will be in handy.
How to tie a tie quickly and correctly?
A simple and fast node is relevant when it is necessary to quickly tie an accessory, but there is absolutely not enough time for such procedures. "Small knot" It is good that it looks great and easily tied on fabrics of any type.
- First of all, place the accessory on the neck so that the largest part is on the left side and is lowered below the smaller
Important: the specified method of formation of the node is considered one of the few in which the seam is located outside.
- Cross the part of the tie, while the smaller should be located above the larger
- Now place a wide part over a narrow part, directing it to the left
- Pass the wide side into the loop. Movements should be directed from the bottom up. Make these manipulations from the wrong side
- Now take it into the loop from top to bottom, but already on the front side
- Pull the tie down, correct it

Ways to tie a tie
"Diagonal node", which is considered one of the most complex and unusual, is made according to the following scheme:
- Cross the largest part with the smallest after the tie is thrown over the neck
- Most now place the large part to less, taking it to the right
- Repeat the action, again making the revolution of one end around the other, drawing a conclusion to the right
- Now the larger component is filled into a loop
- Bring the largest part to the left side
- Take up most of the previously made loop. The knot is ready

"American knot"it is created according to the following scheme:
- Place the accessory on the neck. Cross its parts so that the wide is located above the narrow. Direct the wide right
- Now it is worth the largest component to direct down, through a loop
- Tighten a little
- Stretch the large end horizontally to the right
- Pass it in a loop

A simple way to tie a tie
"Kent" It is considered one of the lightest methods for tying a tie. It is recommended to wear tall men using medium length ties.
- So, for starters, the largest part to the outside, throw the accessory. The largest side at the same time let it be on the right, the small one is on the left. You will have to work with the most part, and lower the lesser slightly higher than the navel
- The wide part of the cross with the narrow one so that the first passes under the second. As a result, the wide component will be removed on the left. Turn it to the right - now it will lie on a narrow
- Now the part with which active work is being carried out, lift and pass into the loop formed between the thing and the throat
- The final stage is the extension of the largest end into the loop down from the front side. Pull the tie a little and straighten it

"Prince Albert" Greatly combines with shirts having an average, wide collar or collar with buttons.
Important: this node is considered one of those few that needs to be tightened more - its appearance from this becomes more strict.
- Throw a tie so that the seams are closer to the neck. The wide end will be on the right, the narrow - on the left
- Put the wide end on the narrow side so that the crosshair forms
- Below under a narrow part, conduct a wide to the right
- Now run to the left on the upper side of the narrow part - this is how the front side of the node will form
- Repeat the previous action
- Pull the wide end to the neck, passing between a tie and throat
- Now stretch the tie through the front loop down and correct the resulting knot

"Pratt" - A fairly universal node that anyone can easily cope with. It is excellent for wearing every day, and for holidays.
- Throw a tie so that the seams look out. The wide side will be located on the right, and the narrow side on the left
- Cross a wide part with a narrow one - the narrow will be over the wide
- Wide pull from the bottom up, extinguishing a tie under the collar
- Make one revolution and pull the end on the left
- It is time to move the end to the right horizontally - this is how the external side of the node will form
- Pull up the end again, stretching it through the collar
- Now it is worth giving up from top to bottom through the front loop
- Pull the end down and correct the knot

How to tie a tie - video
Manhattan knot - Stylish and light. Universal for any costumes and shirts.
Vostochny knot -For those who want something unusual. The result is stylish and attractive.
Kristensen knot - He is also called "Crusade." Ideal for those things that are made of loose materials. The width should not be large.
Onassis knot It is a find for those men who prefer to hide a knot under a shirt collar. Accessories of light material are suitable.
Node "New Classic" - It is a small triangle. Ideal for moderate ties and not very long length.
As you can see, you cannot count a tie. However, you can master several of them in order to facilitate the collection of a man to work or holiday. Believe me, he will appreciate such a skill.
In addition, it is quite possible to please yourself with such nodes, because a tie can be seen more and more often on female neck - such an accessory looks very stylish and appropriate quite often.