There are many techniques and tricks of creating simple and original drawings on the nails, thanks to which you can make an amazing manicure at home - know them by reading the article!
Content
- The simplest drawings on the nails for beginners
- Simple drawings on the nails step by step
- Video: nail design. Scotch tape for nails
- Schemes of simple and beautiful drawings on the nails
- How to make simple drawings on the nails gel polish
- How to make simple drawings on the nails with a needle (diagrams)
- Schemes of simple patterns on nails with a toothpick
- Video: Nail design "Wings of the butterfly"
- Schemes of simple patterns on the nails with a brush
- Video: Making a manicure by a fan brush
- How to make simple drawings on the nails with acrylic paints?
- Simple drawings with shellac on nails
- Video: drawings with shellac on nails
- How to draw on nails simple drawings: tips and reviews
- Video: draw on the nails
The beauty of a woman is primarily well -groomed, and most of all about the wellness of a woman speaks her hands.
Poor manicure, roughness of the skin, the lack of jewelry speaks of untidiness and desire to look not a woman, a circling head and a breakdown of the heart, but a gray -haired one who does not care before others perceive it.
Well, if there is good desire to look good, but there is no money for a salon manicure, then this is not a problem - this article will tell you how to create an amazing pattern on the nails and at the same time not spend any extra money or time.
The simplest drawings on the nails for beginners
Even those who do not have the talent of an artist can create an original and aesthetic pattern on their own nails. This will not require either professional varnishes or any special tools-only fantasy and some improvised means that are in any house are needed.
To create a simple drawing will be required:
- varnishes of various colors
- needle
- cotton wool
- varnish removal (in case something does not go according to plan)

Before the start of the creative process, it is necessary to prepare your hands: lower them for 15-20 minutes into the bath for hands with sea salt, put in order the cuticles and the shape of the nails. After that, the hands can be lubricated with a nutrient cream and wait until it is completely absorbed.
But the cream should not be applied to the nails - this can harm the future drawing.

The simplest nail design is the creation of various lines, points, geometric shapes in a chaotic or ordered form. To do this, the nails are painted in the main color, and after completely drying the varnish is applied with a point of a point or make lines with a brush (but this already requires a certain dexterity).
The use of various stencils for beginners will also be useful. After drying the picture, a fixer is applied from above - so the beauty of your manicure will remain for a long time.
Simple drawings on the nails step by step
Quickly and easily drawing on the nails can be created using stationery adhesive tape. Stencils are made from it, and after that they are glued to the nail and stained with varnish.
When the adhesive tape is removed, they get the perfect drawing, which, after covering the fixer, will please its owner for more than one day.

Most often, with the help of adhesive tape, various lines and geometric shapes on the nails are created, but experienced craftswomen were able to create whole masterpieces of painting on their nails using such a simple adaptation. And for beginners, imitation of a chessboard on nails is perfect.
To get a beautiful chess manicure, you need:
- Prepare hands: salt bath, cutting of the cuticle, giving the nails the desired shape (in our case, the shape of the square or the rounded square is relevant)
2. Cut the tape into comfortable strips 0.5 cm wide
3. Cover the nails with the base, and then, after its drying out, paint the nails with varnish of white, golden or silver
4. After the varnish is completely dry, stick a strip of tape on the bottom of the nail, and stick the other crosswise so that a small even square forms in the upper right corner of the nail
5. Color the entire free part of the nail with varnish so that it enters the stencil line
6. After drying, turn the strips and stick others in the same way mirror
7. Paint with varnish and turn off the stencil after the varnish is completely dried up
8. The finished pattern is covered with a fixer


By cutting tape into thin strips and using them as stencils, you can create an unusual manicure - it will take only a few minutes. To achieve the desired result, you need to follow a simple instructions:
- Clean your nails sequentially with stripes of any three colors (you can choose both contrasting and harmoniously combined with each other)
2. After drying, stick thin strips of tape on your nails
3. Apply black varnish on the entire surface of the nail
4. Wait until the varnish dries and remove the strips
5. Apply a fastener


Video: nail design. Scotch tape for nails
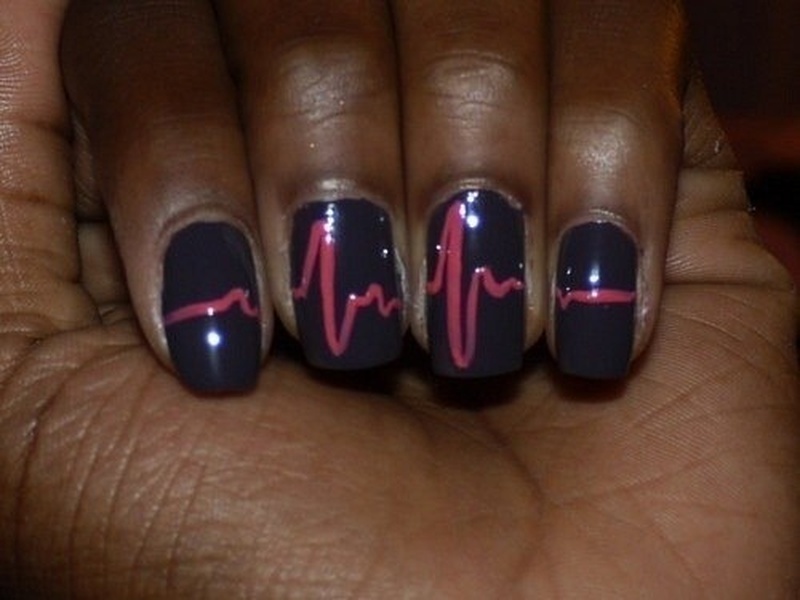
Schemes of simple and beautiful drawings on the nails
Using a needle and varnishes of various colors, you can create original drawings on the nails even to those who have no talent for drawing and experience in creating manicure.


How to make simple drawings on the nails gel polish
Creating a pattern on the nails is a painstaking occupation and is very disappointing if the drawn flowers or lines begin to wash and tear it out after the first wash of the dishes.
But this problem is also solved: for those who want to see their manicure for two weeks, there is a wonderful remedy for manicure-gel polish. Its composition provides resistance, which cannot be compared with the resistance of ordinary varnish.

To create a beautiful drawing, gel polish is needed:
- degeneration tool
- the foundation
- several multi-colored gel varnishes
- ultraviolet radiation
- dots
- cardboard sheet that will be used as a palette

Step -by -step creation of point manicure:
- Before creating a gel polish, the surface of the nail must be degreased and the vitamin base is applied
2. Select the basic shade (preferably light color), apply it on the nails and dry it under the lamp
3. A small amount of gel polish of other, bright colors pour onto the palette
4. Using a small dots, apply points of different colors on the nails, placing them close to each other
5. Dry the pattern under the lamp and apply a shiny coating


If you combine a point drawing with the technique of the famous French manicure, then it will be possible to create sophisticated nails that all friends will envy!
How to make simple drawings on the nails with a needle (diagrams)
Flower patterns on the nails look original. It is not difficult to perform such a drawing, but this is painstaking, requiring patience and perseverance. But the result will delight you and others - such a drawing is suitable for any event and style of clothing, it is only important to choose the right color gama and not to beg with a dive.
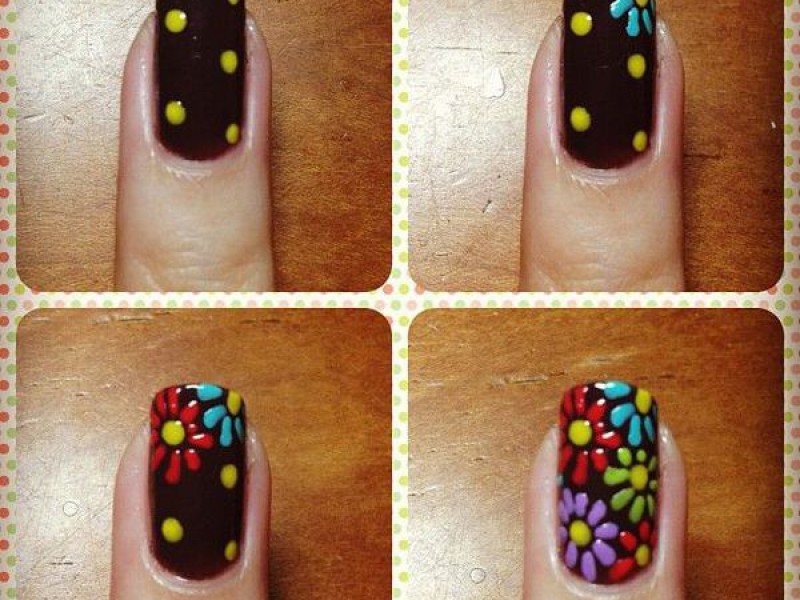
For floral manicure you will need:
- lacu-base of light shade
- red, pink, blue colors for creating petals
- a contrasting color to create the middle of the flower (if the petals are pink, then the middle can be yellow or silver)
- needle
- cotton stick and varnish removal
Sequencing:
- Paint your nails with a light varnish and wait until it is completely dry
2. Close the needle or toothpick in the varnish and put the point on the nail, indicating the middle of the flower
3. Wipe the needle from traces of varnish and, in a circle from the base of the flower, put the points that imitate the petals
4. With such flowers you can decorate the entire nail or draw a few pieces on one edge of the nail


After the pattern has dried, the nails must be covered with a varnish fixer. For greater decorativeness, you can draw leaflets: for this you need to put an end and draw a needle along it in the direction of the flower, forming a sharp leaf.
Schemes of simple patterns on nails with a toothpick
Using varnishes of various colors and a toothpick, you can create an elegant pattern on nails called “Butterfly Wings”. For this, you need:
- varnishes of different colors
- toothpicks
- napkin
- fixing to the varnish
- the foundation

The sequence of creating a picture:
- Apply the basis for your nails and wait for its complete drying
2. Clean your nails with the main color
3. Without waiting for drying, apply three different colors from stripes from the upper corner of the nail to the middle
4. Using a toothpick, immediately draw the lines from the middle to the corner, as shown in the photo
Video: Nail design "Wings of the butterfly"
Schemes of simple patterns on the nails with a brush
With the help of a special brush for manicure, even a beginner can create a simple and aesthetic pattern. Instructions and techniques described below will allow you to independently transform nails no worse than the interior of the art of art.


Video: Making a manicure by a fan brush
How to make simple drawings on the nails with acrylic paints?
A real artist can be felt by drawing acrylic paints on such a “canvas” as his own nail. The wide color scheme and ease of use will create a variety of drawings on which fantasy and creativity will encourage.
But work with acrylic has its own characteristics, which you need to know so that the drawing is aesthetic and preserved for a long time.

Before proceeding with the art process, you should prepare all the tools necessary for this:
- acrylic paints (they can be purchased at any needlework store, stationery and even on the market)
- thin brush
- frecking varnish
- dots

Preparing the nails for manicure (removing the cuticles and giving the desired shape) they must be covered with the base base. After its complete drying, you can proceed to drawing with a brush.
You can depict both different points with dots and wave -shaped lines on the nails, and having compiled these elements, you can create whole inflorescences and enchanting drawings.
If the fantasy did not suggest anything, then you can be inspired by the work of novice masters:


After the end of the pattern and drying of acrylic paint, it is necessary to cover the nails with a protective coating-a stagnation varnish. Otherwise, at the first contact with water, the picture will blur.
Simple drawings with shellac on nails
Shellac is a new generation tool that combines nail polish and an increase gel. Such a combination allows the agent for a long time to stay on the nails without forming chips and scuffs.
It is not surprising that modern fashionistas and lovers of various new products from the beauty sphere prefer the pattern of shellac even at home.

Creating an amazing manicure with shellac will not be difficult if you prepare everything you need:
- shellacs of various colors
- the foundation
- brushes of various sizes and structures
- top coating
- cotton wheels, sticks, alcohol and varnish removal
- Ultraviolet lamp

After preparing your nails for a manicure, sit down more comfortably and get ready to create:
- Cover the nails with the base
2. Gently apply shellac and dry under the lamp
3. If necessary, apply another layer of shellac and dry again
4. With the help of alcohol, wipe the nails with a cotton pad
5. Start creating a picture: draw lines, points, flowers or try to create an imitation of French manicure with various shades of colors
6. Dry your nails under the lamp and cover with a protective layer of the top coating and dry again under the lamp
Video: drawings with shellac on nails
How to draw on nails simple drawings: tips and reviews
Absolutely everyone can create an unusual manicure at home, even if the shower does not lie for drawing, but I really want beautiful nails. It is only necessary to choose the technique in which you will be able to reveal your creative potential as much as possible - the main thing is that both the lesson and the result bring pleasure.

In order for drawing patterns on the nails to work out and preserved for a long time be guided by the advice:
- it is necessary to select quality products that are characterized by increased resistance. For the lack of such, you can turn to the good old varnish, but then you will often have to cross your nails and again.
- when creating a pattern, focus on the size of the nail: do not try to draw a bunch of everything on short nails - it looks ridiculous and tasteless
- if it does not develop with fine art - do not despair, because you can always turn to geometric shapes that always look fashionable and organic
- do not neglect the application of the base and the stagnation varnish
- so the nails will delight with their view much longer
Do not be afraid to experiment: create a drawing that tells the fantasy and do not despair if you have fallen, because this is just experience and the next attempt to make a stunning manicure of the house will be more successful.