In this article, we will offer the ideas of calendars that can be made with your own hands.
Content
- How to make a calendar with your own hands for children to kindergarten, school: step -by -step instructions, photo
- How to make a felt adventor?
- How to make a desktop calendar, flowing paper and cardboard for 2023? How to make a calendar-scrapbooking with your own hands?
- How to make a wall calendar: description, ideas, photos
- How to make a calendar of a paper torn out of paper: description, ideas, photos
- How to make a calendar with photographs: ideas, manufacturing schemes, photo
- Beautiful calendars with your own hands: photo
- Video: several ideas for creating calendars with your own hands
The calendar is, as a rule, a necessary acquisition. However, maybe it makes sense to think about ensuring that such an object also serves as part of the decor? And if you make the calendar yourself, the interior will also acquire a highlight!
How to make a calendar with your own hands for children to kindergarten, school: step -by -step instructions, photo
With small children, you can make a simple and at the same time unusual calendar from the furry:
- First of all, you need to ask the baby pick up buttons of the right size. Such a task will contribute development of fine motor skills of the hands.
- Next, you need to ask the child Cut circles with numbers from paper. Such a task he will teach to handle carefully with scissors.
Important: circles should be of such size that they can fit inside the buttons.
- Then you need to paste the circles into buttons, And themselves buttons - stick on any basis for the calendar. It can be fabric, cardboard. Such work will develop in a child personality, creative thought.

Teachers also advise to make with children weather calendar, Which will help the child learn not only the numbers, days of the week and months, but also weather phenomena.
Come in handy:
- A4 paper
- The felt is thick and thin
- Fairy tape
- Fabric and slanting
Important: the dimensions of the oblique box should be approximately 1.5 m.
- Threads for embroidery
- Needle, scissors
The process of work is as follows:
- First you need to portray on paper sketch.

- Further a panel is cut out of thick felt in size of about 30x42 cm. It is necessary to cut out also 19 details To designate the months and days of the week 2x10 cm, 12 details for numbers in size 4.5x7 cm, 6 and more details For weather in size 10x10 cm.

- Next are created blacks made of thin felt.

- Now cut Strips of Velcro tape.

- Then The tapes need to be sewn to felt pieces sticky side to the outside.

- It's time to prepare templators templates.

- The numbers are needed cut from thin felt.
- Further felt numbers need apply on the plates of thick felt and sew them among themselves.

- Further weather phenomena are cut out of thin material - Sun, clouds. The rain can be cut, or you can simply embroider.
Important: they should also be sewn to pieces of thick fabric.

- In small stripes you need write months, days of the week. It is preferable to use for this purpose the disappearing marker - You can embroider it on it, and the paint itself will pass over time.


- Now you need to cut and sew or simply embroider with threads on the largest basis for crafts the phrase "The weather calendar."
- Further velcro are sewn According to the scheme below:

- Now you can take care creating a pocket - You can put all the removable details in it. Cut one workpiece size 17x32 cm, two blanks 15x32 cm, One strip 10x63 cm.
Important: in parts with a format of 15x32 cm, you need to twist one edge.

- Now two identical blanks are folded by the front sides to each other, stitched on three sides, and then Turned out. On that edge that is not sewn up, you need to do allowances, turn them, remove them to the edge. It is attached from above with threads Velcro.
- Further the fabric strip should be folded out the wrong side, amplified, sewn to the pocket. In this case, the allowances are turned off onto the pocket, attached.

- To the pocket the second part is sewn with a sticky strip, And the pocket itself is sewn to the workpiece under the calendar.
Important: the angles of the felt large workpiece must be trimmed so that it repeats the outline of the pocket.


- The top and bottom are connected Pocket. The edges should be sheathed a slanting head.

- Upper angles The calendar should be provided loops - With their help, the calendar should be attached to the wall. And so that the loops do not catch your eye, you can decorate them with lipped strips - You can attach the symbols of the month to such stripes in the future.


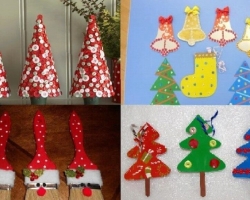
How to make a felt adventor?
The so-called Advent Calendars, which count from the first day of December to the last, are especially popular in Europe. After all, a certain pocket corresponds to each day in which a surprise is hiding. Often people create such calendars on their own. So, for a felt gingerbread house, a calendar will be needed:
- Fetr - there must certainly be a brown color, since the gingerbread house is just such a shade. The remaining colors are selected at the discretion
- Hanger on which clothes are usually placed
- Threads, needles, scissors
- Glue
- Decor - buttons, sequins, beads, sparkles
Creating such beauty is not difficult:
- From brown felt We need to create two large patterns-one dla house.
Important: in width, they should be such that the hanger will fit.
- Previshes are needed sew the front sides outward.


- Now stands cut the pockets. Do not immediately glue them on the basis - it is preferable to think over the plot in advance and, if necessary, decorate the pockets until they are placed on the calendar. This will greatly simplify the work.
- Do not forget about numbers! They can be cut from the same felt, or from any other fabric. You can also attach it as you like - for Velcro, glue, threads.
- The final and most creative stage remains - decor! On the house you need to stick snow -covered window sills and roof, Christmas tree, candies, snowmen, etc.


How to make a desktop calendar, flowing paper and cardboard for 2023? How to make a calendar-scrapbooking with your own hands?
In order to create a similar calendar, come in handy:
- A4 cardboard
Important: the density is preferable to choose the following - 250 g/cm2. Such a density is observed in a photo cardboard.
- Scrap-paper with any motives
- Springs if there is a binder or ring if it is not
- Decor elements
- Printing calendar grid for 2023

You can start work:
- First of all, you need make a cardboard cardboard, that is, the creation of a groove for further folding of the material. The usual bend in half can damage the image, because it is Bigovka that is preferable. It is advisable to use a special board For this process.
Important: of course, not everyone can have a board, therefore you can do with improvised materials. For example, a ruler and a pen that does not write.
- After the Bigovka Cardboard should be folded with a peculiar triangle, which will be sustainably located on the table.
- In order to make the sides of the calendar elegant, each of them is needed decorate a scrap-paper. When cutting the rectangles, be sure to take into account the allowances. They are about about about them 2-3 mm.
- Now The rectangles are glued To the basis from the photo cardboard.
- Then you can do it calendar grid.
Important: the leaflets should be designed in any form and print it so that every month is located on a separate leaf.

- You can begin to decoration The front side of the calendar.
- Next, leaflets with months are laid in a pile, and the pile is processed Bender. The binder needs to be processed for the calendar. If there is no such tool, you can do fastening with rings.
- Now the leaflets are needed string on a spring or rings, Attach to the base.


How to make a wall calendar: description, ideas, photos
For the manufacture of the next universal calendar, you need:
- Cork board
- Buttons with which it is convenient to fix something to such a board
- Color cardboard
- Scissors
- Markers

Operating procedure:
- From color cardboard you need to cut days for each month. Colors can be alternated at your discretion.

- Then papers are attached to the board buttons, a the numbers are applied with a marker.

Important: it is most convenient to fix not all months, but one relevant.
- On a separate sheet The name of the month is written.
- That's all - you can hang the calendar on the wall! The period of change of the month is noted a new portion of paper-days. By the way, on the leaves you can not only draw numbers, but also write notes.


The next idea of \u200b\u200bthe calendar is similar, but has nuances. For manufacture, you need:
- The basis of cardboard with a frame for the picture. Need a glazed base. The size is preferable at least 30x40 cm
- Colored cardboard or colored paper. You can use stickers
- Double sided tape
- Scissors
- Marker
Important: you need to choose a water -based marker, the traces of which are easily removed with a sponge.
We proceed:
- The basis is necessary mentally strict a 31 site - One current month will be presented.
- Further Stickers are attached. If there is only colored paper at hand, you need to cut it into squares, which, in turn, should be attached using double -sided tape.
IMPORTANT: Writing on these pieces of paper does not need anything yet!

- If provided decor, It is worth doing it at this stage.
- It remains only cover the workpiece with glass. Here on it already you can make marks - Month, days, various notes.


How to make a calendar of a paper torn out of paper: description, ideas, photos
Required:
- The board is ordinary wooden
- A board on which you can write chalk
- Acrylic paint is white, as well as a multi -colored set of colors
- Paint in a spray
- Clamps, screws to them
- Paper
- Double-sided tape
The order of work is as follows:
- Wooden board should be covered white paint.
- After the paint is dry, you need to apply stripes and other patterns color paint.
Important: it is preferable to apply paint randomly.
- Then to the place where the chalk board will be mounted, you need Attach tape.

- Board Fasten.
- Clamps must be covered with paint, which is sprayed. It is preferable to leave gaps - this will create an antique effect. Or you can scrape fresh paint.

- With the help of screws the clamps are attached on the board.
- The calendar is ready! Left Attach pieces of paper to the clamps on which the dates will be written. As the dates of the paper will come off. You can write months on the board.


How to make a calendar with photographs: ideas, manufacturing schemes, photo
Favorite photos can be entered in the calendar is quite simple. We need only:
- Actually, photos
- Cardboard
- Printed in advance calendar grids with months and numbers
- Scissors
- Hole puncher
- Bilateral tape or glue
- Satin ribbon or twine

You can proceed:
- So, first of all, you need compare the sizes of photos, cardboard blanks and calendar nets.
Important: they must match.
- A photo need stick on cardboard.
- Then you need to do it The holes at the bottom of the cardboard With a photo and at the top of the pile of sheets With dates.
- Need connect photos with a calendar grid. And you can do this with a twine or tape.


Beautiful calendars with your own hands: photo
We bring to your attention several ideas of calendarsthat can be made with your own hands:


There may be an infinite number options for creating calendars. The hand-heart is unique, which allows you to decorate your interior with unique things. And as a gift, such a calendar is quite universal!