

The article gives step -by -step descriptions of the picture of the newborn.
Content
From this article you will learn how to correctly and simply draw a newborn child. You will discover the basic principles and relationships with which you can create images of wonderful kids.
How to draw a newborn child with a pencil in stages for beginners and children?
At first glance, it may seem that drawing a child is simple. However, practice shows that it is necessary to begin to draw newborn from abstract children's portraits and figures, having previously studied proportions and remembering simple schemes given in step -by -step lessons.
Let's try to draw a baby, although this task is not easy: the kids are constantly in motion and only experienced artists manage to draw them from nature. Babies are a popular topic in the visual arts. This is explained by the ability of babies to cause admiration and tenderness in those who are watching them.
We will draw such a glorious baby:

The finished drawing can be presented to a young mother who has his own fidget and a prankster.
- We apply the initial lines on the sheet: a circle, which will then become the baby’s head, slightly retreating from the circle, draw two arched lines - shoulders, outline the lines of the body and arms. Inside the circle we draw two parallel lines that the third line crosses in the center.

- Having retreated from the circle, we clarify the contour of the head: the upper part will be wide and rounded, the lower part will narrow in the cheeks. We denote the child’s chin from below the child.

- We painted parallel lines inside the circle for a reason: they are necessary for the symmetrical location of the eyes, nose, lips. We draw on both sides of the central line the large oval eyes of the baby. Arch -shaped strokes denote the lower eyelids. We finish long bent eyelashes on the upper eyelids.

- We draw the pupils, leaving white round glare in them.

- On the circle line we will draw two curved dashes. It will be in surprise raised up the eyebrow of the baby. We draw a tiny nose on the lower vertical line. We draw a mischievous smile.

- From the lower contour of the cheek, we draw a curved line down, denoting the contours of the tummy and panties, which puff at the top.

- We draw short with the spread of the baby's hands spread. The main thing is that they look chubby, like in newborn children.
- We clarify the contours of the baby’s legs, adding his fingers on each foot and a heel on the left leg.

- We draw on the crown a few funny stuck hairs and add ears. They are almost not visible behind the widely placed hands, but we need to indicate their contours and internal lines.

- We decorate our miracle with a pink color. The baby's eyes will make sky blue, and the panties are blue.

Here's how you can draw a newborn in motion:


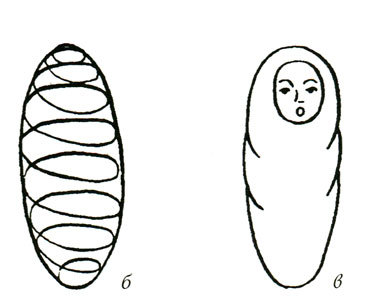
Another simple way to draw a baby:
- We depict a round head and an oval body, intersecting with each other. We show with two curved hand lines. We draw a central vertical line inside the circle, add two more - horizontal.
- Now you can dream up and, if experience allows you to draw Such a funny baby.


A little more time will need to draw this laughing child:

As you noticed, the little one is simply portrayed if it is a cartoon character. In this case, small inaccuracies allowed during drawing will not spoil the picture.
- draw the head, add the body in the form of a trapezoid and two legs
- detail the drawing: add the eyes, small ears, nose and dummy
- we draw pens, hairs on the head

According to the following scheme, you can easily draw a baby in full growth:

- We draw the same lines as in the picture.
- Taking advantage of the hints-pictures presented below, you will draw a "real" pretty baby. Do not think it's difficult. A step -by -step lesson is very simple.
- We will determine how much space the baby will take on the sheet and mark with light lines its approximate outlines.
- We draw the initial contours of the baby. To do this, we will give a geometric shape to some areas.

- Now we describe the contour of the head. We draw auxiliary lines inside the circumference for the head.

- We draw short strokes on the eye line - the baby is sleeping, because there is no need to draw open eyes.

- We draw the baby and lips of the baby.

- We will finish the ear and all the lines inside it.

- Detail and add lines on the face.

- We draw rare hairs. We just lead curved lines from the top of the head to the spin.


- We outline the contour of the body.


- We draw the lines of the handles and legs.


- Detail the drawn areas, add the fingers, plan the short strokes of the knees.
- We finish the folds on the body of the baby.

- It remains to draw soft folds of the diapers on which the baby lies.


As you can see, drawing little Lalya is not so difficult.
How to draw a face, a portrait of a child with a pencil in stages?
Before drawing a portrait of the baby, you need to remember the rules for building the child’s head. To do this, it is not necessary to study the course of human anatomy, but just remember one simple formula:
- We begin the drawing from the contour of the head. It should be round. We draw two lines inside: horizontal and vertical. On the vertical line we will draw the eyebrows of the baby.
- After that, we will divide the lower half of the face into 4 equal parts. Under the line of eyebrows we will draw our eyes, in the next part we draw our nose, then - the upper lip, in the last section we draw the lower lip and chin.
Look at the drawing to understand the principle of building a children's portrait. Here each line has its own color:

- the red line divides the circumference of the head horizontally into two parts - the eyebrow line
- with the help of the blue line, it is easy to draw eyes, it is also the contour of the lower eyelid
- the green line will help to draw your nose correctly
- the orange line is the line of the mouth and the chin
The eyes of the newborn are large widely salted. The eyebrows of the kids do not stand out much, because they can be drawn with several strokes. We draw the nose snub, the sponges are chubby, and the small chin is planned only by one stroke line. If the baby is fed, then he can finish several folds under the chin. You also need to add hair, ears.
We draw a portrait of a newborn child:
- We begin the drawing from the circle and intersecting lines inside.

- We clarify the contour of the face by showing the hair line and sticking hairs on the temples.

- We draw the upper eyelids, nose and mouth, focusing on the early lines drawn.

- We draw our eyes in more detail, add eyebrows, chubby lips.

- Now you can proceed to the scalp: draw rare hairs on the crown and show the hair line on the forehead with short stroke lines. Add small ears.

- We draw the baby’s shoulders, adding the missing strokes in this part of the picture.

- We circle the contours with a dark color and wash the auxiliary lines.

So that the baby in the figure is not like an adult, some points must be observed:
- in a newborn, the body's body is different from the proportions of an adult: their head is large, their hands and legs are puffy, and a short body is short
- at the beginning, it is necessary to portray the largest details, after which you can proceed to the rest
Here detailed instructionsthat will help you in stages to fulfill a portrait of a newborn with a pencil. To begin with, we will get acquainted with the drawing of the child’s profile. 5 horizontal lines are drawn in the figure, thanks to which the portrait of the baby will turn out as realistic as possible:
- A line AB is drawn in the upper part of the head, which shares the upper part of the head and lower. The eyebrows of the child are located on this line.
- The CD line is the line of the lower eyelid and the upper part of the auricle.
- The EF line passes under the nose.
- The GH line passes under the lower lip.
- Line IJ passes under the chin

Let's move on to drawing a portrait. We need a blank sheet of paper, a well -sharpened simple pencil and ruler.
- We draw a square, the size of which corresponds to the size of the head of the child being depicted. We draw two lines inside the square, dividing it into four equal sections. This division into parts is necessary to create accurate proportions during drawing the face of the child and the head.

- In the lower left section, draw a circle in which we will place the face of the child.

- We enter a large circle in a drawn early square. It will be the baby's head.
- In a small circle, draw facial features: lips, nose, eyebrows.

- We clarify the contours of the child’s head and plan a short line of the ear in the right lower section.

- We draw eyes, draw nostrils, mouth, cheek. Add lines inside the ear.
- We remove excess pencil lines, squares and circles.
- We draw hair, gradually wiping the contours of the head, neck. We correct small details and adjust the proportions.

- We begin to apply light stroke lines to the baby's face. Do not rush at the same time. Take breaks.

- After some time, if you go out for a walk, you will do other things, you can notice inaccuracies and correct errors. Tiny spots in the eyes will look especially interesting - a reflection of light from the shiny surface of the eye.

- Add stroke lines on the face, neck.
- Add the shadows on the ear. We use simple pencils HB and 2V for this.

- We draw a hairy part of the head with simple HB and 2B pencils.

- The portrait of the baby is ready.

Look at the picture to understand how to draw the face of a newborn with a pencil.
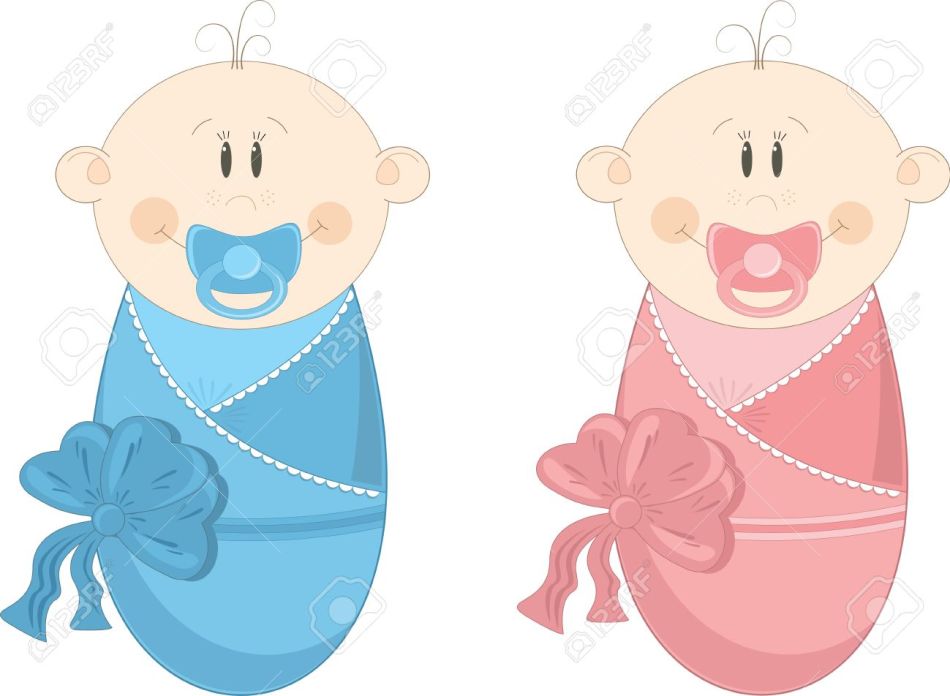
How to draw a child in a diaper?
To draw a baby in a diaper will help you with schematic drawings presented below:

Drawings of a newborn child for sketching
If you are looking for pictures with kids for sketching, then look at the options below.


Video: How to draw a baby?
Video: Simple drawings #46. Baby in a stroller


