

Features of cutting snowflakes from paper.
Content
- How to cut off paper from paper with your own hands in stages?
- Beautiful snowflakes: schemes and templates for cutting
- How to translate a pattern for cutting snowflakes?
- How to make a voluminous snowflake from paper?
- Volumetric snowflakes from paper: schemes and instructions
- Origami snowflakes: photo
- Beautiful paper from paper with your own hands: ideas, photo
- Video: How to make beautiful snowflakes from paper with your own hands?
Perhaps every adult at least once in his life cut out paper snowflakes and shared his skills with children.
How to cut off paper from paper with your own hands in stages?

- five-
- six-
- eight -pointed
To do this, prepare:
- a sheet of paper of ordinary density
- chancellery and manicure scissors
- pencil or pen
- workplace at a table not covered with a soft tablecloth
- fold the sheet with a triangle, connecting the opposite ends. In this case, you get an extra strip that cut with scissors
- turn the workpiece into the triangle again, fixing the opposite angles together
- and bend the triangle for the third time according to the method described above
- put the upper corner of the triangle on its longest side and bend the workpiece. Cut the excess strip with scissors
- draw a pencil/handle pattern on a folded sheet on one side
- cut carefully with scissors
- expand the snowflake and decorate it with a room/window/Christmas tree

Beautiful snowflakes: schemes and templates for cutting


How to translate a pattern for cutting snowflakes?
If you liked a specific drawing and you want to copy it, then either:
- draw a pattern on the blank by eye, approximately
- print it and draw it through a carbon copy
- print, cut, attach to the workpiece and circle
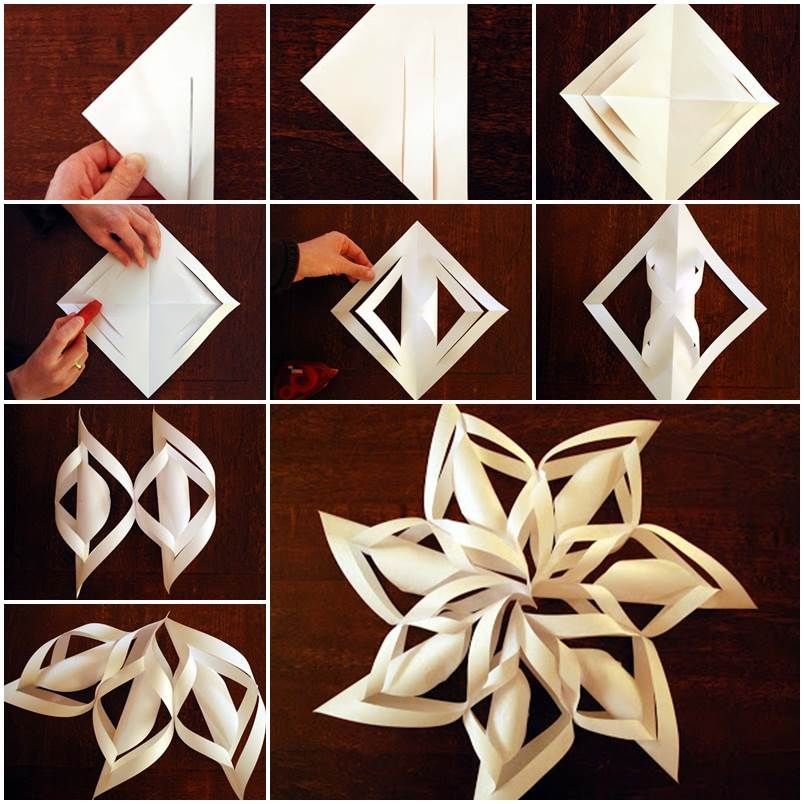
How to make a voluminous snowflake from paper?

To make them, take:
- paper
- pencil/handle
- ruler
- chancellery scissors
- glue
- stapler
- fold a triangle from a sheet of paper
- cut the extra strip
- using a ruler and pencil, draw a line coming from the top of the triangle to its base
- return 3-5 mm to the right and left of this line and draw the lines parallel to the sides of the triangle so that the Christmas tree is obtained
- place the lines at a distance of 5 mm. The wider the strips, the less openwork the snowflake will turn out
- cut each line with scissors
- expand the triangle square
- turn the center of the sheet with a tube and glue
- turn the future snowflake and glue the next strip into the tube
- turn the sheet again and perform similar actions
- repeat the work before the end of the strips
The final stage is the connection of fragments among themselves. Gently fix the strips of each element with a stapler so that their most magnificent sides are located in the same plane.
Volumetric snowflakes from paper: schemes and instructions

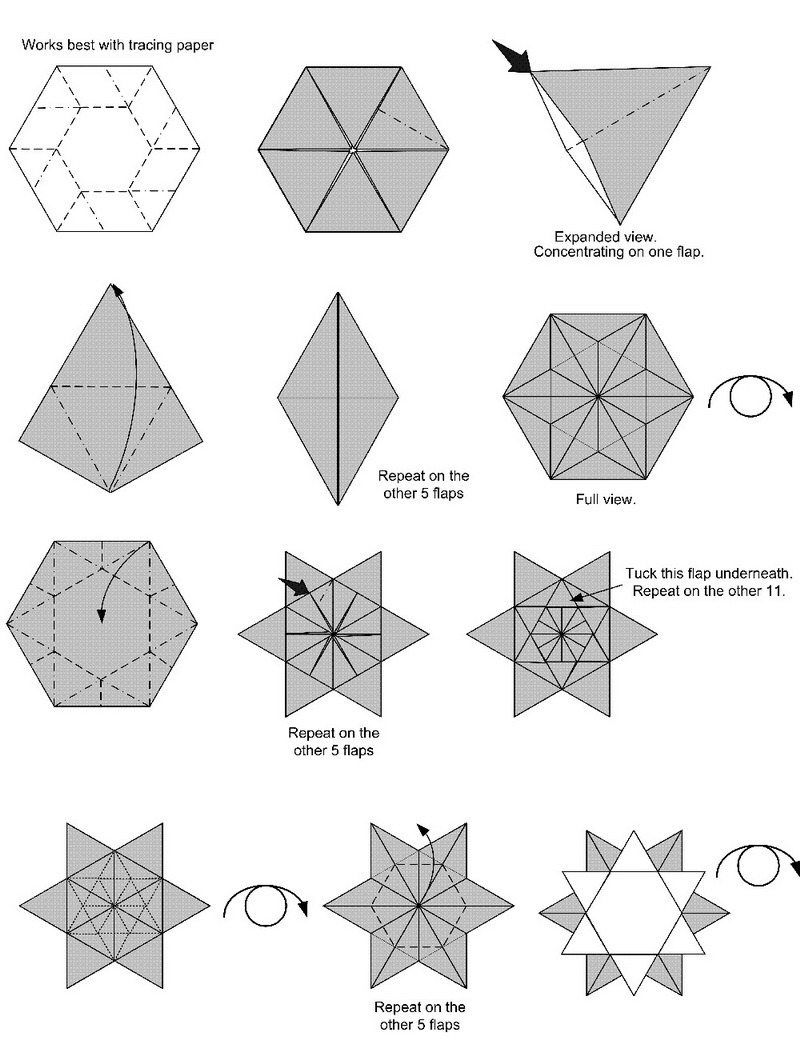
- origami
- quilling
- from strips
- 3D
- fan
- with the addition of tapes, buttons and any other materials for creativity
The instructions for creating a snowflake from paper in the technique of origami are inserted in the form of a figure below.
Make a voluminous snowflake from the strips according to the instructions. Take:
- 6 strips of paper of the same width 30 cm long
- stapler or glue
- chancellery paper clips
- fold the stripes of the crossbow three pieces and intertwine them with each other, so that in the center there is a square
- fix the interweaving place with paper clips or stapler
- combine the extreme ends of the strips to each other to make the petals. You will get 4 petals and strips.
- perform similar actions with other six stripes
- put one workpiece on the other at an angle of 45 ° and connect the free edges of the strips so that the snowflake looks like a voluminous flower

Prepare:
- 3 sheets of paper
- scissors
- stapler or glue
- turn the sheet of paper with an accordion and fold in half
- repeat these actions yet twice
- cut the drawings at the ends and in the middle of the blanks
- fix the accordions for the extreme parts with a stapler or glue
- the center of fastening decorate, for example, a small -sized paper snowflake or a bow from a wide tape
- attach the thread and hang where they planned
Briefly, the scheme of creating a snowflake from paper using the fan technique looks like this:

Origami snowflakes: photo


So, we examined different techniques for cutting snowflakes from paper, as well as schemes and photos of finished products for inspiration. Save yourself those that you liked for fascinating classes with children in cold winter evenings before the New Year.
Beautiful paper from paper with your own hands: ideas, photo
Paper snowflakes look interesting and beautiful if you take not just a white sheet of paper, but colored. Then a specific pattern plays new faces and harmoniously combines with the interior or children's pattern.


A lot of different snowflake schemes! Thanks a lot.
A lot of different snowflake schemes! Thanks a lot.
Thank you. Every New Year we make them. How many options have been invented? Do not count ...
You know that in nature there is not a single same snowflake. Think about what fantasy who created them?