How to grow indoor violets at home?
Content
- Own violets: reproduction by leaf step by step
- After how many days do violets have the roots?
- Soil, land for growing violets
- Watering violets through the wick
- Lighting, air humidity for violets: Requirements
- What fertilizers to use for violet growing?
- Is Peters fertilizer, good force, a ferte for growing violets?
- When is it better to plant and transplant indoor violets?
- How to plant or transplant violets?
- Care for violets in the spring, summer, autumn, winter
- Why do not bloom violets, how to make them bloom?
- Spots on the leaves of violets: what to do?
- Fialists with photographs and their treatment
- Video: indoor violets (Senpolia): rejuvenation, reproduction and transplantation
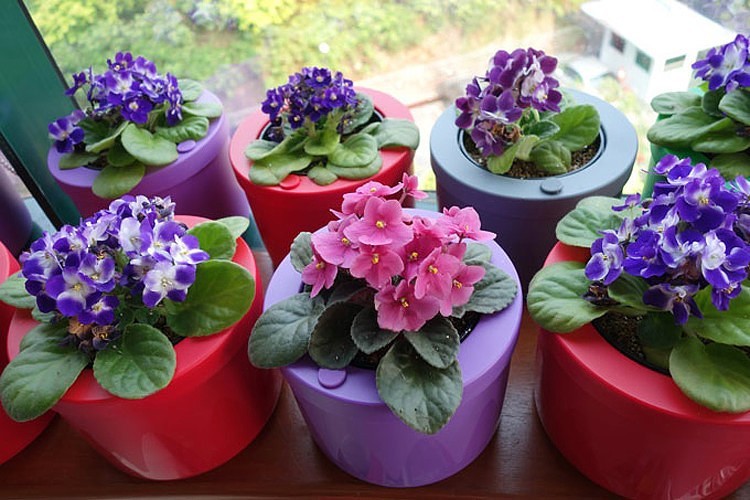
Violet - This is a indoor plant, which is a socket of rounded leaves, which is attached directly to the root system. The complete absence of the stem makes it unlike all other decorative flowers. An avid flower collectors love violet for her bright and memorable appearance. Unlike many other indoor plants, it has a variety of color, which allows you to create floral compositions with its help, which become the highlight of the dwelling.
But still, violet has a small flaw. She loves to carefully take care of her. If you do this wrong, then it is unlikely to delight you with its bright flowering. If you want to know how to water, feed and transplant violets correctly, then read our article.
Own violets: reproduction by leaf step by step
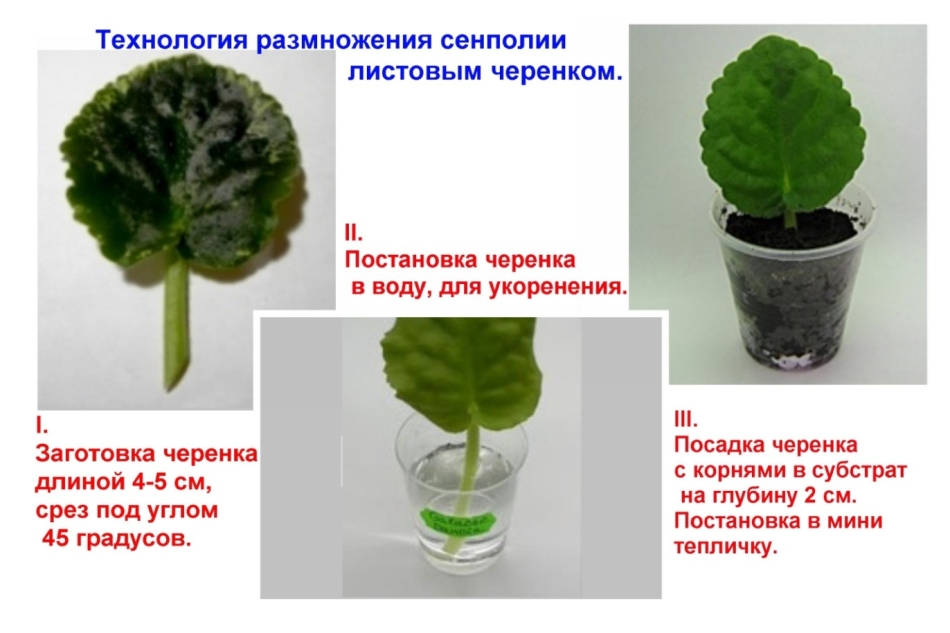
If you decide to propagate the violet yourself, then the first thing you need to do is find a healthy and strong leaf, which will subsequently become a new flower. It is best to take it in an adult plant that grows well and does not get sick. It is desirable to cut it in the second row of leaves or under a flowering outlet.
But those leaves that are at the very top or bottom of the flower for transplantation are not suitable. The lower leaves are not suitable for these purposes due to the fact that they are subject to decay, and the highests, as a rule, are not yet so developed as to successfully let the roots.
Recommendations for the reproduction of violets:
- Gently pinch off the leaf from an adult violet and carefully examine it from all sides. Be sure to make sure that it has no spots or damage.
- At the next stage, it will be necessary to prepare the leaf. To do this, you will need to take a sharp knife and cut its stem at an angle of 45 degrees. Such manipulation will increase the area on which the roots will begin to form, which will subsequently give a fairly powerful root system.
- Then prepare the dishes in which you will lower the leaves. It will be better if it is containers with a thin neck. If you do not have anything like it, then take an ordinary plastic cup, just do not lower the leaf into it without a paper cap with a slot.
- Next, dissolve activated carbon in water and pour the resulting liquid into the prepared containers. If you do not want to prepare such a solution, then mix distilled and ordinary water in equal parts. In this case, you also get a poorly disinfected environment with a minimum amount of microorganisms.
- Pour disinfected water into containers and lower the prepared violet leaves in them. If you want to avoid decay, then make sure that their stem falls into the water by no more than 1 centimeter.
- Put the containers with the sheets in the place where there is enough light during the day, but at the same time, follow the direct sunlight do not get on them during the day. Also, do not forget to make sure that the water in containers always remains on the same level, and if required, then pour it periodically.
- After the leaf has the roots, gently transplant it into the ground. Do everything so that the young roots are not damaged, and in no case do not deepen the leaf into the soil. With such actions you will only delay the development of a full -fledged plant.
After how many days do violets have the roots?

As practice shows, on average, the roots of cut leaves begin to appear approximately 20 days after they were lowered into the water. But, of course, this does not always happen. This process is affected by the water in which the plant material was lowered, the state of the leaf itself, and no matter how ridiculous it sounds, the season. Those who are breeding indoor plants know that at the end of winter and at the beginning of spring, all decorative flowers begin to develop intensified.
Due to the fact that during this period they begin to receive much more natural light and heat, they accelerate all processes and, as a result, they begin to more intensively bloom and release leaves. These processes slow down by the end of summer, and in the fall are practically suspended. In view of this, if you propagate the violet in the spring, then its leaf can let the roots even in two weeks. If you try to do this in the summer or autumn, then you can only see the first roots in a month and a half.
Soil, land for growing violets

I want to say right away that violets categorically cannot tolerate the soil teeming with bacteria and microorganisms, and that is why the option “to dig up at home” will definitely not work for you. If you act in this way, then your plant will grow poorly or, in general, die. In view of this, it will be better if you still take care so that your indoor plants grow in the right soil.
Moreover, if you wish, you can buy it without any problems in any specialized store. Well, if for some reason you don’t like the purchased soil, you can cook it yourself quite calmly. For those who do not know how it is done correctly, we present several ways to prepare light and healthy soil, which is ideal for growing indoor plants.
So:
- The easiest way to prepare the right soil, mix one part of ordinary soil with two parts of peat and add to all this small amount of moss-sphagnum. After thorough mixing of all components, the product can be laid out on flower pots and young violets are planted in it.
- If you want to make really good soil with your own hands, then take 6-8 parts of high-quality peat and add to it one part of the moss-sphagnum, perlite, vermiculite and charcoal. In this case, you will get loose soil, which will prevent the reproduction of putrefactive bacteria and contribute to the faster development of the flower.
Watering violets through the wick

Most novice flower growers when growing violets make the same error. They water it in the same way as other indoor plants. As a rule, with such watering, some part of the moisture inevitably falls on the leaves and stems, and as a result, pathogenic bacteria that provoke rotting begin to multiply there intensively. In view of this, it will be better if you water the violets through the wick.
For such watering, you will still need to stretch out a piece of fabric or rope at the stage of planting a flower in the hole. One end should be taken to approximately half of the pot, and the other should have a length that would allow it to get giving moisture from the very bottom of the container with water. So, after the wick is drawn into the pot, it will need to be installed in a container with water so that the bottom does not touch the liquid, but at the same time the wick was lowered into it.
If you do everything right, then you no longer have to follow whether the soil in a flower pot is drying out. If necessary, the plant itself will take the amount of moisture to it, thereby helping that the soil in the pot has perfect humidity.
Lighting, air humidity for violets: Requirements

As you already, probably, understood when growing violets, it should be taken into account all, it would seem, at first glance, the nuances. In view of this, if you want this indoor plant to please you with its beauty all year round, then be sure to follow the lighting and humidity in the room in which it stands.
For example, in order for the violet to intensively bloom, she needs to receive a sufficient amount of light at least 12 hours a day. For this reason, if it so happened that your flowers are in a room in which there is not enough natural lighting, then be sure to provide for the possibility of turning on electric lamps.
As for humidity, ideally its indicators should be at a mark of 70-80%. Of course, in an apartment or in a house with batteries, such humidity is a rarity. But still, in this case, there is an opportunity to solve the problem. You can spray water 2-3 times a day in a room from a spray gun or simply periodically put wet pieces of matter on the battery.
What fertilizers to use for violet growing?

Violets, like other decorative plants, need additional top dressing. If you stick them into the ground and you will simply water them occasionally, then they will definitely not grow normally. In view of this, it will be better if you periodically enrich them with useful trace elements. As practice shows, if at least once a month do not feed violets, then they begin to grow much worse and cease to bloom.
As for what fertilizers to use for the normal growth of violets, then everyone should decide for himself what fertilizer he is ready to spend. And this means that you can buy any top dressing ( Peters, Etissso, Valagro), the main thing is that it contains the maximum of substances useful for plants.
The optimal composition of fertilizer for violets:
- Potassium
- Nitrogen
- Phosphorus
- Sodium
- Bor
- Zinc
- Sulfur
- Magnesium
- Molybdenum
Yes, and remember that even the best fertilizer should be used as carefully as possible. Therefore, you should in no case exceed the dosages indicated on the labels and feed strictly following all the instructions. You can make it in two ways.
If it is planned, then just dilute the fertilizer in the water and soak them the soil (you can simply water the violet or put the pot with the plant in the pan with fertilizers). If your plant requires emergency assistance, then you can pour diluted fertilizers into a spray gun and spray them above the flower.
Is Peters fertilizer, good force, a ferte for growing violets?

Peters, good strength and farics are ideal means for feeding violets at all stages of their growth and development. Since they relate to complex fertilizers, with their help you can solve almost all the problems that arise in this decorative plant. You can increase the protective forces of the flower, stimulate their growth and flowering and contribute to the good development of the root system.
Moreover, if you use these fertilizers, you can reduce the number of transfers to a minimum, thereby saving the flower from excess stress. Due to the fact that he will not need to regularly restore his root system, he will bloom almost without breaks.
When is it better to plant and transplant indoor violets?

We already told you above how the violet behaves at different times of the year. And if you were attentive, you probably remembered that in late autumn and winter it practically stops growing and blooming or as advanced flower grinders say, falls into a state of rest. Of course, if you try to transplant it precisely during this period, then it will definitely be bad to take root in a new place.
If you want the flower to take the roots in a new pot as quickly as possible, then transplant it in the spring or at the beginning of the summer. True, in this case, there is one nuance. Violets are very poorly tolerated by heat. Therefore, if you want everything to go well, then select the transplant time so that at least two days after the leaf is transferred to the soil on the street, cloudy weather holds.
If you have to transplant the violet in the period when it falls into a state of rest, then be sure to provide it with the right amount of light. You can do this using indoor lighting.
How to plant or transplant violets?

Remember, if you need to transplant the violet, then you need to do this with a complete replacement of the soil. As practice shows, no matter how regularly top dressing is carried out, the soil is still exhausted and, as a result, the transplanted plant is not able to receive useful substances in full. Therefore, it will be better if you prepare fresh soil in advance and only after that proceed to planting violets.
So:
- To get started, slightly tilt the pot and scroll through the flower, try to get it with the soil
- Next, we begin to clean the roots of the plant from the old soil. This can be done with your hands or simple shaking
- At the next stage, we begin to inspect our plant
- We remove dry flowers, yellowed leaves and rotten roots
- So that this whole procedure does not harm violets, we cover all the seats with crushed activated coal
- We take a thoroughly washed pot and lay a drainage layer (expanded clay or foam) in it
- Pour the soil on top of it (how to cook it, we told you a little higher)
- Put a violet on it, carefully distribute all its roots, and then sprinkle again with a layer of soil
- Let the violet stand for one day, and then water it and send it back to the window
Care for violets in the spring, summer, autumn, winter

As for the departure in the spring, summer and autumn, it is quite standard. All that will be required of you regularly water the flower and do not forget to feed. If you do all this on time, then the violet will definitely delight you with its bright look. But with the advent of winter, the care of the violet becomes a little different.
Firstly, you must do everything so that throughout the day it receives the right amount of light. Therefore, it will be better if you transfer it to the sunny side or try to turn on indoor lighting immediately after it starts to get dark. Secondly, during this period it is necessary to strictly monitor the humidity and temperature in the room. If these indicators are very low, then the flower will certainly die.
It is also worth remembering that in winter, violets do not need to be fed. You can quite calmly carry out the last top dressing in November, and next time to bring nutrients to the soil in the beginning of March. During the rest, the violet will rejuvenate and with the advent of spring will begin to delight you with a large number of bright flowers.
Why do not bloom violets, how to make them bloom?
If you notice that your violets produce leaves, but at the same time bright flowers do not appear on their outlet, then this is a sure sign that the plant does not like something. The most unpleasant thing in this situation is that if you do not eliminate the causes that do not blow the flower to develop correctly, then in the end this can lead to its death.
The reasons preventing the violet bloom:
- Lack of light (bad indoor lighting)
- Incorrect top dressing of an adult flower
- Too dry or too wet soil in a pot
- Air humidity below 30%
- Too dense soil
- Various diseases and pests
As you can see, the reasons why the violet may refuse to bloom exists quite a lot. And this means that in order for your indoor flower again to delight you with delicate flowers, you definitely need to make it getting everything that he needs. Believe me, if you carefully care for your room beauty, then you will definitely not have such problems.
Spots on the leaves of violets: what to do?

Beginning flower growers, seeing the spots on the leaves of the violet, are immediately upset as they think that they are a harbinger of the death of a flower. In fact, in this way it can respond to changes in the environment. For example, if the flower evaporates more moisture than it gets, then its leaves are covered with brownish spots.
Yellow spots indicate that the plant received a sunburn and it must be urgently removed from under sunlight. Watery foci of white color appear with abundant watering or a sharp temperature difference. I immediately want to say that you do not need to treat the affected leaves if you want the plant to get well, just remove them, and coat the seats with crushed activated coal.
Fialists with photographs and their treatment

It was as unpleasant to recognize this, sometimes even with proper care, the violet can get sick. In this case, the cause of problems is microscopic pests that damage the leaves, stems and roots of the plant.
Such diseases are more dangerous than care, therefore, you need to get rid of them in the shortest possible time. If this is not done, then the flower will inevitably die, while infecting all those plants that stood near it.
Diseases and their treatment:

- Fitophthrosis (You can get rid of this disease with phytosporin by spraying the affected plant).

- Fusariosis (You can try to get rid of the problem with any fungicide suitable for combating diseases of indoor plants).

- Powder (Plants are sprayed with an antifungal agent such as Benlat).

- Gray rot (First, all damaged leaves are removed, and then Teldor's fungicide is carried out).