Instructions for creating opal design of nails.
Content
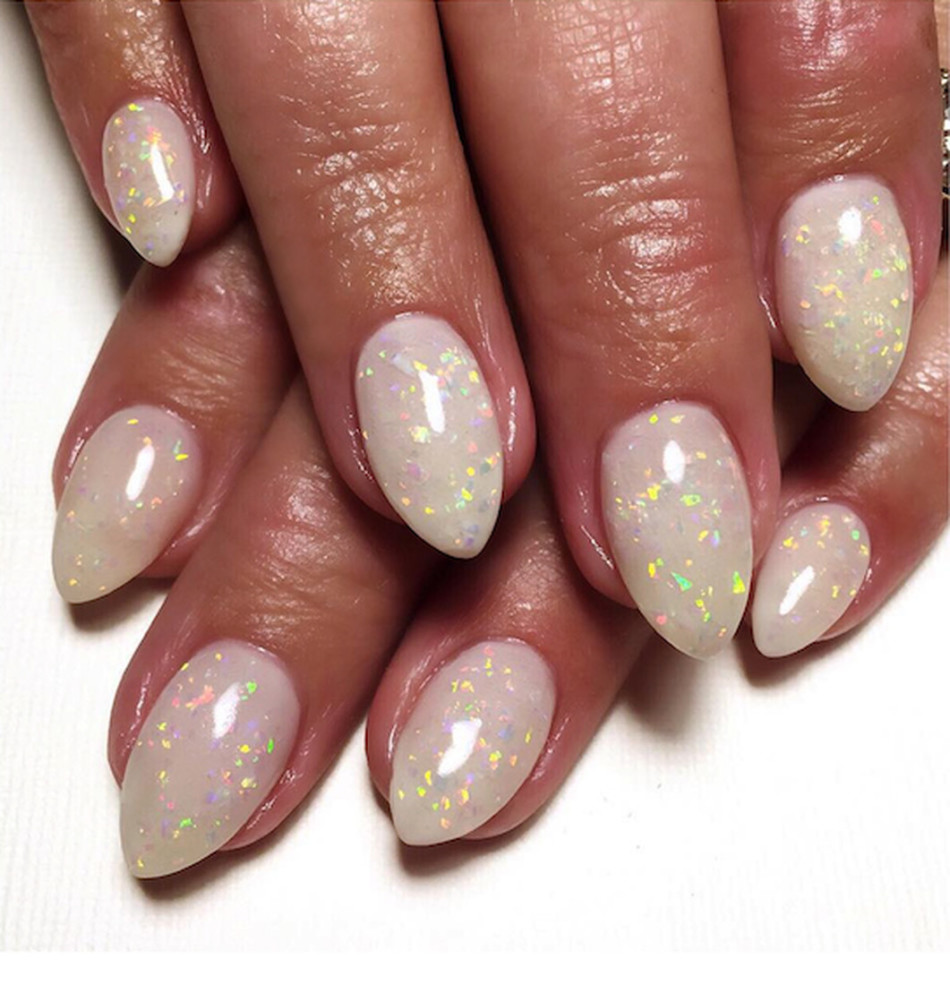
Opal nail design is a common technique that has become popular this year. It can be made in several ways. In this article, we will tell you with which materials you can create opal nails.
Opal nails: What is it?
For the first time, this design became popular with the help of American stars on Instagram. Similarly, with the shape of the ballerina or PIPE, opal nails also came into fashion. Fashion has reached our country, now this design is ordered quite often. The main advantage is that such nails do not look very catchy, and meet the trends of nude manicure. The design can not be done on all nails, but only selectively, that is, on nameless or medium.
To perform such a design, foil, camifubuki, shells, and even Yuki flakes are used. Let's get acquainted with the most common and simple options for creating opal design. The main task when performing the coating is to give the nails shine, and block them with a matte top so that a peculiar turbidity or muffled shine, as well as radiance, is created.

How to make opal design of nails with foil?
The easiest option is to create a design with foil broken glass. That is, not translation foil is used, and not the material in pieces, which is easily torn with tweezers, but dense foil.
Instructions:
- To create design, the nail is covered with white gel polish. Pieces of foil are laid out on a wet base, which is applied over the main color. It should be with a blue or pink tint, preferably different colors.
- At the same time, it is worth giving preference to translucent foil, which is practically not visible, it only gives itself brilliant.
- After that, the design is again overlapped with a thick leveling layer of the base. If necessary, stickiness is removed and with a peel is grinded in order to get rid of sticking corners, which often happens with broken glass.
- After that, the design is blocked by a matte top. Thus, all the shine, which is created with the help of foil, becomes muffled, creating the effect of opal. This is not the only way with which you can create opal design.

How to make a dumping design of the nails of camifubuki and mica?
To create this kind of manicure, kamifubuki is often used. Recently, stars, circles, as well as a month have become common. The material by color is selected similarly as foil.
Instructions:
- These are translucent plates with multi -colored castings, that is, blue and yellow, as well as blue.
- Camifubuki are applied on top of the white base on the not -so -dried base, which is dried after the design of the design in the lamp.
- Further, it is overlapped with a thick layer of the base, covered with a matte top. The design is obtained with a muffled shimmer.

Opal nail design can also be created with a glossy top, however, to achieve a blurry effect and get rid of a pronounced shine and decor texture, they often use milk gel polish or make it independently. We offer you several options for creating opal design.
Instructions:
- In this case, mica is used, these are small flakes that have a variety of overflows. To create design, the nail is overlapped by the white base. After that, pieces of mica are laid out on a wet base in a chaotic manner.
- Choose thin pieces to spend less time leveling the nail plate. Pieces of mica are overlapped with a thick layer of base. It is best to take rubber to create the perfect glare.
- After that, the matte top is not used, and the nail is covered with milk gel polish on top. If you do not have it, then a few drops of white varnish intervene in a regular top of nails in order to achieve translucency. The resulting translucent mixture is overlapped.
- After that, the decor is covered with a layer of finish coating. Thus, it is possible to slightly muffle the gloss of the mica.

Inlapping nails with opals: photo
Failure opals are also quite popular, that is, the pebbles themselves, which can be purchased for Aliexpress. They are rhinestones, only muddy and similar to lunar stone or opal. Now quite popular in design. Below we present a few photos with inlays with such opals. They are sold in different colors, sizes.
Often combined with broths and ordinary shiny rhinestones, Swarovski stones. They look profitable in combination with pixies, as well as broths of black and silver colors.


Opal on nails using liquid stone technique
You can also make a liquid stone on the nails. It will look stylish, since this season imitation of rings on the nails is very popular. Liquid stone Opal will become its central part.
Instructions:
- For design, select the tone, cover them with nails in two layers, after which you need to cut a piece of foil with a blue tint. It is best to take a broken glass foil, the size should be the way you want to get the center, or even a little smaller. Because the whole composition will be decorated with small rhinestones and broths.
- Further, the foil is glued to the not quite dried base, which is then polymerized in an ultraviolet lamp. It is necessary to prepare a milk gel. To do this, a small amount of white gel painting or gel polish interferes in the sculptural gel.
- Make sure that the resulting mixture is translucent. Now, with the help of a brush, you need to apply a small drop to the resulting base from foil, simulating the stone. This composition should be convex.
- Everything is quickly dried in a lamp, if necessary, a second layer is applied if the sculptural gel is very liquid. Now it is necessary to work out the contour with small rhinestones or broths. Next, you need to lay out the harnesses that depart from the ring.
- These are thin stripes that can be made from scattering small rhinestones, fixing them additionally broths. Such a composition looks very nice. Try to ensure that the size of the stone is small, because there will be an additional decor of stones and broths, which will betray massiveness to the central stone.
- It is necessary that there is a small period for thin lines that will move away from the main stone.

How to make an opal design of nails rub?
Quite often, opal design of the nails is created with rubbing. This is one of the simplest options.
Instructions:
- To do this, the nail must be prepared, covered with a layer of base, two layers of a flower garden. It is best to choose a dense white gel polish. Next, a thin layer of top without a sticky layer, which is dried, is applied, rubs into its surface.
- It is best to use pearl rubbing, a unicorn for this, and one that lies not with sparkles, but a homogeneous mirror coating. It shines very beautifully in different colors.
- After this, the rubbing is covered with a thin layer of the base, the ends are processed with a file. A sticky layer is removed so that the sawing from the nail does not stick to the stickiness of the base. After that, everything is overlapped with a matte top.
- If desired, you can perform a drawing using a glossy top. A flickering shine that gives a rub, very poorly visible through a matte top, but gives the effect of the disgrace on the nails. At the same time, the glossy top will enhance the shine, and make the design voluminous.
- This is a very simple, but beautiful design that even a beginner can perform.

Want to be in trend? Then be sure to create opal design on the nails.


